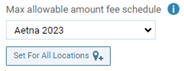
Max Allowable Fee Schedules By Location
If you work with insurance configuration, you know that, although fee schedules are shared throughout the organization, fee schedules are assigned on a per-location basis. To reduce some of the labor this entails, you can now set an insurance plan’s Max Allowable Fee Schedule for multiple locations in one place.
It is common for a payer to specify different reimbursement rates according to geography. The more physically distant your multiple locations are, the more likely this is to be true. Therefore, you must still create a fee schedule for each location that is priced differently from a centralized standard (for example, Aetna Location #1, Aetna Location #2, and so on). On the other hand, if your locations are tightly clustered in a metropolitan area, they may not vary at all, and you can apply the same fee schedule to all locations.
Note: The “Edit Insurance Plans” security right is required to edit a plan.
To set fee schedules by location for a given insurance plan from any location:
1. Select Carriers on the Home menu, click a carrier, and then click an insurance plan.
2. On the Edit Plan page, click Set For All Locations.
3. In the Max Allowable Amount Fee Schedules By Location dialog box, do one of the following:
- Select a fee schedule for each location individually.
- Select a fee schedule for one location, and then apply the change to all other locations by clicking Apply to All.
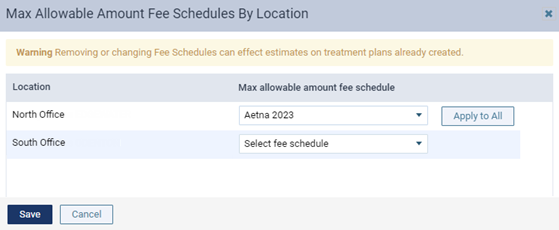
4. Click Save.
ERA Inbox
In Dentrix Ascend, you can view the ERAs that have been received at your location. With this release, the ERA inbox has been enhanced.
Note: Each location in your organization has its own ERA inbox.
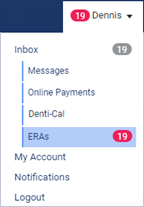
If the location that you are logged in to has unread ERAs in its inbox, a red dot with a number appears next to your user name on the User menu. The number on the dot indicates the total number of unread messages, online payments, Denti-Cal reports, and ERAs for that location.

To open the ERA inbox, open the User menu, and then select ERAs.
The Inbox page opens with the ERAs tab selected. The ERAs that have been sent to your location appear.
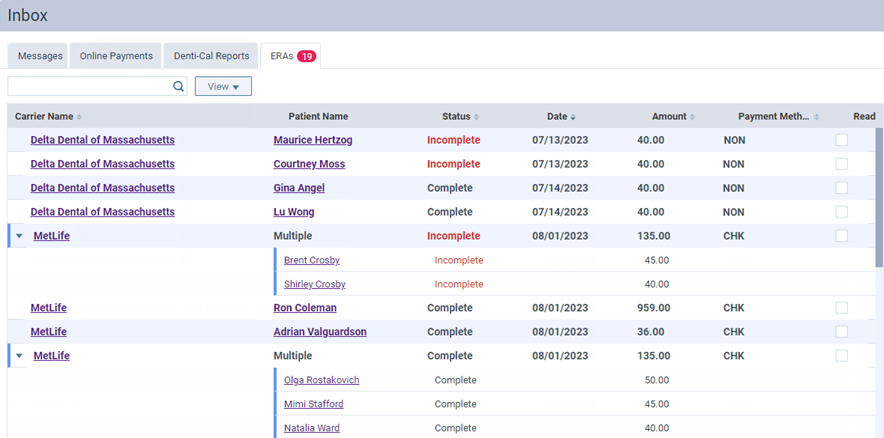
Note: For an ERA with multiple claims (“Multiple” appears in the Patient Name column), you can expand that ERA entry to view the corresponding claims.
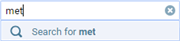
To search for ERAs by carrier name or patient name, enter all or part of a name, and then press Enter (or click the Search for [text] option that appears below the box.
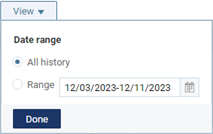
To filter the ERAs by date, click View to open the menu, and then select one of the following options, and then click Done.
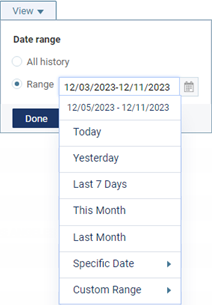
- All history – To view ERAs for any date.
- Range – To view ERAs on a specified date or within a specified date range. With this option selected, click (or tap) in the box, and then select Today, Yesterday, Last 7 Days, This Month, Last Month, Specific Date (and choose the date), or Custom Range (and choose the starting and ending dates).
To view an ERA or manually process an incomplete ERA, click (or tap) the corresponding Carrier Name link or Patient Name link. You are taken to ERA Payments tab of the Bulk/ERA Insurance Payments page, and the applicable ERA is selected automatically.
To mark an ERA as having been read, select the corresponding Read checkbox.
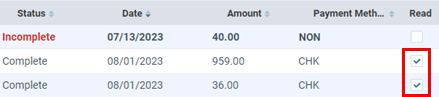
Note: An unread ERA appears in a bold typeface in the list.
New Learning Content
The Education Team continuously adds to and updates content in the Dentrix Ascend Resource Center. Below are the latest videos and blogs. Click the title to get more information about these topics.
Videos
These videos include the latest updates in Dentrix Ascend and include closed captioning.
- Creating a Fee Schedule (Update)
A fee schedule is a list of prices for specific procedures, services, or products you provide your patients. You will create at least one to represent your office price list, and if you participate in insurance, you will create many fee schedules, each of which will represent carrier in-network rates or maximum allowable fee. Watch this video to learn how to create a fee schedule in Dentrix Ascend. - Assigning a Fee Schedule (Update)
After you create a fee schedule, the next thing you’ll need to do is assign the fee schedule in Dentrix Ascend, depending on how you run your dental practice. You can assign the fee schedule to a provider, to an insurance plan, to a location in your organization, or to a patient as a discount plan. Watch this video to learn how to assign a fee schedule in Dentrix Ascend. - Defining Favorite Procedures (Update)
If your practice is like most, your clinical activities follow the 80/20 rule—80% of the work you do is covered by 20% of the procedure codes. Wouldn’t you like it if those most common procedures were right at your fingertips? Watch this video to learn how to define your favorite procedures.
Blog Post
- Why You Should Be Using Imaging AI (Artificial Intelligence) Today
Are you hesitant to use Imaging AI? Well, you shouldn’t be. Read this short article to learn about some interesting statistics uncovered in a recent survey.