This release introduces an update to the Calendar’s handling of provider groups. Changes to the handling of patient email addresses reemphasize the relationship of the patient to the primary contact, and there is an enhancement to the sending of appointment reminders to the primary contact. Multiple enhancements have been made to the Imaging module.
Scheduling
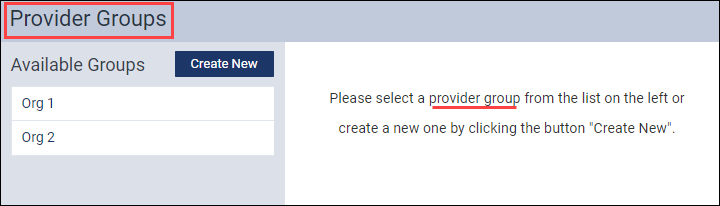
A user group is a selection of providers (dentists, hygienists, and so forth) that you can use to quickly customize the Calendar view, as explained in a recent release. You can edit user (provider) groups as needed.
In this release, the User Groups name has been changed to Provider Groups.
This name change has been updated on the Calendar View menu, on the Settings menu, on the pages for setting up the groups, and for user rights on the User Roles page.
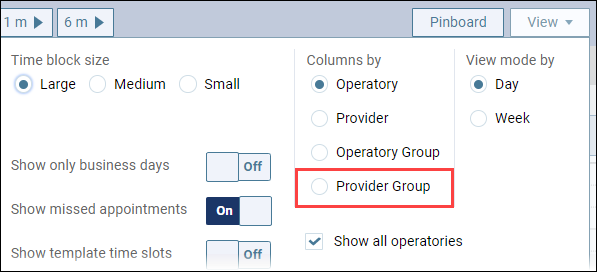
On the Calendar View menu: The name has been changed from User Groups to Provider Groups.
Before Update
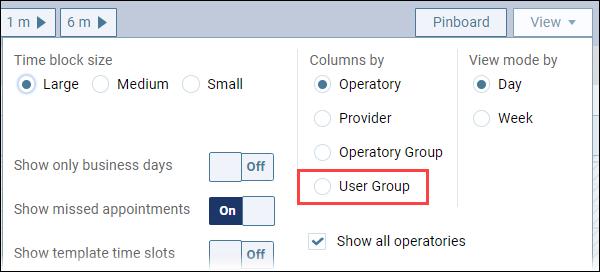
After Update
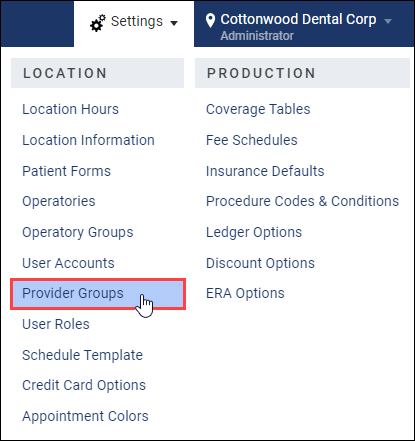
On the Settings menu: The menu name has been changed from User Groups to Provider Groups.
Before Update
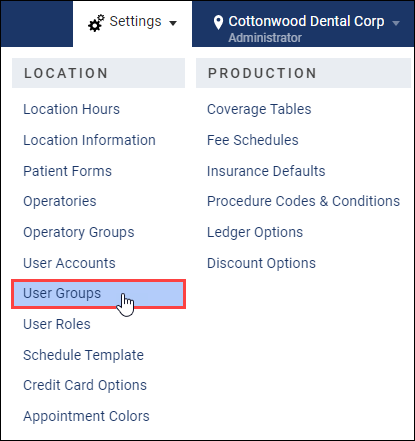
After Update
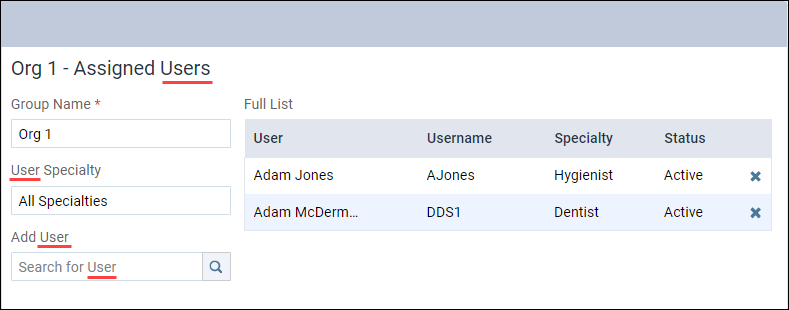
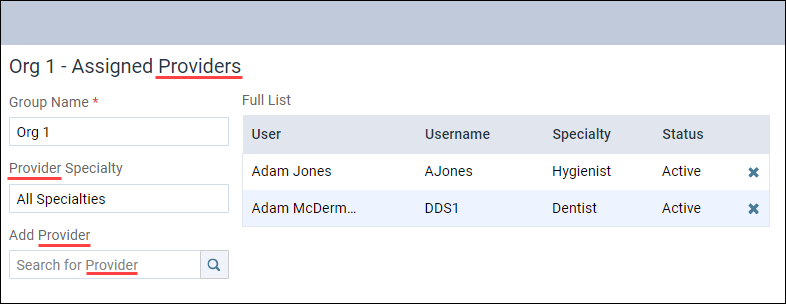
On the User Groups page: The title and page text have been changed from User Groups to Provider Groups.
Before Update

After Update
On the Assigned Users details section: The labels have been changed in the details section from User(s) to Provider(s).
Before Update
After Update
On the User Roles page:
Under the Settings category, the names of these rights have been updated:
- Review User Group has been changed to Review Provider Group.
- Delete User group has been changed to Delete Provider Group.
- Create/Update User Group has been changed to Create/Update Provider Group.
Patient Information
This update introduces several enhancements to the handling of patient email addresses, as configured in the Basic Info tab of the Patient Information menu.
Duplicate Email Address Alert
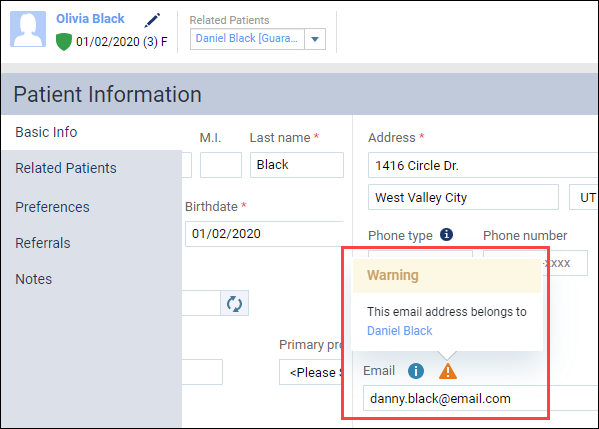
Dentrix Ascend does all automated patient messaging by looking at the patient’s primary contact. In family or group situations many patients can share the same primary contact. For reference purposes, Dentrix Ascend does allow you to enter duplicate email addresses; however, this is unnecessary data entry.
We want to help you avoid duplication of effort. With this update, an alert appears when you save a duplicate email address on a patient’s Basic Info page. Click the alert icon to see whose email you have duplicated. The warning message contains a link to that person. The alert appears only when you first save the duplicate.
Patient Reference Email
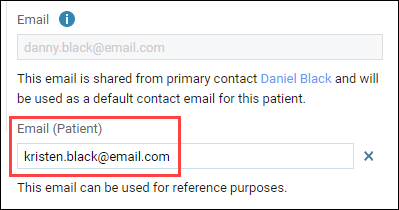
This update brings a new Add Patient Email button to the Patient Information > Basic Info page. The button appears only when the patient is NOT their own primary contact (i.e., “Self” is not selected as the patient’s primary contact).
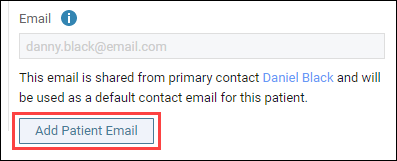
Click Add Patient Email to add an alternate email address to the patient’s record. IMPORTANT: This email address is for your reference only and Dentrix Ascend will NOT use it to reach out to the patient through the automated Patient Communications system. You could, however, copy the address and paste it into an email sent from your practice’s email service provider for incidental communications.
Missing Email Alert
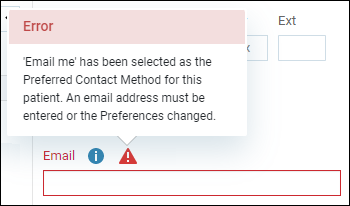
If you have selected the primary contact’s preferred contact method as Email me (in the Preferences tab), but you later remove that primary contact’s email address in the Basic Info tab, you will see an Error alert when you attempt to save the change. You can save your changes, but the alert will remain until the issue is corrected.
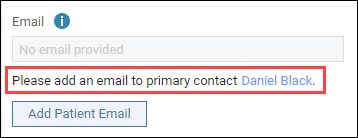
You will also see a message, without an alert, under the Email field in the patient records of the patients attached to the primary contact, reminding you to add an email.
Scheduling
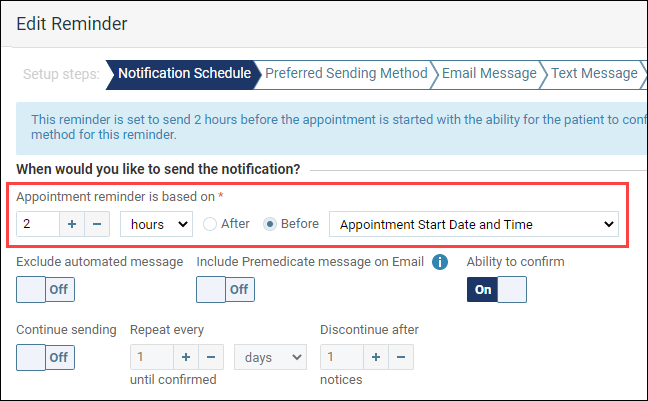
Appointment Reminders Send Time Update
A recent release modified the handling of automated appointment reminders. Now, any reminders that would have gone out between 9:01 p.m. and 7:59 a.m. local time will not be sent to patients. This is to be compliant with the Telephone Consumer Protection Act (TCPA).
As an improvement to this behavior, rather than simply not sending the appointment reminder, any reminder whose notification logic would lead to it being sent out between 9:01 p.m. and 7:59 a.m. will now be sent at 9:00 p.m. that day (or what will become the day before).
Clinical
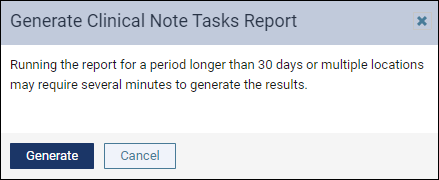
This release introduces a new Generate Clinical Tasks Report notification. When you select dates spanning more than 30 days, or select multiple locations, the new notification alerts you that the report may take more time to generate. You can then either click Generate to generate the report or click Cancel to generate the report later when you have more time.
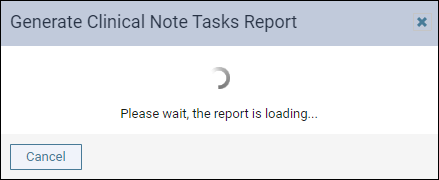
When you click Generate, a “Please wait, the report is loading…” message appears while the report generates.
Audit Log
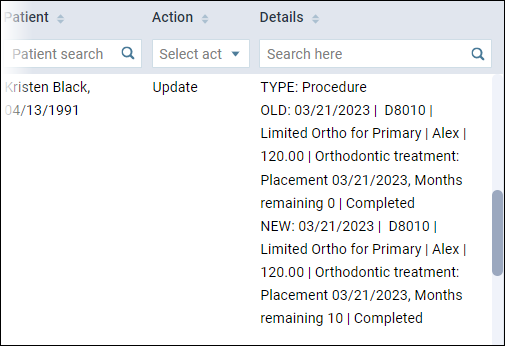
The Audit Log allows managers to track changes so they can easily identify who, when, and what kind of changes were made. This release includes several new tracking items. The Audit Log now reports creation, update, and delete events for the following activities:
- Ortho and prosthesis information in a patient’s existing or treatment-planned procedures.
- Require treatment info field setting for orthodontic and prosthetic procedure codes.
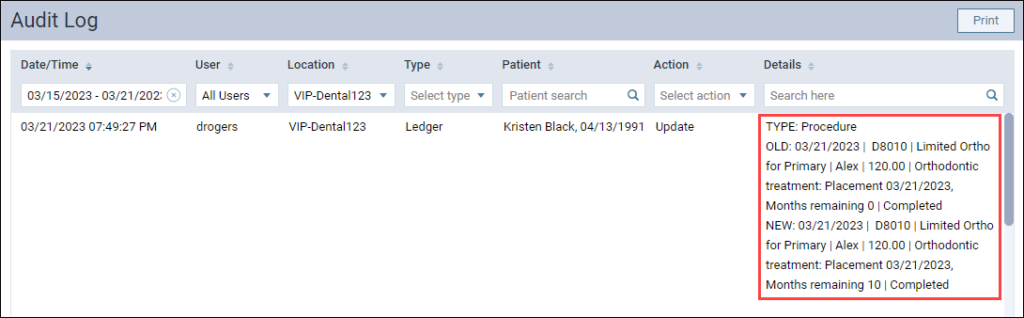
Zoomed in view of Audit Log Details
Note: A user’s role controls whether they have access to the Audit Log.
For a better understanding of user roles, watch Roles and Rights Overview. For a complete listing of user rights and their application, see Security rights list in the Resource Center.
Imaging
This release introduces enhancements to Detect AI (Artificial Intelligence) and other imaging features.
Dentrix Ascend Detect AI Enhancements
This release introduces enhancements to Dentrix Ascend Detect AI that include the ability to rotate the AI results when the image is rotated,
Rotated Images
With this update, when you rotate an image, the caries detect AI results will automatically appear on the rotated image.
Note: If you choose to rotate an image, be aware that the image will get resubmitted to Videa Heath and there may be a 3 to 5 second delay for the caries detection boxes to reappear.
Acquisition Status Notification
With this release, the Acquisition Status shows that the images are being uploaded to the AI provider. While the images are being submitted, no buttons are available at the bottom of the viewer, such as Finish Acquisition and Recapture.

If an error occurs during AI submission, an AI Submission Failed message appears. You have the option to click Re-Submit, Finish Acquisition, or X to close the message.
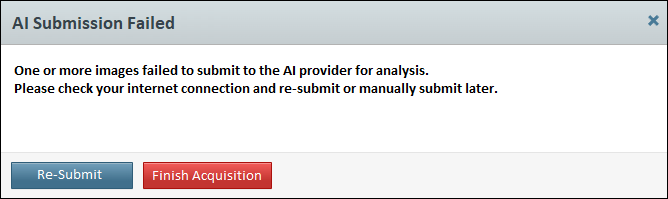
- If you click Re-Submit, the message closes, the image(s) are resubmitted for AI analysis, and the Acquisition Status box displays the Uploading Image(s) to AI Provider message.
- If you click Finish Acquisition, the imaging acquisition mode closes. From the image viewer, you can select the image and click Submit for analysis to get the AI caries detect results for that image.
- If you click X, the message closes, and the imaging acquisition will proceed to the next image. When you finished acquiring images, you can select the image where the AI submission failed and click Submit for analysis to get the AI caries detect results for that image.
Other Imaging Enhancements
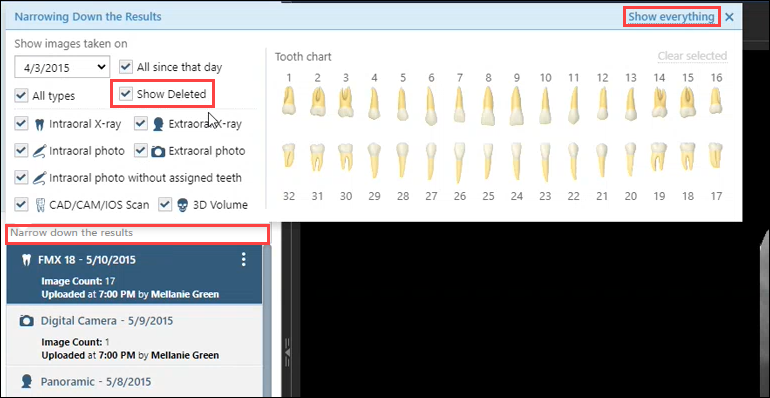
Restoring a Deleted Imaging Exam or Deleted Images
With this release, you can restore previously deleted imaging exams and images.
Note: By default, the Show Deleted option is not available.
To view a deleted image or imaging exam, click in the Narrow down the results field to open the Narrowing Down Results dialog box. Then, click Show Everything to enable the Show Deleted option.
Restoring a Deleted Imaging Exam
“Deleted –” appears before the name of any deleted exams so they are easily distinguishable from the non-deleted exams.

To restore an imaging exam, select the deleted imaging exam, click the 3 dots, and select Undelete exam to restore the deleted image.

After the exam is undeleted, the “Deleted –” text is removed from the exam name. Also, if you click the 3 dots with this exam selected, the Delete exam option appears instead of the Undelete exam option.
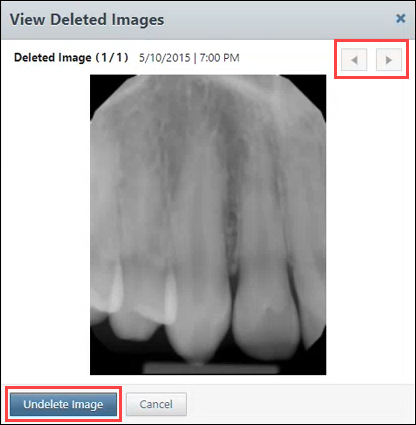
Restoring an Image Within an Existing Imaging Exam
When an imaging exam has a deleted image, you can now select empty exam slots in the imaging exam template. If deleted images exist for the selected slot, an Undelete Images button appears in the image viewer. Otherwise, the button is not shown.
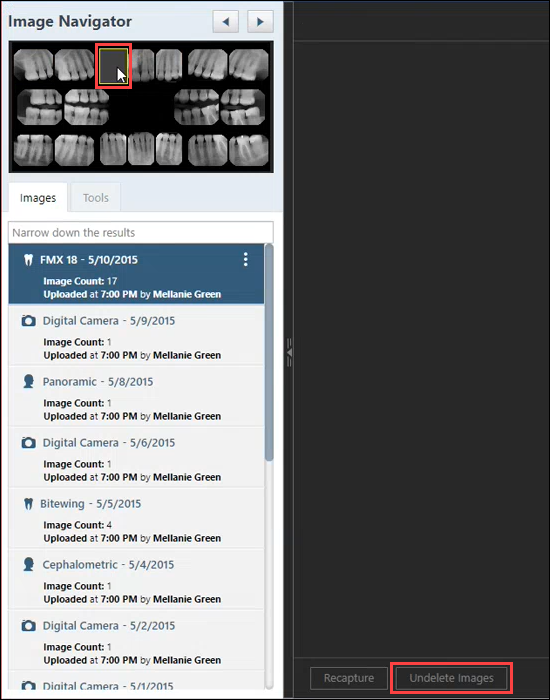
When you click Undelete Images, the View Deleted Images dialog box opens. Here you can click the arrows to scroll through each deleted image and click the Undelete Image to restore that image to the imaging exam.
Allow Restart on Acquisition Device Error
If acquisition stops because of a device error, a new Start button allows you to restart the acquisition.
Show/Hide Exam List – Imaging Exam Flyout
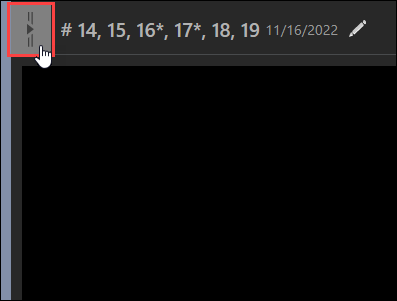
The new Show/Hide Exam List – Imaging Exam Flyout allows you to hide the imaging exam list so you can view each image from all imaging exams and not have to click each imaging exam on the imaging exam list.
To use the Imaging Exam Flyout, click the Hide Exam List arrow to hide the imaging exam listing.
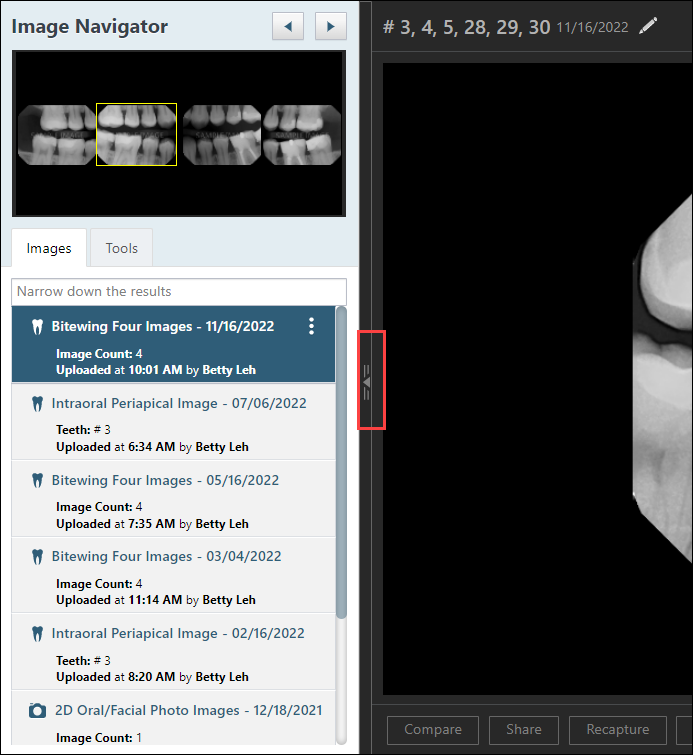
Then, click the left arrow to view the previous image of the imaging exam or click the right arrow to view the next image of the imaging exam.
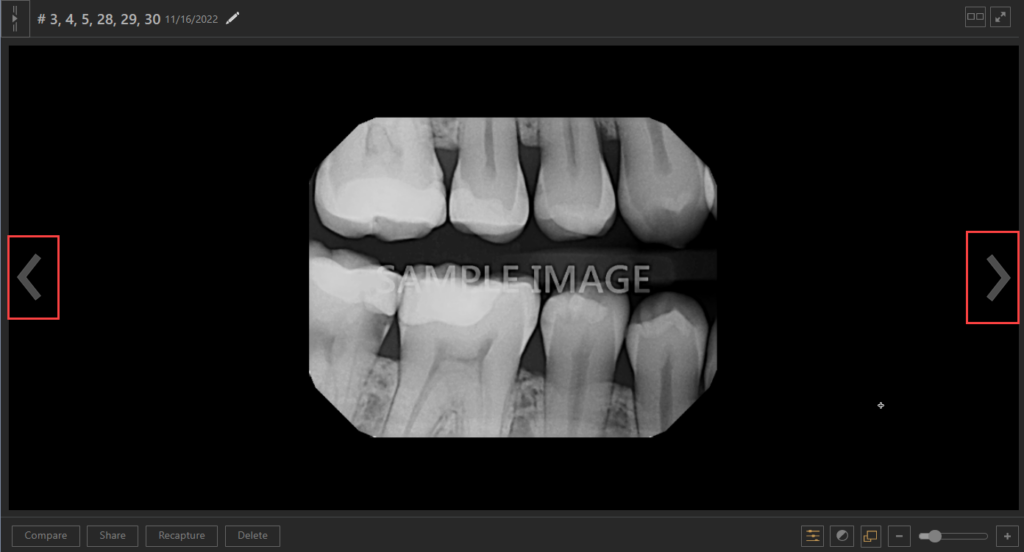
When you want to show the exam list, click the Show Exam List arrow.
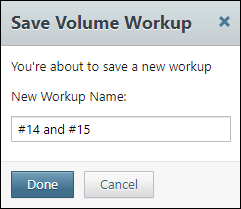
3D Volume Workups
With this release, you can press Enter on your computer keyboard instead of clicking Done to save a New Workup Name for a 3D CBCT (Cone Beam Computed Tomography) image.
User Rights
No new user rights were introduced in this update, but several user right names were modified, as noted above.