The product update released January 11, 2022 features a new workflow for switching the order of primary and secondary insurances. This update also introduces the ability to choose which procedure codes require clinical notes. Additionally, there are now easier ways to manage claims in the Unresolved Claims report, and much more.
Insurance
New Workflow for Switching Primary and Secondary Insurances
This release introduces an easier workflow for switching primary and secondary insurance plans and handling outstanding claims attached to these insurance plans. This release includes the following features:
- Updating Insurance Coordination Order When a Plan Expires
- Swapping Primary and Secondary Insurances
Future releases will include additional enhancements to the insurance coordination order workflow.
Updating Insurance Coordination Order When a Plan Expires
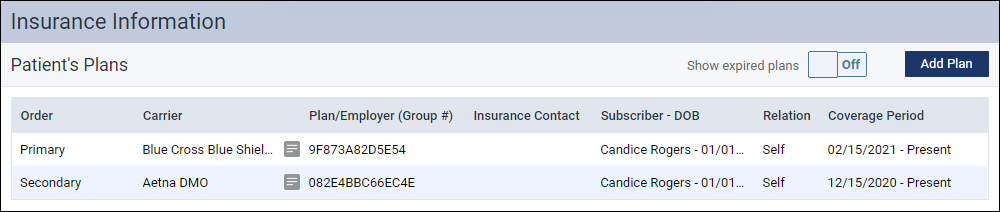
In the patient information ribbon, click the green shield icon to see a patient’s insurance information. If a patient’s primary insurance coverage has expired, there is now an easy process for promoting the secondary insurance carrier to the primary insurance carrier.

From the Insurance Information page, select the secondary insurance plan. Then from the Insurance coordination order dropdown, select Primary. Click Save.

Click Save to confirm the change.
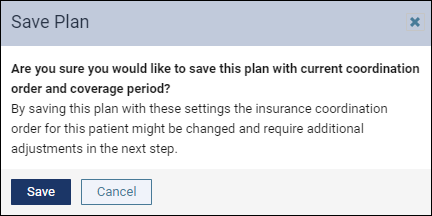
The Change Insurance Coordination Order dialog opens. On the left side, you can see the current state of the insurance plans. On the right side, you will see the desired state after the changes. Click Change.
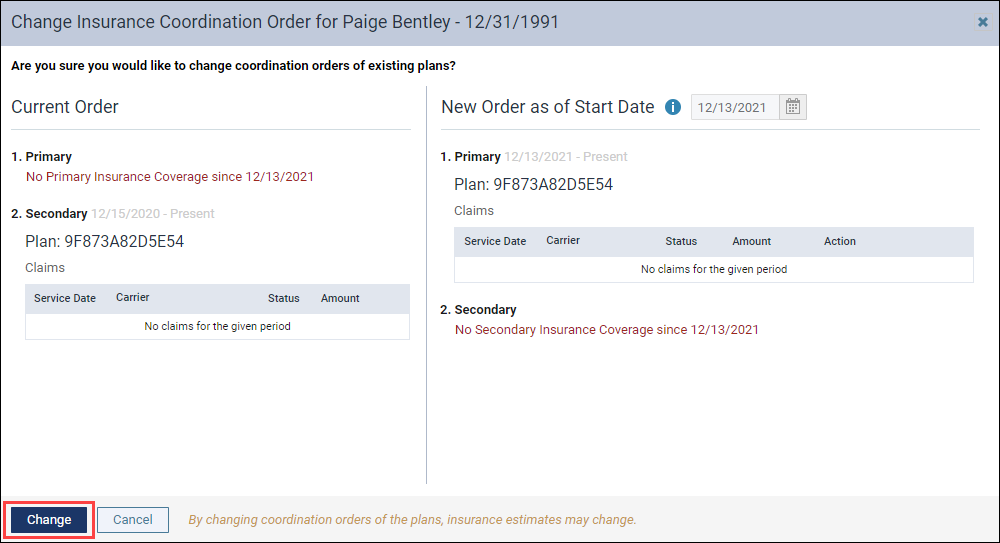
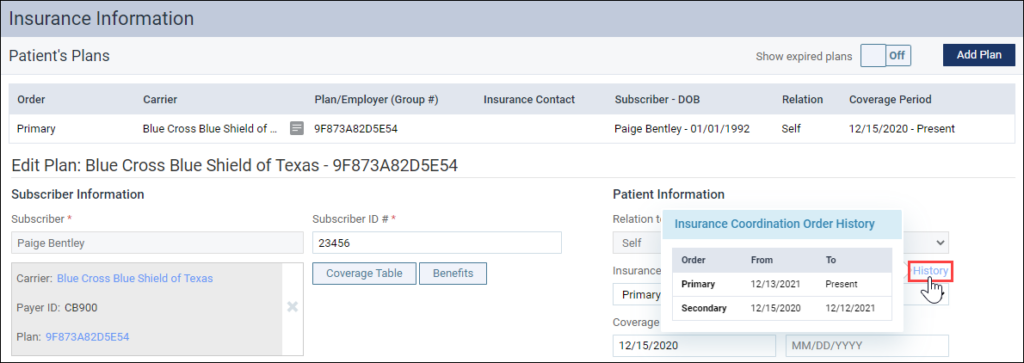
The secondary insurance plan moves to become the primary insurance plan. Click History to see a record of the change.
Swapping Primary and Secondary Insurances
In the patient information ribbon, click the green shield icon to see a patient’s insurance information. If you would like to swap the primary and secondary insurances, Dentrix Ascend now has an easy way to do that.

From the Insurance Information page, click the secondary insurance plan. Then from the Insurance coordination order dropdown, select Primary. Click Save.

Click Save to confirm the change.

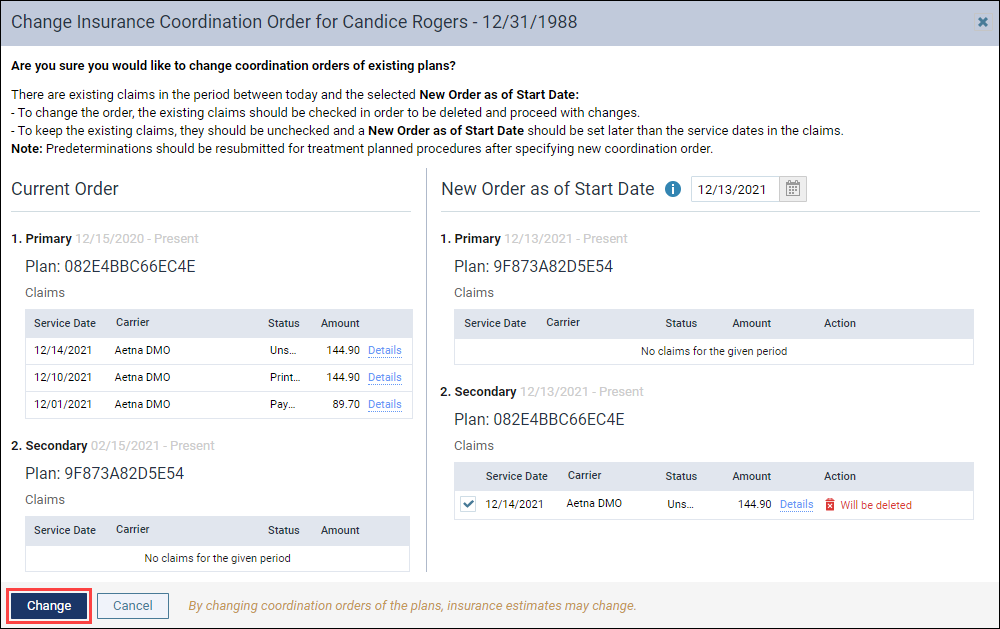
The Change Insurance Coordination Order dialog opens. On the left side, you see the current state of the insurance plans. If there are claims associated with the plans, you will see the Service Date, Carrier, Status, and Amount of the claims. Click Details to see more information about the claims.

On the right side, you will see the desired state after the change and the date when the change will occur. You may choose to swap the insurances as of the current date or an earlier date. You will also see what will happen to the claims associated with the insurances.
Dentrix Ascend will give you different messages according to the status of the associated claims:
 | Unsent claims: These claims will be deleted and can be re-created once the insurance coordination order changes. | |
 | Sent claims: You have two options for sent claims.If you want to delete a claim, select the checkbox next to the claim. You will need to notify the insurance company of the deletion. Hover over the phone icon to see contact information for the insurance company.If you do not want the claim to be deleted, change the New Order as of Start Date to be after the service date on the sent claim. This will allow the claim to be processed before the primary and secondary insurances are swapped. | |
 | Payment Received: These claims cannot be deleted because there are payments entered for them. Change the New Order as of Start Date to be after the service date of the paid claim to continue. Select a date using the date picker or click the Earliest possible date hyperlink next to the date picker to quickly update the date. |

If you change the New Order as of Start Date, click Update Preview to show the claims information as of the new date.
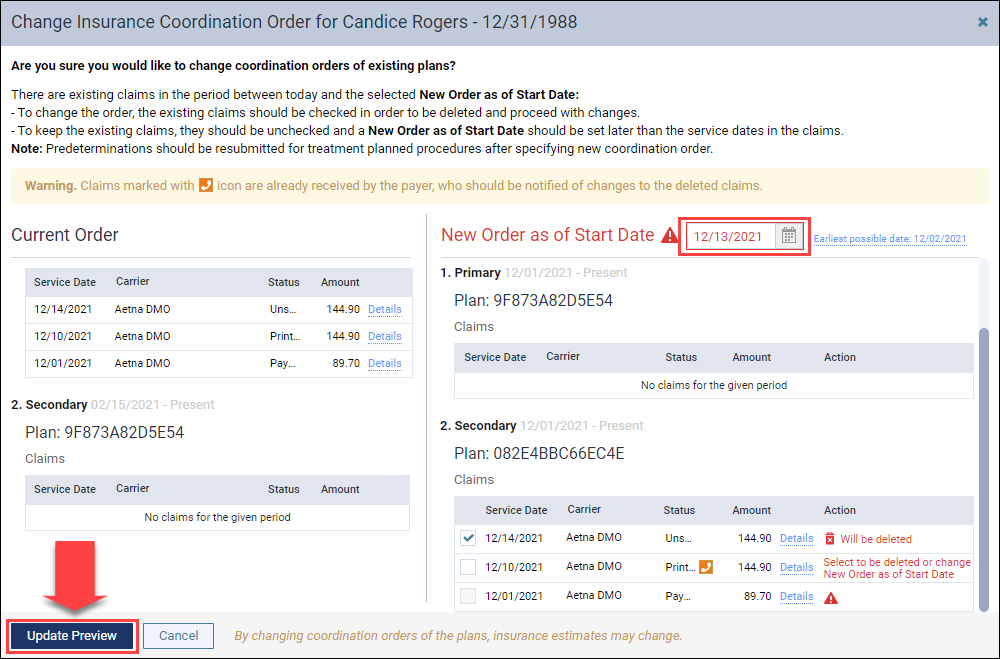
The dialog updates to only show claims that fall after the start date you chose. Review the actions for the remaining claims (if there are any). Once you are finished, click Change to swap the insurances.
If you are deleting a claim, Dentrix Ascend will ask you to confirm that deletion.

The Insurance Information page updates to show the new order.
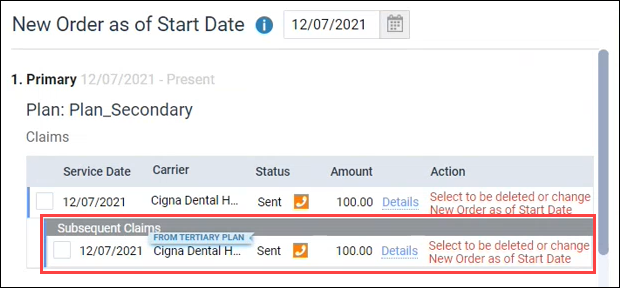
Note on subsequent claims: If you have subsequent claims (for example, a claim sent to the tertiary insurance to cover what the primary insurance did not), these will also appear in the claims list on the Change Insurance Coordination Order dialog. Subsequent claims have the same statuses (Unsent, Sent, and Payment Received) and are handled in the same way as initial claims.
All of the above change events are tracked in the Audit Log.
Enhancements to the Unresolved Claims Report
With this release, the Unresolved Claims report has been enhanced to help you better manage your unresolved claims. The enhanced functionality is for the Set Follow-up and the Dismiss claim features.
Set a Follow-up Date
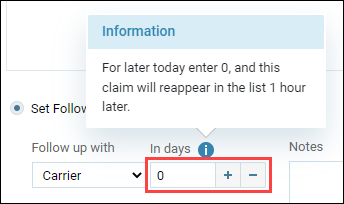
For the Set Follow up option, you can still use the dropdown menu to choose whether to follow up with the Carrier or with the Patient. As of this release, you can now use the plus (+) and minus (-) buttons to select a specific number of days before you want to follow-up on a claim.

Set a follow-up date of 0 to hide the claim from the list for 1 hour.
Dismiss A Claim
When you choose to dismiss a claim, it automatically moves to the new Dismissed Claims tab.

To move a dismissed claim back to the Unresolved Claims report, locate the claim in the Dismissed Claims tab. Check Move to Unresolved Claims and click Save.

Note: Dentrix Ascend excludes dismissed claims from the total number of claims and the total value of the claims shown at the top of the Unresolved Claims report.

Patient Information Badge Enhancements
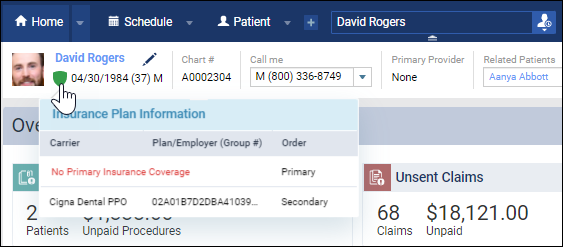
With this release, you can now view the patient’s basic insurance information when you hover over or tap on the green shield in the patient information ribbon. Prior to this update, clicking the green shield was a shortcut to the patient’s Insurance Information page (and it still is).
This enhancement saves you time, because you don’t have to leave the page you’re on when you need to verify the patient’s basic insurance information.
Viewing Patient Insurance Information on a Computer
On a computer, hover over the green shield to view the patient’s insurance carrier, plan, and coverage type. If you need more information, click the green shield to go to the patient’s Insurance Information page.

Viewing Patient Insurance Information on a Tablet
On a tablet or other mobile device, tap the green shield to view the patient’s insurance carrier, plan, and coverage type. If you need more information, tap Go to Insurance Plan Information Page.

Note: Only the most recent insurance information displays. Expired insurance plans will not display.
If the primary insurance plan has expired, you will see “No Primary Insurance Coverage”.
If the secondary insurance plan has expired, you will not see it.

Note on the patient information ribbon: As a reminder, to open the patient information ribbon, click the Show patient information dropdown icon below the patient’s name on a desktop and next to the patient’s name on a tablet.
Set Predetermination Requirements
We are building a new feature set especially for treatment or insurance coordinators. These new features will save time and remind team members to send out predeterminations when needed. A new Manage Predeterminations window represents the first phase of the new predeterminations feature set. In the future, you will be able to select which procedures require predeterminations. When we complete this feature, Dentrix Ascend will automatically prompt team members to create a predetermination request when they add one of the selected procedures to the Treatment Planner.
To see the Manage Predeterminations window, open an insurance plan and click the new Predeterminations button.

The Manage Predeterminations window is where you will select the procedures in this specific plan that require predeterminations. Note that the entire organization will share the plan settings.
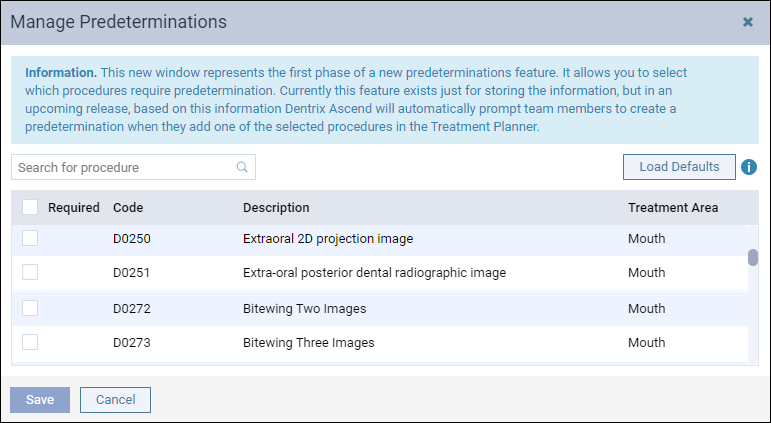
The Search for procedure field allows you to search for a procedure by code number or description (for example, “crown” or “2721”). Select a procedure to indicate that it requires a predetermination. When you select a procedure, an icon appears next to that procedure code.
Based on a survey of eighteen months’ worth of data, Dentrix Ascend engineers came up with a list of procedures for which most carriers requested predeterminations. We consider these procedures “common” procedures. To load this list of preselected procedures, click the Load Defaults button.
WARNING: Loading the defaults replaces any work you have done to this point. The recommended workflow is to load the defaults first, and then refine your selections.
This feature is under construction. We will tell you more as the feature develops.
Ledger
Dentrix Ascend Pay Enhancements
With this release, the interface related to Dentrix Ascend Pay has been updated to be inclusive of different credit card processing methods.
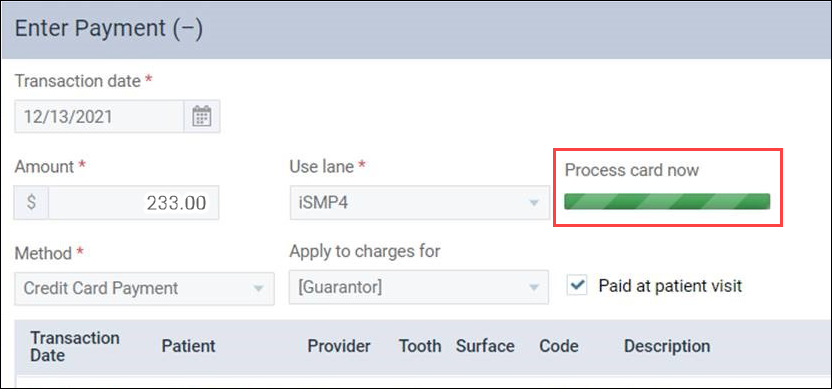
Now when you want to process a credit card payment, you will click Process Card, which previously was named Swipe Card.

After you click Process Card, you will see the Process card now message instead of Swipe card now to indicate that the patient can swipe, insert, tap, or wave the card or smart device to render payment.
Online Payment Icon in the Ledger
With this update, a new online payment icon has been added to the ledger. This helps you easily distinguish an online credit card payment from an in-person credit card payment.
Generate Receipts from the Online Payments Tab
With this release, you can now generate and print online payment receipts directly from the Online Payments tab in your Inbox. You can also view the online payment receipt to quickly review the online credit card payment details instead of opening the credit card payment transaction in the patient’s ledger.
When you open the Online Payments tab in your Inbox, you will see the new attachment icon for each online credit card payment.
Click the attachment icon to open the online credit card payment receipt in a separate browser tab. You can click the print icon to print the online payment receipt.

Clinical
Require Clinical Note Switcher
This update introduces a new usability improvement to clinical note requirements. On an organization-wide basis, you can now go into your Procedure Codes & Conditions page and turn off the requirement to enter a clinical note for specific procedures.
To turn off the clinical note requirement for a procedure, in the Settings menu go to the Procedure Codes & Conditions page and select that procedure. In the Edit Procedure Code window that opens, toggle the Require clinical note switcher to No and click Save. Your user role must have the Edit procedure/condition codes right to do this.

Note: With this update, Dentrix Ascend automatically toggled all procedure codes in the Products category to No.
Usability
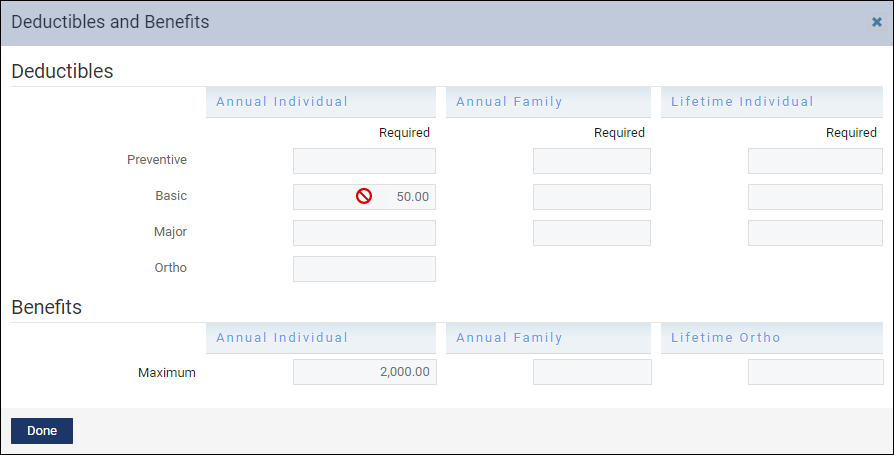
Deductible and Benefits Fields Disabled When User Has No Edit Rights
With this update, for users whose role does not allow them to modify the deductibles and benefits of an insurance plan, the fields are plainly disabled. In the past, the Deductible and Benefits window was a little misleading for users who did not have the right to make edits. Specifically, these users were able to make edits to this page and did not see the “denied” message until they tried to save their changes.
User Rights
There are no new user rights for this release.
New Learning Content
The Practice Education team has been busy preparing resources to help you maximize your use of Dentrix Ascend. Below is a list of the newest videos and webinars added to the Resource Center.
Webinars
Power Reporting Education Series
Watch these 5 webcasts to maximize the potential of your Financial Power Reporting.
- Introduction to Power Reporting: With this basic review of Power Reporting, you can confidently venture into this powerful reporting engine.
- Using Power Reporting to Pay Providers on Collections: Learn how to use the best report for paying providers on collections: Applied Collections.
- Using Power Reporting to Pay Providers on Production: Learn how to use the best report for paying providers on production: Provider Production.
- Using Dates in Power Reporting: Understand what the introduction of transaction dates and modified dates means for your financial reports in this specially focused webinar.
- Using Filters in Power Reporting: The right filter, appropriately applied, can turn a complicated report into a thing of beauty. Learn how filters can help you explore your data in new ways.
Videos
Using Dentrix Ascend on an iPad
You can use an iPad to work in Dentrix Ascend, but there are some operational differences of which you should be aware. Watch this demo to see them in action.
Acquiring Intraoral and Facial Images Using an iPad
Even though you cannot acquire x-rays on an iPad, you can still capture intraoral and facial images using an iPad. Watch this demo to see them in action.
Managing Patient Medical Alerts
When patients come in for their appointments, it’s important to know whether they have a medical condition you should be aware of.
Attaching Fee Schedules to In-Network Insurance Plans
Having the write-off amount accurately calculating on your patient ledgers for in-network plans allows your team to collect the correct amount of money at checkout. It also saves you from issuing refund checks to patients you may have over-collected from.