The product update released February 24, 2022 includes further enhancements to the predetermination reminder feature. The Request a Feature portal has a new location, look, and feel. There are multiple enhancements to the Imaging module included with this update.
Insurance
Predetermination Enhancements
Continuing with the new predetermination features added in release 387, we have added a couple more refinements to the predetermination feature set.
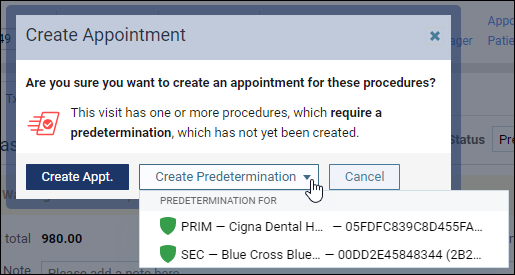
Warning to create a predetermination before creating an appointment
If you don’t notice the red “needs predetermination” icon in a lengthy list of procedures associated with a treatment case, the Create menu now has an additional reminder if you attempt to create an appointment that includes that procedure.
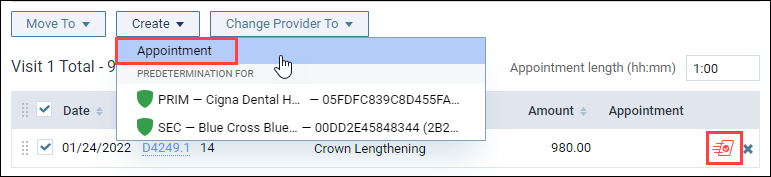
When you click Appointment in the Create menu, a new Create Appointment dialog prompts you to first create the predetermination claim, either for primary or secondary insurance, or both. Then you can click Create Appt to continue to the Calendar and create the appointment. You do have the option to ignore the reminder and click Create Appt to open the schedule.
Gray out the predetermination icon when Bill to Insurance is turned off
Dentrix Ascend recognizes that it makes no sense to send a predetermination claim for procedures that you will not include as part of an insurance claim. When Ascend detects a procedure which your configuration says should require a predetermination, normally it displays a red icon. But when the Bill to Insurance switcher for the procedure has been set to Off, now the predetermination icon grays out. You can see an explanation of this color by hovering over the icon.
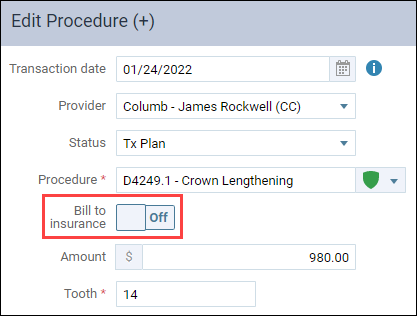
If the Bill to Insurance was switched off in error, click the procedure code link to open the Edit Procedure window and switch it On. The icon will turn red as a reminder to use the Create menu to add a predetermination claim.
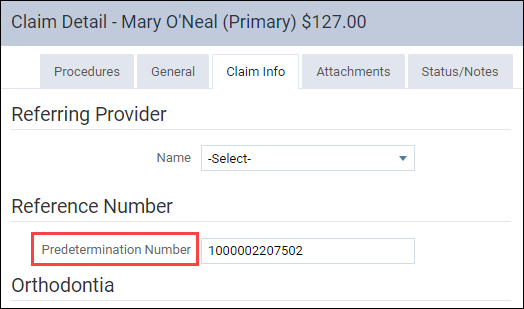
Predetermination Number naming consistency
For the sake of consistency regarding predetermination claim number tracking, in the Claim Detail window the former Prior Auth Number field is now named Predetermination Number to match the reference number as displayed in the Predetermination Detail window.
Usability
New Feature Request Workflow
With this release, there is a new process for submitting feature requests that is conveniently located in Dentrix Ascend. From the Help (?) menu, click Request a Feature to access this new feedback process. Instead of seeing the Aha! site open in a new tab, you will see a new feedback module slide out from the right side of your screen. The new feedback module has three sections: Submit a Request, My Priorities, and Suggested by Others.
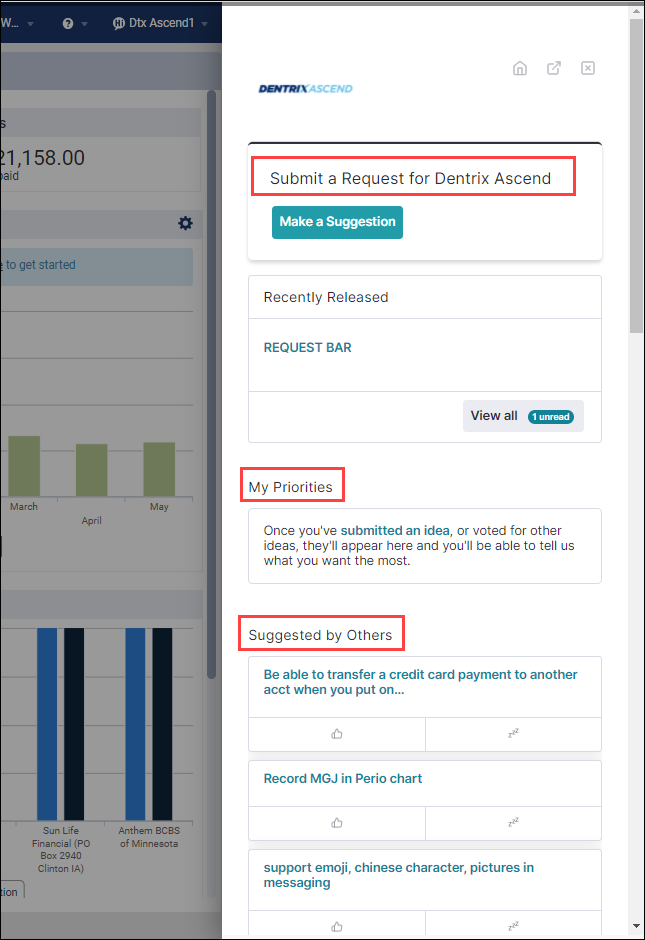
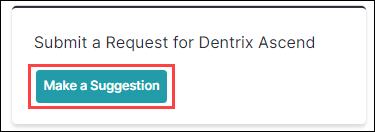
Submit a Request for Dentrix Ascend
Click Make a Suggestion to submit a new request.
Enter a title of your request or suggestion. As you type a title for your request, it automatically brings up similar requests made by other customers to help avoid duplicates. You have two options:
- Vote on an existing request that is similar to your request.
- Submit your request.
Vote on an existing request
Click I want this! to vote on an existing request that is similar to your request. When you click I want this! your vote is automatically submitted. A confirmation appears with the title of the request or suggestion that you voted for and the status of the request.


Submit your request
To submit your request, answer the questions about the problem you are running into or what you are trying to achieve, and what your current workaround is (if any). Click Submit request once you have provided all the required information.

“Markdown allowed” refers a text formatting method, useful if you want to add headers or bold text or italic text to your request. Click the Markdown allowed link to open a new tab with an explanation and some examples.
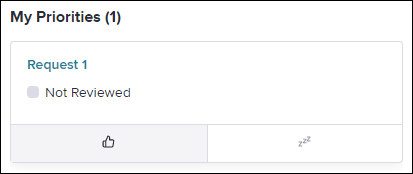
My Priorities
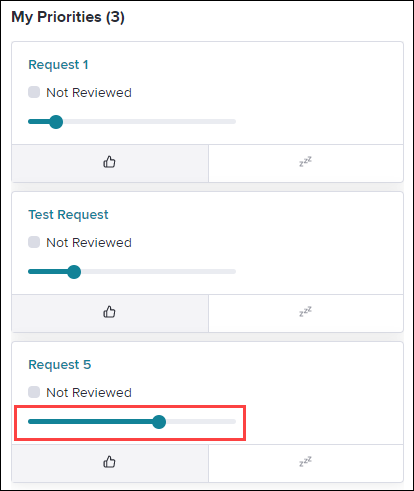
After you have submitted an idea, or voted for other ideas, your request appears under My Priorities, and you’ll be able to tell us what you want the most.
To prioritize your suggestions: Once you have submitted at least two requests, each request also has a slider bar which you can use to set the priority of your request. If you move the slider up on one request, the slider bars for the other requests move down. This allows you to set priorities of which of your requests are the most important to you.
Voting: At the bottom of a request are two voting icons; a thumbs up vote, meaning you want this feature, and a set of Zs, meaning you are not interested in this feature. Once you click on either of these icons, this request moves to the Suggested by Others list. You can move the request back into your My Priorities list by voting once again.
Suggested By Others
You can also see requests submitted by other users like you.
- To see more information: Click on any request title to see more information, enter a comment in the Discussion area, or subscribe to (follow) this idea.
- To vote on another user’s request: Click the I want this (thumbs up) icon if you see a request that you also would like to see in Dentrix Ascend. The request is then added to your My Priorities section, and you can prioritize it using the slider bars. If you clicked on the thumbs up by accident, simply click it again to remove the request from your My Priorities list.
- To dismiss another user’s request: Click the Zzz or I’m not Interested icon, if you do not agree with a request that another user has made. This clears the request from your dashboard, so it doesn’t come up every time you log in.
There are a few icons at the top of the feedback module.
- Home icon: Click the home icon at any time to be taken back to the main page with the three sections: Submit a Request, My Priorities, and Suggested by Others.
- Open in full screen: Click the menu of actions icon to open the feedback module. The full screen view is helpful if you would prefer to have more screen space when you are entering a request or reviewing requests made by other users. It also has search capability. When you are finished, click the back arrow in your browser to return to Dentrix Ascend.
- Exit icon: Click the exit icon to close the Feedback module and return to Dentrix Ascend.
Note: As Dentrix Ascend made the move to a new feedback system, several hundred (but not all) suggestions made through the Aha! site were ported over. If you cannot find a request you made in Aha! within the new system, you may need to enter it again.
Power Reporting
A couple fields have been added to Power Reporting to better help you build custom reports related to predeterminations and treatment plans.
Predetermination Coverage Type
You can now add the new PreD Coverage Type field to see whether a predetermination was for the primary or secondary carrier. You can use this field in the Analysis Procedure Tracking Report Builder, the Interactive Treatment Plan Report Builder, and the Analysis Treatment Plan Report Builder.
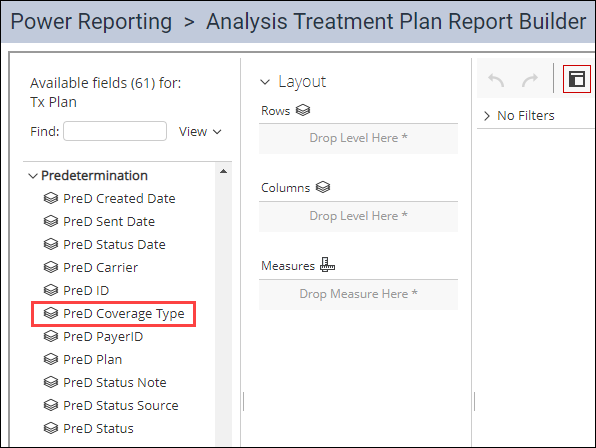
It is important to note that the information in this field reflects only the most recent claim submission. There is no historical record of whether a predetermination claim was submitted for primary or secondary insurance.
The new PreD Coverage Type field was also added to the default versions of the existing Predetermination – Tracking and Predetermination – Unsent reports.
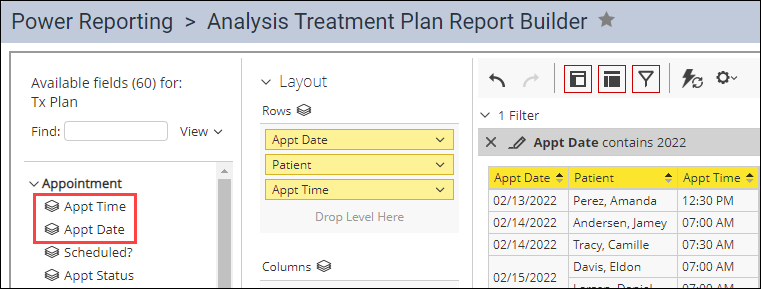
Appointment Date and Time for Treatment Planner Reports
An earlier version of the Analysis Treatment Plan Report Builder included an appointment time field that was a combination of both date and time. The report now splits those values out into two discrete date and time fields named Appt Date and Appt Time.
Imaging
New Imaging Features
The new imaging features included in this release are intended to help you streamline your acquisition and imaging workflows by reducing the number of clicks and improving the viewing and recapturing of images.
Remove Clicks from Acquisition Workflow
With this update, Dentrix Ascend will automatically finish the image acquisition and close the exam or finalize the image import and close the import. It is no longer required to click Finish after the last image is acquired, nor Finalize after the last image is uploaded from an import.
Note: If you need to re-capture an image, you will need to re-open the exam, click Proceed with Acquisition and then recapture the image.
Also, it is no longer required to click Continue when acquiring images for Pans or from Phosphor plate scanners. Dentrix Ascend will automatically finish the acquisition and close the exam.
Move Recaptured Images
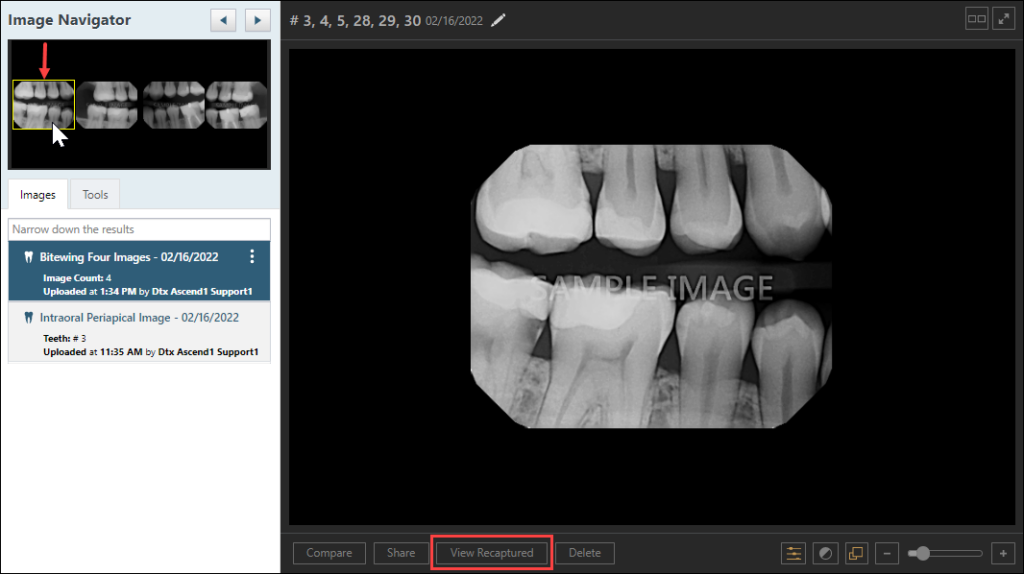
The new Move Recaptured button now allows you to quickly move a recaptured image to different slot when multiple images (or recaptures of the same tooth) exist in a slot in a template/series. This allows you to make corrections when multiple images were taken in the wrong slot in the template. Before this update, you were not able to move a recaptured image to a different template slot.
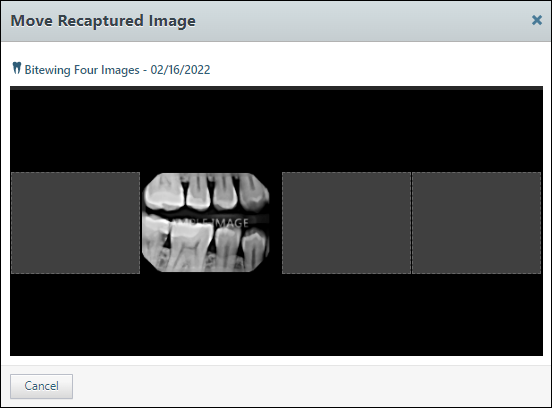
To locate a recaptured image in the image template, select the image in the Image Navigator. If a recapture image exists, the View Recaptured button will display.
Click View Recaptured to view the images in the template slot.
The View Recaptured Images window opens and displays the images that have been acquired for that template slot. To move the recaptured image to a different slot, click Move Recaptured.
Note: If multiple images were acquired in the same slot, click the arrow to view the recaptured images.
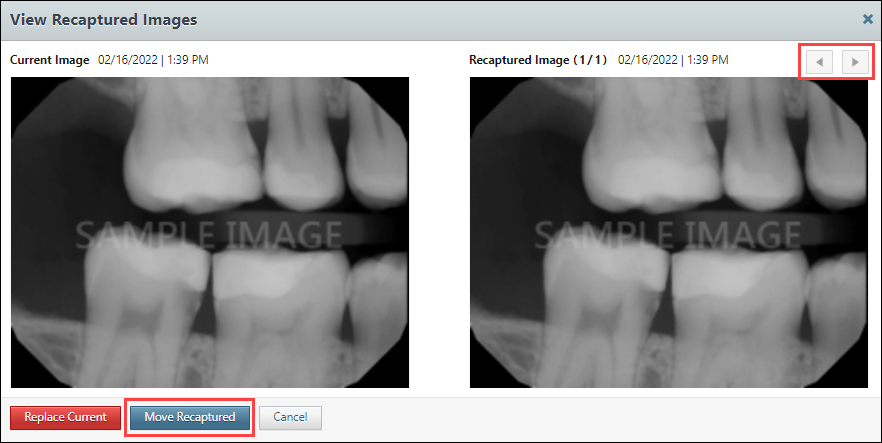
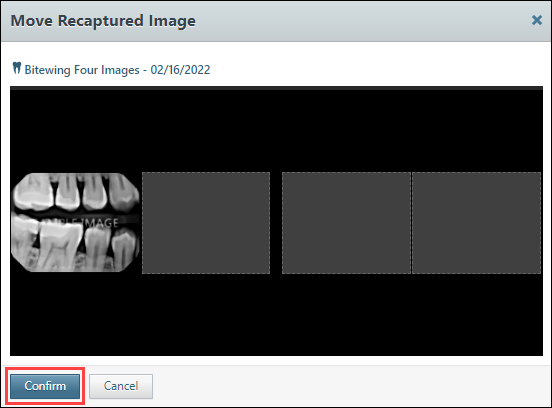
The Move Recaptured Image window opens.
Drag the image to the correct slot in the template and click Confirm.

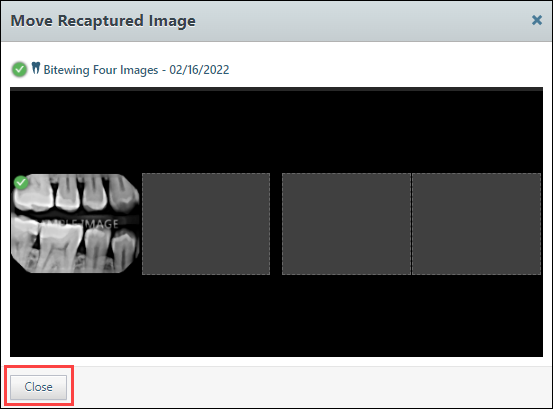
Then click Close. A green checkmark confirms the image has been moved.
Viewer Background Color Change
With this release, the background for the image viewer has changed from dark gray to black to provide more contrast when viewing images.
Auto Select First Favorite Procedure
The Auto Select First Favorite Procedure enhancement automatically selects the first imaging procedure listed under your Favorites tab. This feature enhancement is intended to streamline your acquisition workflows by reducing the number of clicks to save you time.
Before this update, the top procedure listed under the Favorites tab was not auto selected, and the side panel was blank until a procedure was selected under Favorites.
Before: The first listed imaging procedure under Favorites is not auto selected.
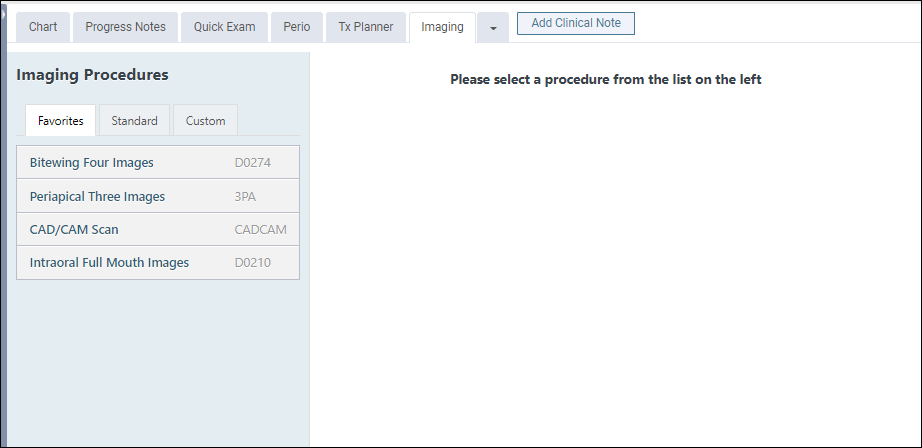
With this update, the first imaging procedure listed under the Favorites tab is auto selected and displayed in the side panel. Now when you click Acquire Images, if a favorite procedure exists, the procedure is auto selected. Click Begin Acquisition and proceed with the acquisition or select another procedure on the favorites list.
After: The first listed imaging procedure under Favorites is auto selected.

Select Template Slot During Acquisition
The Select Template Slot During Acquisition enhancement allows you to select an open template slot in the imaging template to reduce the number of clicks when acquiring images. Before this update, if you wanted to acquire an image in a specific slot you had to either click Skip Backward or Skip Forward. Now, you can select a specific template slot and acquire the image.
Note: Dentrix Ascend follows the acquisition sequence you have selected in your software. It is important to follow this sequence when you are acquiring images. If you do not follow the sequence, Dentrix Ascend will think that you are finished and automatically close the acquisition on the last numbered sequence.
For example, the FMX template (below) follows the numerical sequence shown. If you select 15 first, it will proceed to 16, 17, and 18 and then close the acquisition.
To customize your acquisition sequence, read Creating custom imaging procedures in the Dentrix Ascend Resource Center.

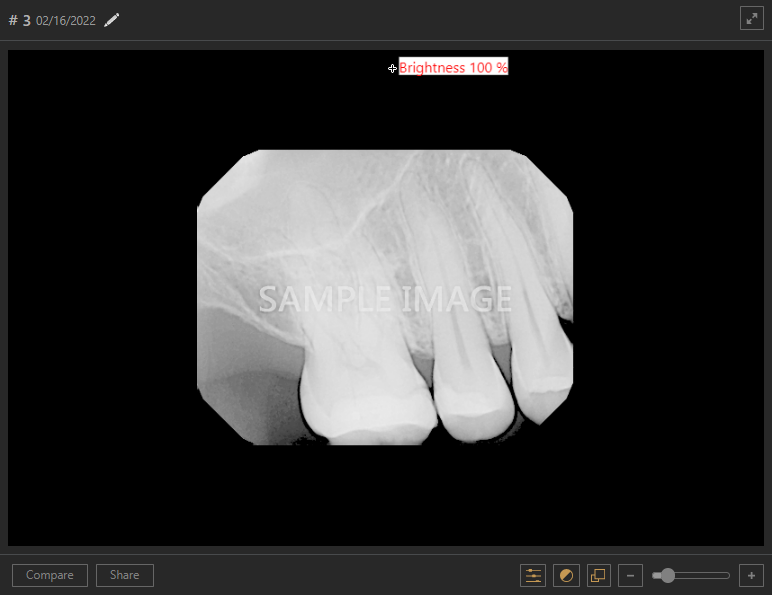
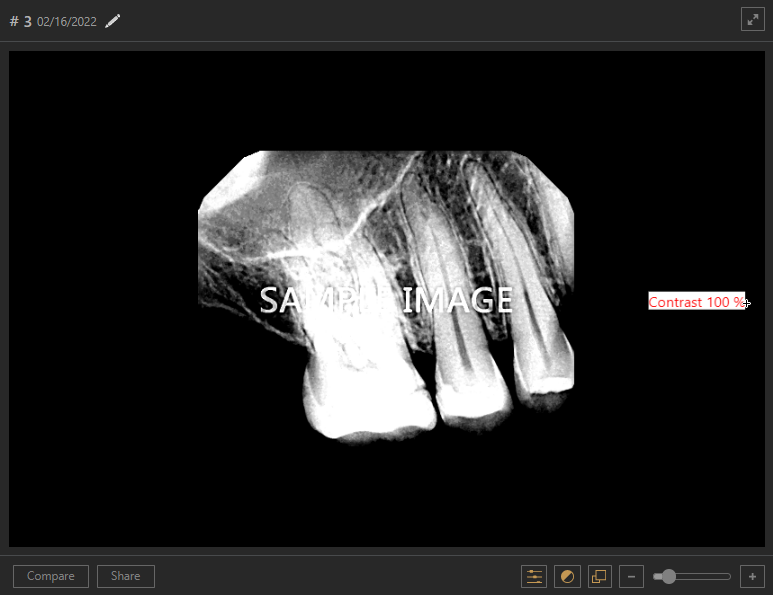
Brightness/Contrast Drag Tool Enhancement
With this release, the functionality of the brightness/contrast and zoom tools have been expanded to include the entire image area template. This allows you a more extensive range to drag the contrast/brightness and zoom tool beyond the image to help you view the tool values.
Prior to this update, the mouse drag tool functions were limited to the image area only, which made it difficult to view if the brightness/contrast tool values were reached at their maximum value of 100%.
Now the expanded drag tool feature enhancement allows you to go beyond the image and view the 100% contrast or brightness values. Also, the zoomed size of the image no longer affects the amount of range you have to perform brightness/contrast adjustments.
Large Image Preview Removed from Acquisition
To reduce the amount of time used during acquisition, the large image preview and countdown between image acquisitions have been removed. This substantially speeds up acquiring a series of images, especially when the operator acquiring x-rays uses a hand-held x-ray source and does not leave the operatory.
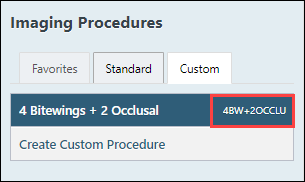
Procedure Code Increased to 11 Characters
With this update, the imaging procedure code character count has been increased from 7 to 11 characters, which is useful when you want to create imaging multicodes.
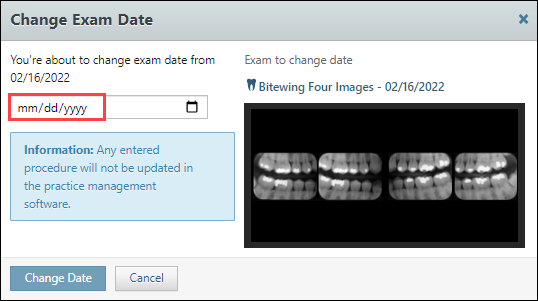
Update Imported Exam and Image Date
This update now gives you the ability to edit the date the image was originally acquired as opposed to when it was imported and uploaded in Dentrix Ascend. This is useful when you receive images from a referring dentist, third party, or a new patient and must import the images into an Ascend imaging exam via a file import device.
To change the date of imported images, click the three dots, and then click Change exam date.

The Change Exam Date window opens. Either enter the date or click the calendar icon and select the date from the date picker.
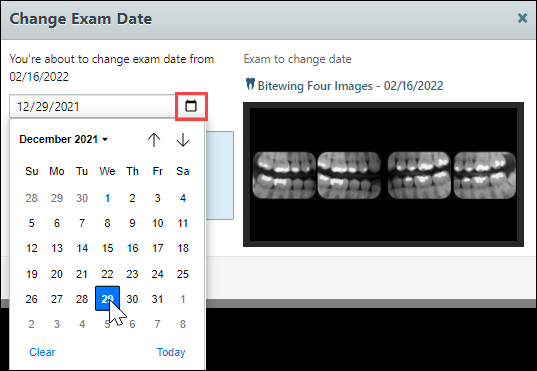
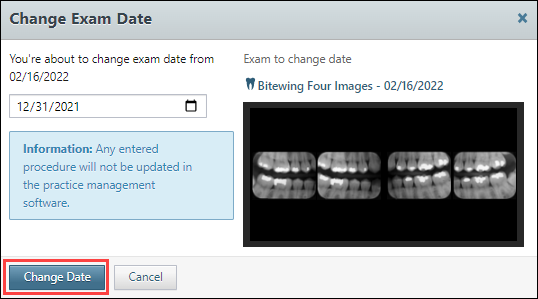
Click Change Date to save the date the image was originally acquired.
Imaging Conversions
With this release, the following imaging conversions and software device bridge have been added to Dentrix Ascend:
- CareStream Imaging 8 bidirectional new software device bridge
- Apteryx Xrayvision conversion
- EagleSoft conversion
User Rights
No new user rights were introduced in this release.
New Learning Content
We are constantly adding content to the Dentrix Ascend Resource Center and to the #DentrixAscendBlog to help support you. Here is a list of new resources that have been published since the last release.
Deciding Which Power Report to Use
The Dentrix Ascend Resource Center has an interactive guide to help you narrow down the dozens of choices presented in the Power Reporting menu.
Completing Procedures
A procedure will not show up in the ledger, be counted as production, or be eligible for insurance claim submission until it gets marked as completed. Watch this video to learn more.
3 Tools to Master Your Recare Workflow
Use this on-demand webinar to learn how to maximize your recare workflow through automated recare reminders and online booking.