The product update released April 13, 2022 introduces enhancements to the presentation of predetermination information. Imaging was updated with several convenient enhancements, and new data fields were added to Power Reporting.
Insurance
Predetermination Enhancements
With this release, there are new predetermination enhancements to help you view and check on the status of predetermination requests for patients.
Predetermination Type and Sorting Added to the Predeterminations Page
When you are on a patient’s Tx Planner tab, there is a Predeterminations button which opens a Predetermination Requests page.

We have added a new Type column to help you easily see whether you sent a predetermination to primary or secondary insurance.

You can now sort the Predetermination Requests page to make it easier to find information about a predetermination. By default, the table is sorted by Date Sent, with the most recent record at the top. Click the sorting arrows in any column to change the sorting order.

Predeterminations Added to Insurance Claims Page
The Insurance Claims page can now include predetermination requests. You can tell which entries are predeterminations by looking in the Claim Type column. For a predetermination, PreDet followed by either (Primary) or (Secondary) appears depending on whether the predetermination was for primary or secondary insurance.

You can include or exclude predetermination records by toggling the new Include predeterminations switch On or Off.
Power Reporting
This release introduces several enhancements to Power Reporting.
New Treatment Area Field
A new Procedure Treatment Area field has been added to the Analysis Treatment Planner report builder. This allows you to see the exact treatment area for a procedure.
Note: If the treatment area is a range of teeth, the tooth numbers included in the range will be listed in the Proc Treatment Area field.

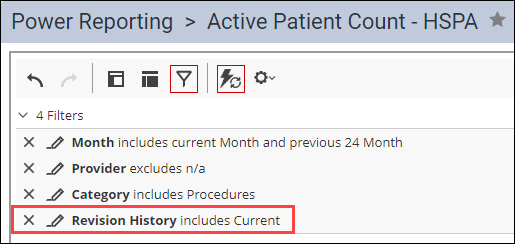
New Revision History Filter
A new Revision History filter has been added to the Deposit Report and the Active Patient Count – HSPA Report to exclude historical information. This ensures that accurate counts are displayed because only the latest information is counted.

Reconciling the Applied Date with the Modified Date
This release introduces an update to the relationship between the Modified Date and the Applied Date in Power Reports. The Modified Date shows the last time a transaction was changed. The Applied Date shows when a payment or credit was applied to a procedure or charge. As of this release, the Applied Date will mirror the Modified Date in Power Reports that include payments, procedures, credit adjustments, and charge adjustments.
For example: If a charge has an applied amount, the Applied Date and the Modified Date will be the same date to reflect the date a credit was applied. If a charge does not have an applied amount, the Applied Date will be “Not Available.”
If a charge has an applied amount, but later that charge is edited, the Modified Date becomes the date of that change.

New WorldPay Credit Card Processing Fields in Ledger Reports
If you have a WorldPay account and use Dentrix Ascend Pay to process credit card information, there is a new set of fields in Ledger reports that will be useful to you.
You will find the new Credit Card Processing fields in the Fields panel. Because you use Dentrix Ascend Pay, the data from your credit card processor is automatically captured in Dentrix Ascend. You can view this data by adding these fields to your reports.

Note: If you do not use Dentrix Ascend Pay, these fields will still be visible to you, but the data will show as “Not Available”.
Usability
Insurance Carrier Page Update
With this release, the pagination on the Insurance Carrier page has been updated. This update focuses on giving you quicker access to your insurance carrier plans.
By default, you can view 100 carriers at one time. This allows for faster load times because it limits the initial viewable list to 100 entries. You can also change the view to show either 200 or 300 carriers by selecting the 200 or 300 from the Showing list. To navigate the pages of insurance carriers, you can either click the page numbers or click the Previous or Next links.

Patient Information
In the past, Dentrix Ascend would prevent you from having the same email address for multiple patients. However, it is common for related patients to have the same email address—such as a parent who serves as the primary contact for all their children.
With this release, when you input an email address, a yellow warning icon will appear to alert you that the email address already belongs to another patient. However, you will be able to proceed and save the same email address for multiple patients. The warning appears when you input an email on the Basic Information tab of the Create Patient or Patient Information pages. It also appears on the Contact Info tab in the appointment panel in the Calendar.


Note that just because you can enter the same email for multiple patients this does not change the essential logic that patients are contacted through their primary contact.
User Rights
No new user rights were introduced in this release.
Imaging Enhancements
New Recapture Button
With this release, a Recapture button has been added to the Image Viewer for imaging procedures.
In Release 388 Dentrix Ascend announced a new imaging workflow that automatically finished the image acquisition and closed the exam. This update introduces further imaging enhancements. You can now click the new Recapture button from the Image Viewer when you need to recapture an image.

After you recapture the image, the Select Image window automatically opens. Select which image you would like to keep. Click Keep Existing to keep the existing image or click Keep Recaptured to keep the recaptured image.

Next, click Finish Acquisition to close the exam or click Recapture to recapture the image again if needed.

When the acquisition closes, the Image Preview gives you the option to review the recaptured images. Click View Recaptured to review the recaptured images if needed.

The View Recaptured Images window opens. You see the current image on the left side, and the recapture image on the right. If there is more than one recaptured image, click the arrows to view the different images. Then click Replace Current or click Cancel to keep the current image.

Image Attachment Enhancement
Dentrix Ascend has added the acquisition date and tooth number to image attachments to help you comply with certain state imaging regulations.
Now when you need to attach an image to an insurance claim, the image will automatically have the image acquisition date and the tooth number(s) for that image.
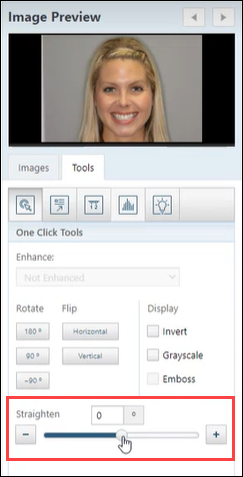
Image Rotation Enhancement
Dentrix Ascend now allows you to rotate an image in the image viewer. This allows you to straighten an image if needed.
To rotate an image, select the image from the Image History and open the Tools tab. Drag the Straighten slider tool to the left or right depending on the angle of rotation you need. You can also type the degree of the angle in the Straighten angle box.
Imaging Conversions
With this release, the following imaging software has been added to Dentrix Ascend:
- Romexis Software volume acquisition device bridge
New Learning Content
The Education Team continuously adds or updates content to the Dentrix Ascend Resource Center. Below are some of the latest videos and articles. Click a title to get more information about these topics.
Acquiring Images
Watch the Acquiring Images video update to learn the new imaging features and enhancements included in the IT 388 release.
Editing a Treatment Planned Case
Dentrix Ascend offers you flexibility when you need to make changes in the treatment planner. You can quickly and easily edit the treatment planner to accommodate your office and patient’s needs. Watch this video to learn about editing a treatment plan case.
Power Reporting Fields
The Power Reporting module gives you access to a lot of information. This master document links to more documents where all the data fields and measures are explained.
Filling Open Appointment Times
Dentrix Ascend keeps gap-filling appointment opportunities in one spot so you can find the perfect patient for any openings that may arise.
Creating a Custom Acquisition Sequence
Dentrix Ascend comes with some default image acquisition sequences. You may prefer a different order. Read this article to learn how to do it your way.