Click the name below to learn more about a new feature or enhancement for this month in Dentrix Ascend.
- 2024 ADA Claim Form
- Locum Tenens Treating Dentist
- Deleting Billing Types
- Dentrix Ascend Detect AI AIDE Tool
- Detect AI Huddle Dashboard
- Imaging Enhancements
- Electronic Remittance Advice (ERA) Enhancements
- Text Message Update
- Return to Page After Logout
- CDT procedure code updates for Update 2024
- Settings menu and Custom Pick Lists page updates
- A new Billing Type setting for a feature that is under development
- A new location-specific switcher for Default provider selection logic
- The new Dentrix Ascend Pay Recurring Payments feature
See the new learning content that Practice Education has created to help you in Dentrix Ascend.
December 21, 2023
This release introduces the new 2024 Version of the Standard ADA Printed Claim Form, which includes the new Locum Tenens Treating Dentist field. This release also introduces the new Detect AI AIDE tool and the new Videa Health Huddle dashboard, as well as other imaging enhancements.
Insurance
New 2024 Version of Standard ADA Printed Claim Form
The ADA maintains the standardized claim form used for insurance billing. The ADA updates the codes annually, and the claim format occasionally. Included in this release are updates to the printed claim form. Four new fields have been added to the paper form:
- Box 3a. Payer ID for third-party payers
- Box 11a. Other Payer ID for other supplemental coverage
- Box 39a. Date Last SRP (not included in the electronic claim format; however, it is still important that you put the SRP last treatment date in the narrative for a claim sent electronically so there is not a delay in payment due to a rejection.)
- Box 53a. Locum Tenens Treating Dentist? (not included in the electronic claim format)
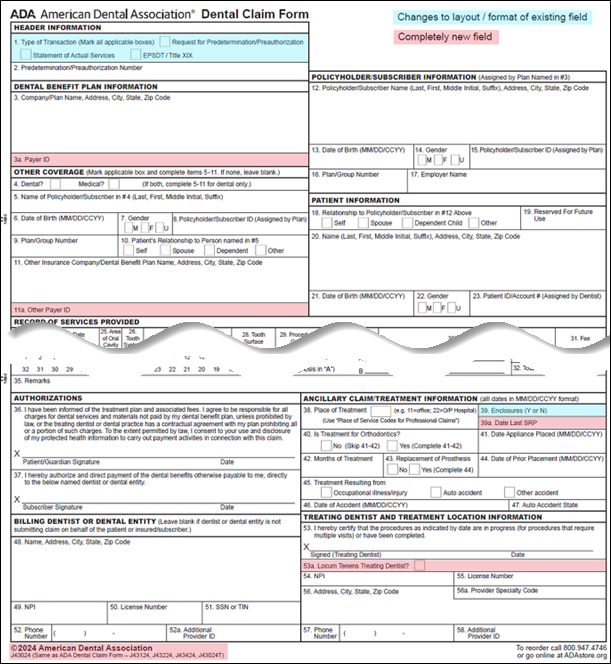
Note: These changes to the printed version of the form have no impact on electronic claims. The ADA encourages you to continue submitting electronic claims, and to submit paper claims only when documentation for Locum Tenens or Last SRP is needed.
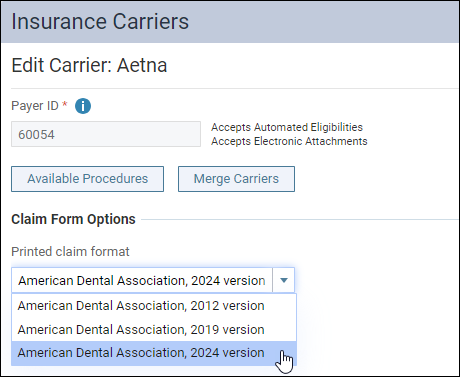
To submit information in these two fields of the printed claim, the Claim Form Options for the payer must be set to American Dental Association, 2024 version.
Locum Tenens Treating Dentist
To help you maintain a consistent claim acceptance rate with payers, Dentrix Ascend now supports Locum Tenens providers. This is one of the new fields in the printed ADA 2024 form.
Note: While the ADA has added the field for Locum Tenens on the new 2024 claim format, it does not in any way change whether a payer will pay for a claim for services provided by someone out of network if the temporary doctor is out of network. It does inform the payer that services were provided by a temporary doctor, which might make a difference with how that claim is paid; however, that is still up to the payer. Insurance company guidelines supersede ADA guidelines.
To identify a provider as a Locum Tenens Treating Provider, open the provider record on the User Account page, select the Provider Info tab (requires the Settings > Edit User rights) and toggle the Locum Tenens Treating Provider switcher to Yes.

To help you identify such a provider in the claim detail, there is also now a Locum Tenens Treating Provider switch on the General tab of the Claim Detail window. The default value reflects the claim’s rendering provider as set in the provider’s user account, but you can change it for a particular claim if needed.

Deleting Billing Types
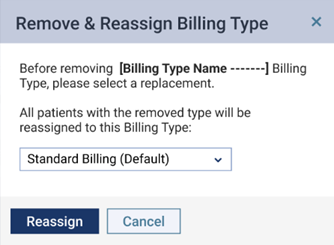
You can now delete a billing type that you no longer want to use. If the unwanted billing type is assigned to any patient records, Dentrix Ascend will prompt you to select a replacement billing type for those patients.
Note: You cannot delete the billing type that is set as the default.
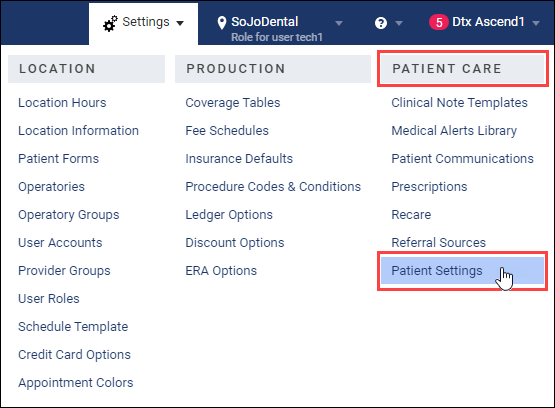
1. On the Settings menu, select Patient Settings.
2. On the Patient Settings page, select Billing Type on the left, and then click the billing type that you want to delete on the right.
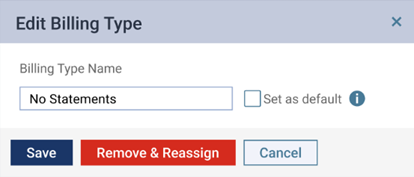
3. In the Edit Billing Type dialog box, click Remove & Reassign.
4. In the Remove & Reassign dialog box, select the replacement billing type, and then click Reassign.
Imaging
Dentrix Ascend Detect AI AIDE Tool
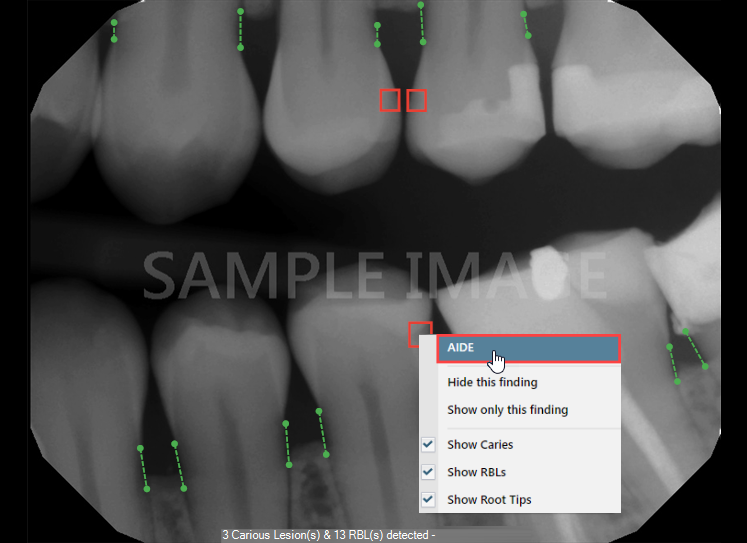
This release introduces the new Detect AI Artificial Intelligence with Diagnostic Enhancement (AIDE) tool. Often times, a dentist will zoom in on an image and also change the contrast to better view an area of concern. The new AIDE tool gives a dentist the ability to automatically apply image enhancements.
To use the AIDE tool, click inside a caries detection or next to the RBL indication and then click AIDE on the menu to open four views with different pre-applied effects to diagnostically enhance the image.
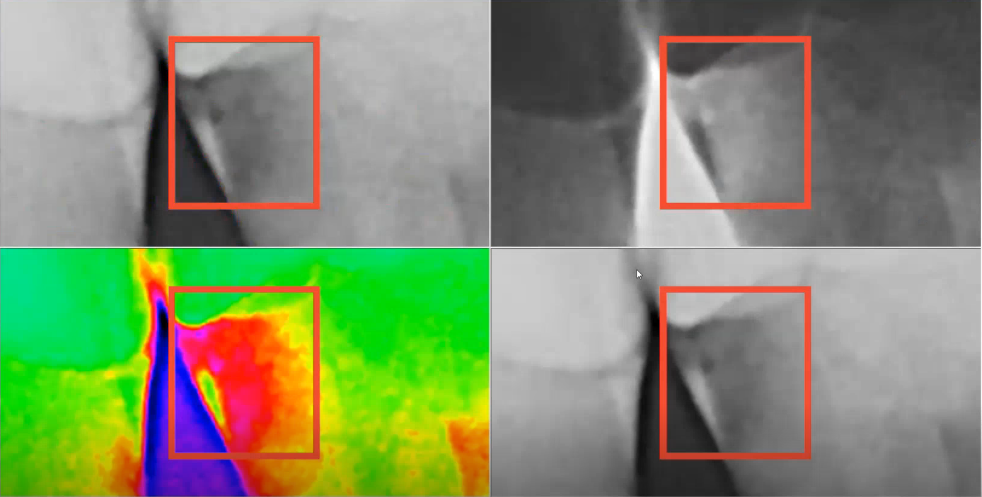
Display Views
The four AIDE display views are:
- Zoomed in filtered.
- Zoomed in inverted.
- Zoomed in colorized.
- Zoomed in unfiltered.
Caries Detect Indications
Radiographic Bone Level Indications

Bright and Contrast Functionality
The Detect AI AIDE tool uses the same functions that you normally use to decrease or increase brightness and contrast.
To change brightness and contrast:
- Click and drag up or down in the viewing area to decrease or increase the brightness.
- Click and drag left or right in the viewing area to decrease or increase the contrast.
- Double click in the viewing area to reset the brightness and contrast levels to their default states.
Navigation
The Detect AI AIDE tool also uses the same navigation functions that you normally use to navigate images.
To navigate an image view:
- Zoom in by rolling your mouse wheel forward.
- Right-click to pan across the image (in zoom in mode).
- Zoom out by rolling your mouse wheel backward.
- Expand the view to a full screen view by clicking the expansion arrow.
Detect AI Huddle Dashboard
This release introduces the Detect AI Huddle link and dashboard in Videa Health to help your practice review patients that are that are due for bitewings, perio charting, or a prophy. It also identifies patients with potential periodontal disease and/or potential restorations. This is the first phase of development for this feature.
The information collected on the Huddle dashboard is gathered when you acquire images in Dentrix Ascend Imaging. Initially, you will use the Huddle dashboard retroactively to review patients that were seen that day. Later, as you acquire more patient images, you will be able to use the Huddle dashboard more proactively.
Use the Huddle dashboard at the end of the day to review the patients that were just seen to see if treatment was missed. This gives you an opportunity to check a patient’s perio exam to see if periodontal disease was noted or to check if a treatment plan for restorations was created for a patient. Even during its initial use, the Huddle dashboard can help you find potential production for your practice.
Later, in the next six-month recare cycle, you will be able to see patients that are due for bitewings, perio charting, or a prophy. This can be extremely useful; for example, if a patient is coming in for a filling, you can see that they are due for prophy and bitewings. You can either schedule an appointment before the patient leaves or try to schedule the treatment for that day if there is an opening in the hygiene schedule.
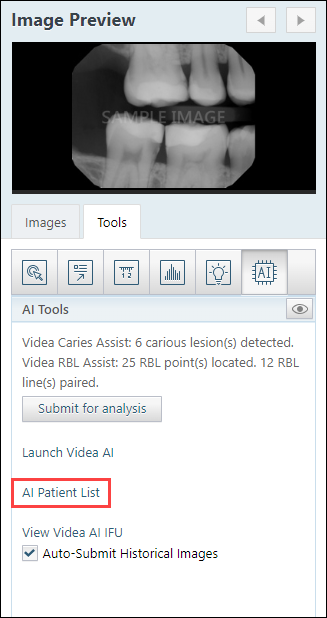
To open the Videa Health Huddle dashboard, click the AI Patient List link on the Imaging Tools tab for any patient.
By default, the Videa Huddle dashboard opens to today’s date with a Privacy On setting to hide patient names and ages. Click Privacy On or the Hide icon (eye with a line through it) to view the patients’ names and ages.
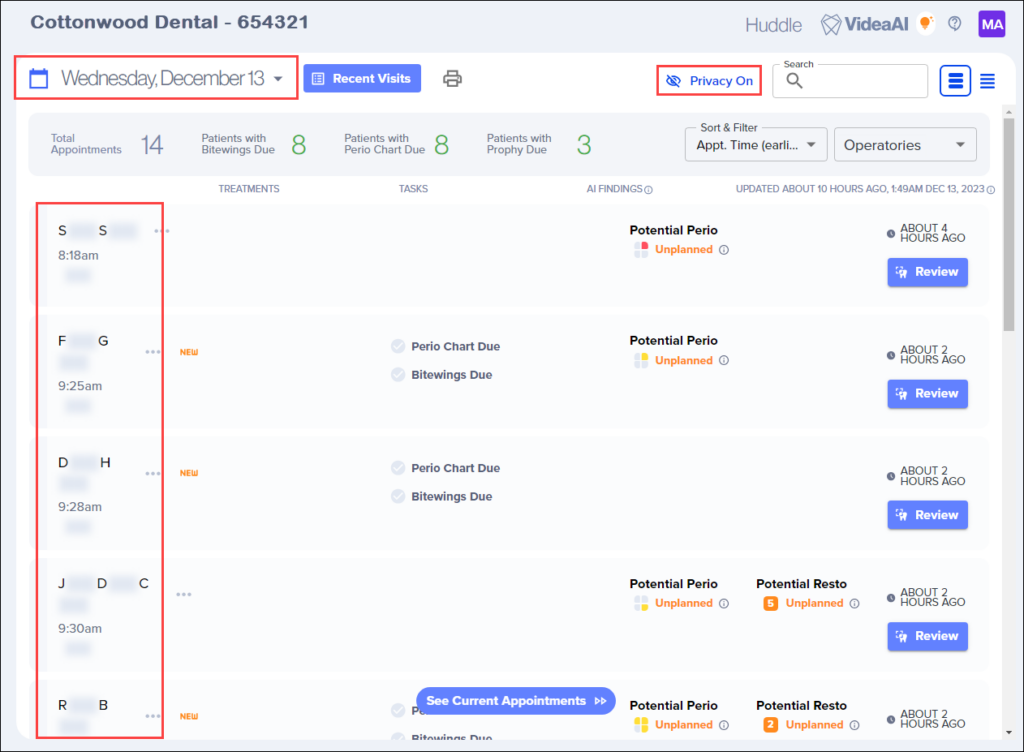

To view the patient’s date of birth, click the ellipsis (row of three dots) next to the patient’s name.
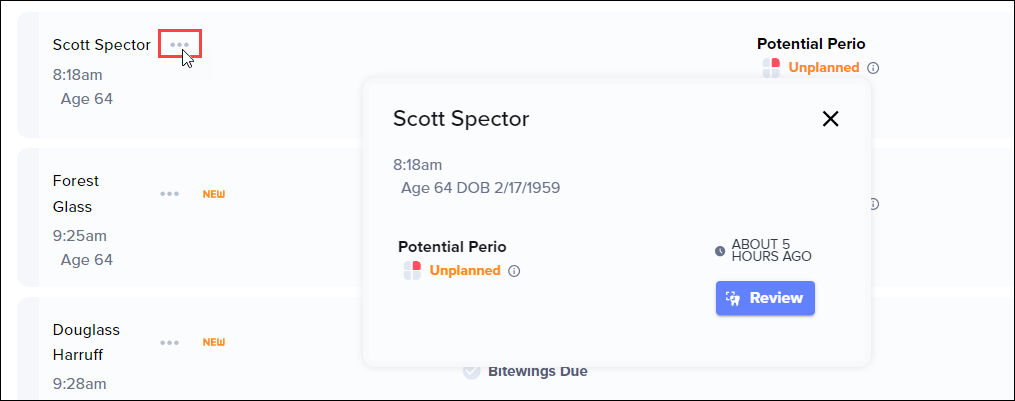
The Huddle dashboard displays treatments, tasks, and AI findings for each patient listed if they are due. Additionally, the Huddle dashboard displays potential periodontal disease or caries requiring restorations for a patient if detected by the AI.
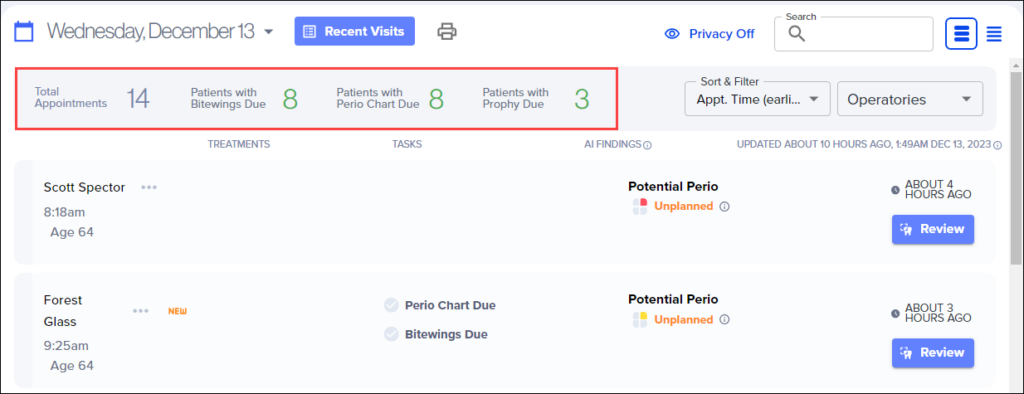
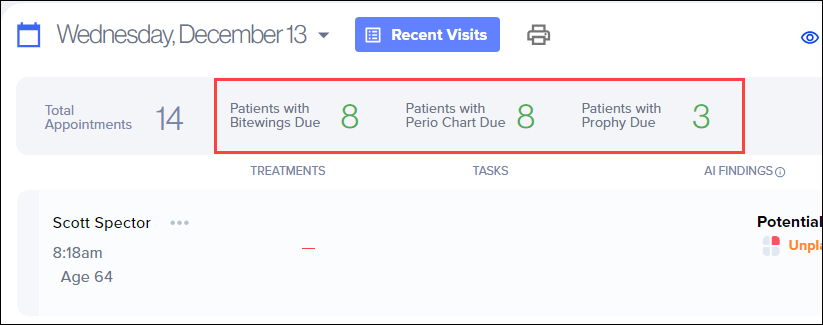
Huddle Dashboard Toolbar
At the top of the dashboard, a toolbar displays the total number of appointments for that day and a task filter that displays the total number of:
- Patients with bitewings due
- Patients with a perio chart due
- Patients with a prophy due
Note: These numbers automatically update within 5 to 15 minutes after you acquire patient images. So, the numbers will update throughout the day as you see patients.
Filtering the Information
The Huddle dashboard gives you options to filter the information listed. You can filter by:
- Task
- Time, Radiographs or Findings
- Operatory
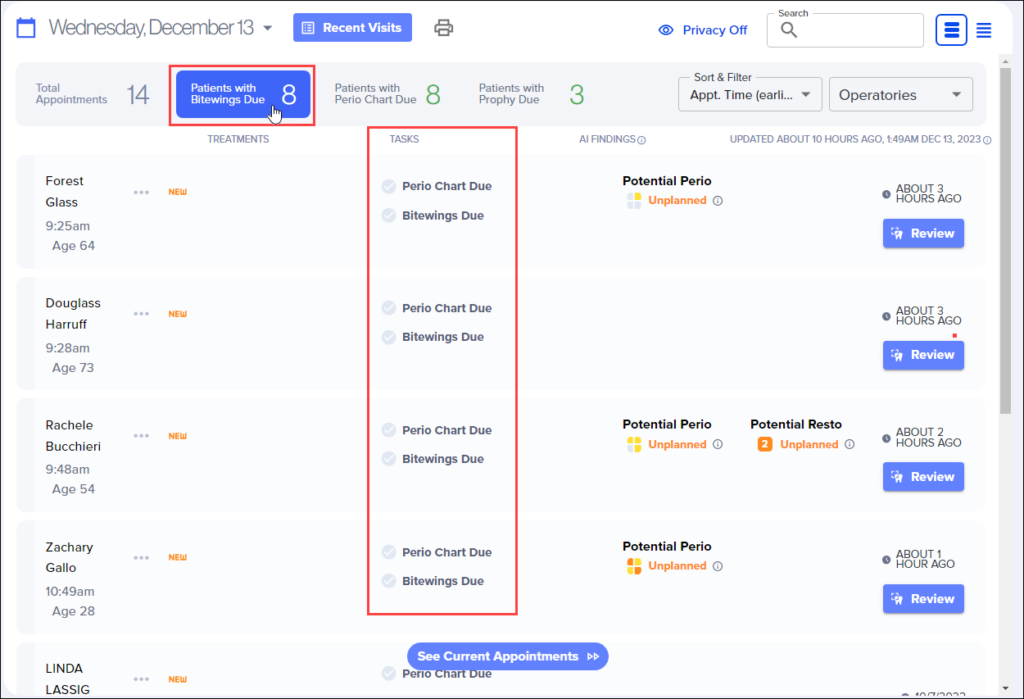
Filtering By Task
You can sort the information on the dashboard by task when you click Patients with Bitewings Due, Patients with Perio Chart Due, or Patients with Prophy Due.
Note: When you first start using the Huddle dashboard, these numbers will be zero because they are calculated on patient images that were acquired since this feature was enabled. As you continue to acquire images, these numbers will automatically update so that in the next six-month cycle, you will be able to monitor patients that are due for bitewings, a perio exam, or a prophy.
For example, if you click Patients with Bitewings Due, the dashboard finds and lists the patients that are due for bitewings that day—even though bitewings may not be among the procedures planned for today.
Filtering by Time, Radiographs or Findings
You can sort or filter the information on the dashboard by selecting an option on the Sort & Filter menu:
- Appt. Time (earliest)
- Appt. Time (latest)
- Radiographs available
- Resto Findings
- Perio Findings
Note: By default, Appointment time is selected.

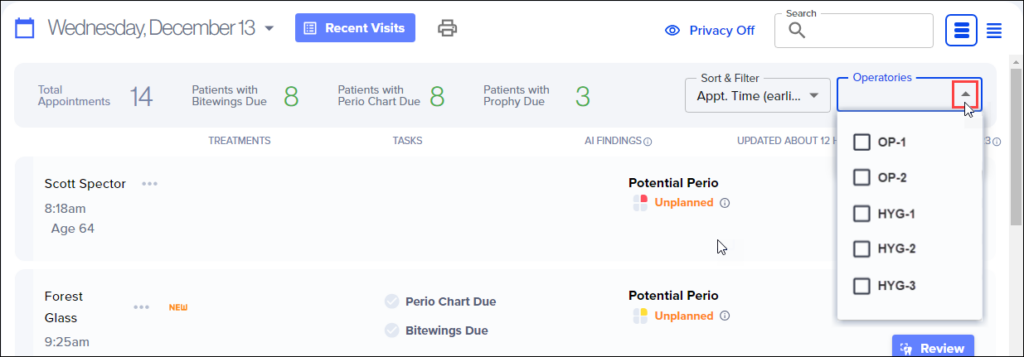
Filtering by Operatory
You can also filter the information on the dashboard by operatory from the Operatories menu.
Note: By default, no operatories are selected.
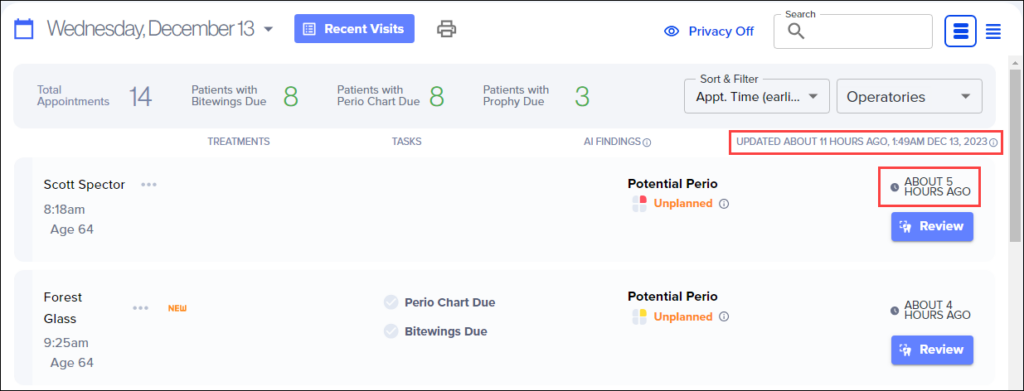
Dashboard Updates
The Huddle dashboard in Videa Health automatically updates about five to fifteen minutes after images are acquired in Dentrix Ascend Imaging. You can view the number of hours, time, and date of the last update at the top of the dashboard. You can also see the update for each patient.
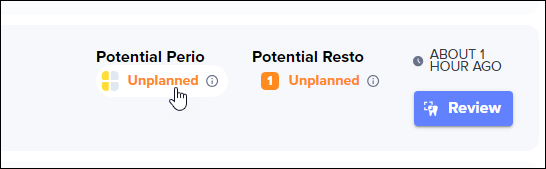
Reviewing Patient Information
When you click the status icon under Potential Perio or Potential Resto (Potential Restorations), a thumbnail image opens so you can review the AI findings.
Note: Radiographs and findings are from the image set taken on (or closest to) the selected appointment date.
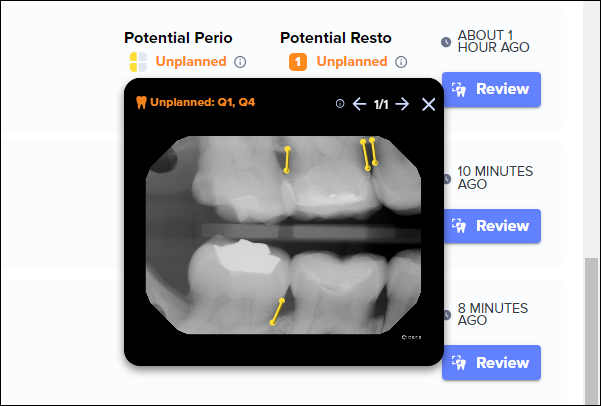

When you click Review, a full view image opens in Videa Health so you can review all AI findings.

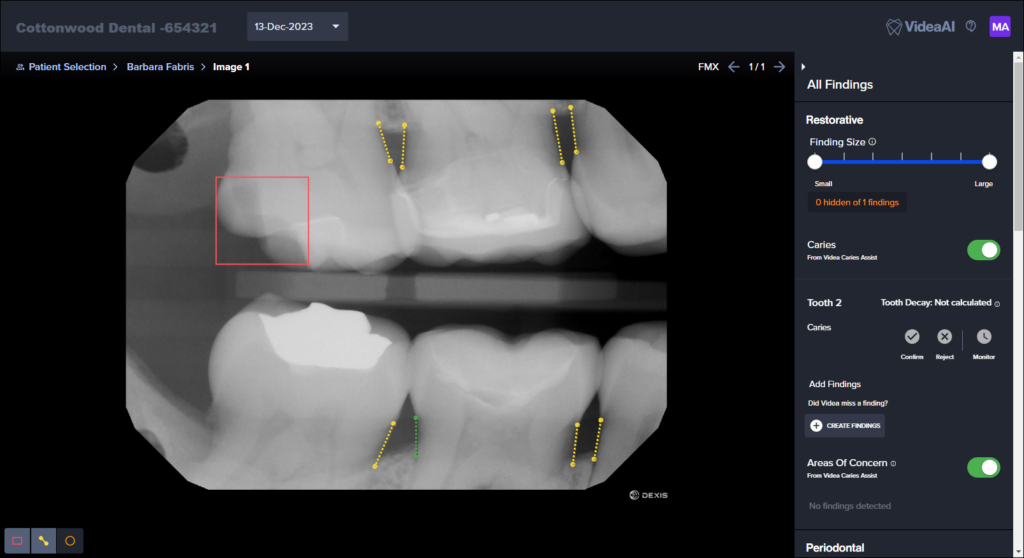
After you click Potential Perio, Potential Resto, or Review, a green checkmark and “Findings Reviewed” appears.

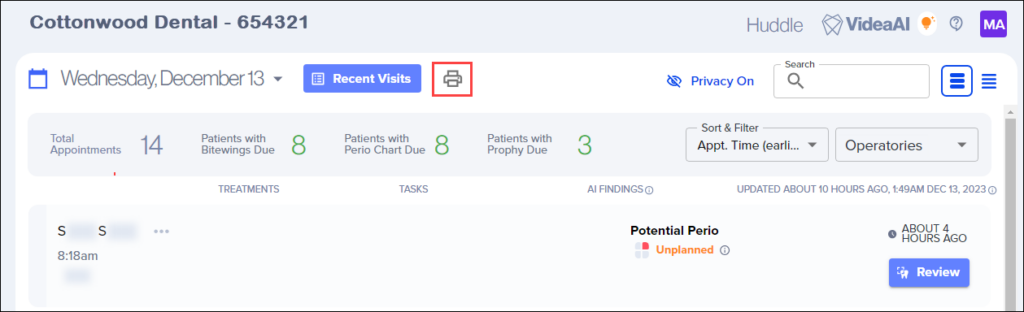
You can click the Print icon to print the information on the Huddle dashboard for your staff to refer to at the end of the day to check the following for patients seen that day:
- If they received the bitewing images, perio chart, or prophy treatment that were due.
- If they had perio or restorative treatment entered in their chart and/or their Treatment Planner in Dentrix Ascend.
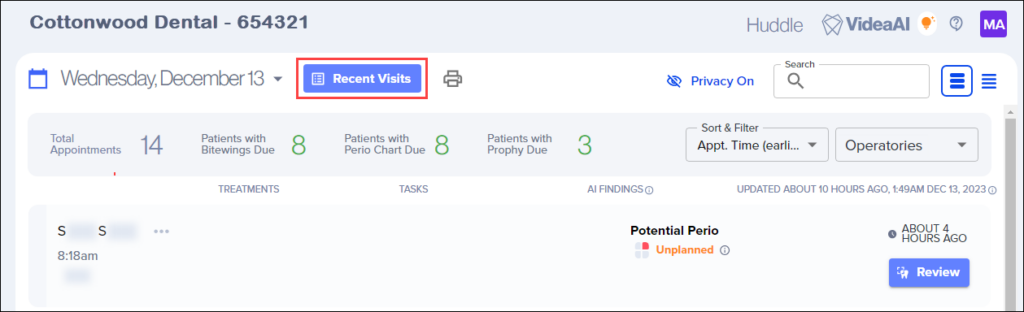
When you click Recent Visits, it displays historical patient information.
Imaging Enhancements
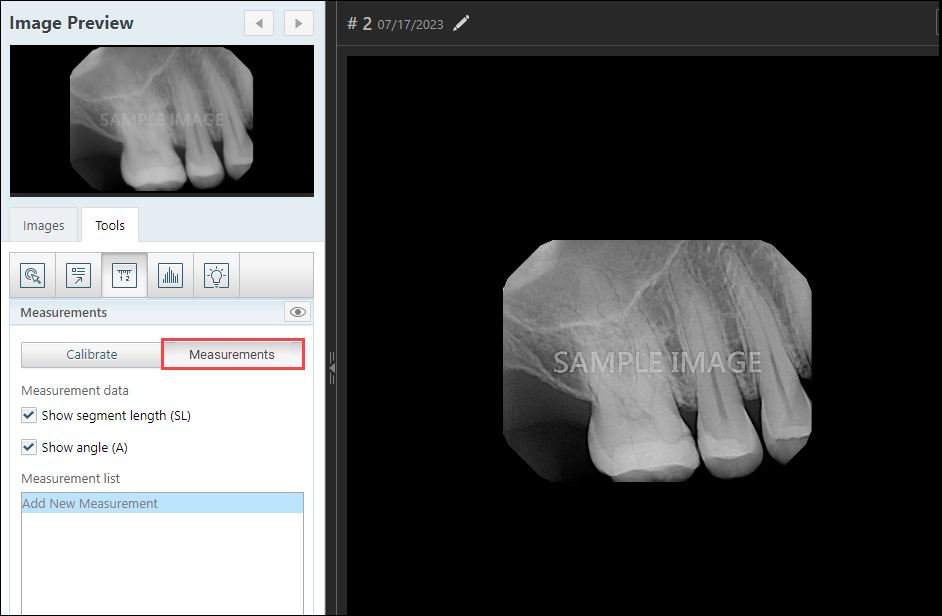
Measurement Enhancements
This release introduces a name change for the Dynamic Measure tool on the Tools tab and a workflow enhancement. Prior to this release, the name was Dynamic Measure. With this release, the new name is Measurements.
Old name: Dynamic Measure
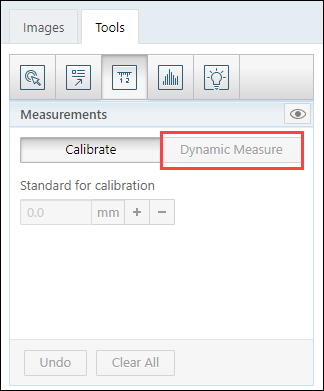
New name: Measurements

Also, the measurements workflow has been enhanced. Prior to this update, you would have to click the Measurements tab after you drew the calibration line on the image and entered the measurement in the Standard for calibration box.
With this release, the Measurements tab automatically opens when you press Enter on your keyboard after you draw the calibration line and enter the measurement in the Standard for calibration box.

Measurement Enhancements: Images with Known Pixel Size
Some digital sensors have a known pixel size for images, so no calibration is needed. Other digital sensors do not have a known pixel size for images, so calibration is needed prior to you using the Measurements tool in Dentrix Ascend.
Prior to this release, by default, all images required calibration regardless of whether an image had a known or unknown pixel size before distance and angle measurements could be used. With this release, calibration is not required when an image has a known pixel size; the Measurements tab is selected automatically so you can start drawing the actual measurements.
Measurement Enhancements: Pixel Size Warnings
This release introduces a change to where warning messages appear. The warning text for known pixel size measurements will appear after the measurement list, and the last sentence of the warning (“Calibration to a known object length is highly recommended for any diagnostic use of measurements.”) has been removed because it reiterates what is already in the IFU.
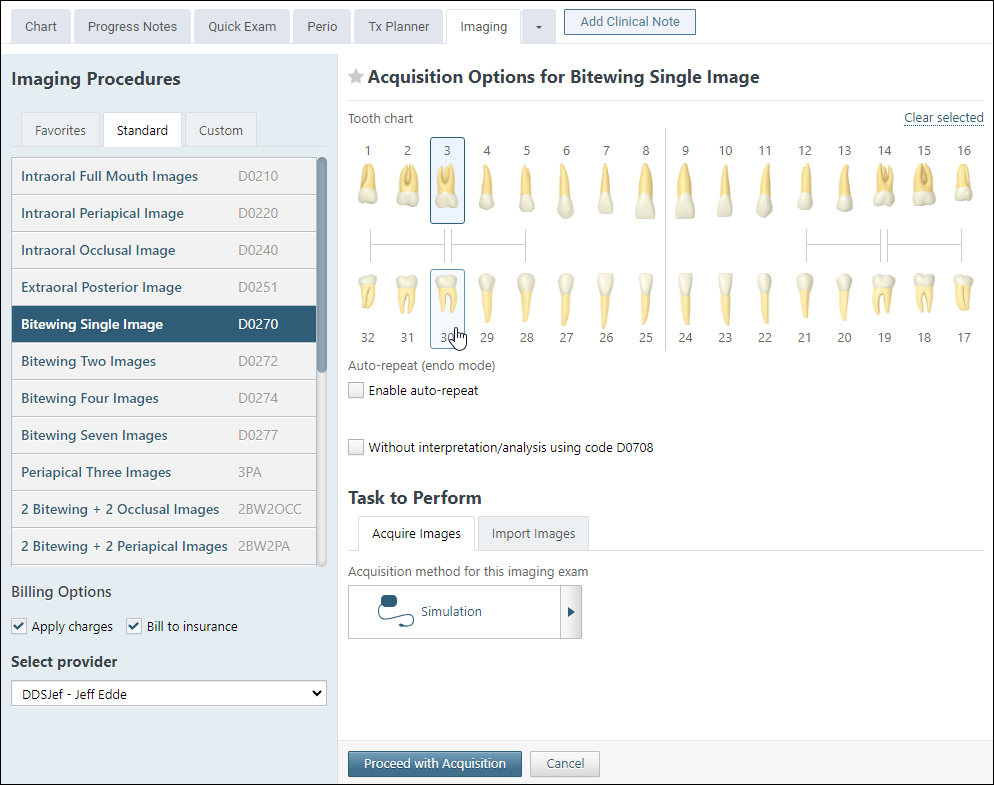
Bitewing Single Image Enhancements
This release introduces a change to the workflow when you are acquiring a single bitewing image.
Prior to this release, you could select one tooth and then click Acquire to acquire a single bitewing image, which is not clinically correct.
With this release, you must selectat least one tooth in the maxillary arch and one tooth in the mandibular arch when you want to acquire a single bitewing image. You also still have the option to click the brackets to select maxillary and mandibular teeth.
Note: The Acquire button is not available until you select at least one tooth in the maxillary arch and one tooth in the mandibular arch.
Schick 33/Xios XG Acquisition Enhancement
Prior to this release, two image filters were applied to images that were acquired with the Schick 33/Xios XG digital sensor device. The Schick 33/Xios XG digital sensor would apply an image filter in addition to the default Apply Enhancement filter in Dentrix Ascend, which could cause image resolution issues.
With this release, one image filter will be applied to images that are acquired with the Schick 33/Xios XG digital sensor device. To improve the quality of images acquired with this device, the Apply Enhancement filter will not be available when you select the Schick 33/Xios XG device.
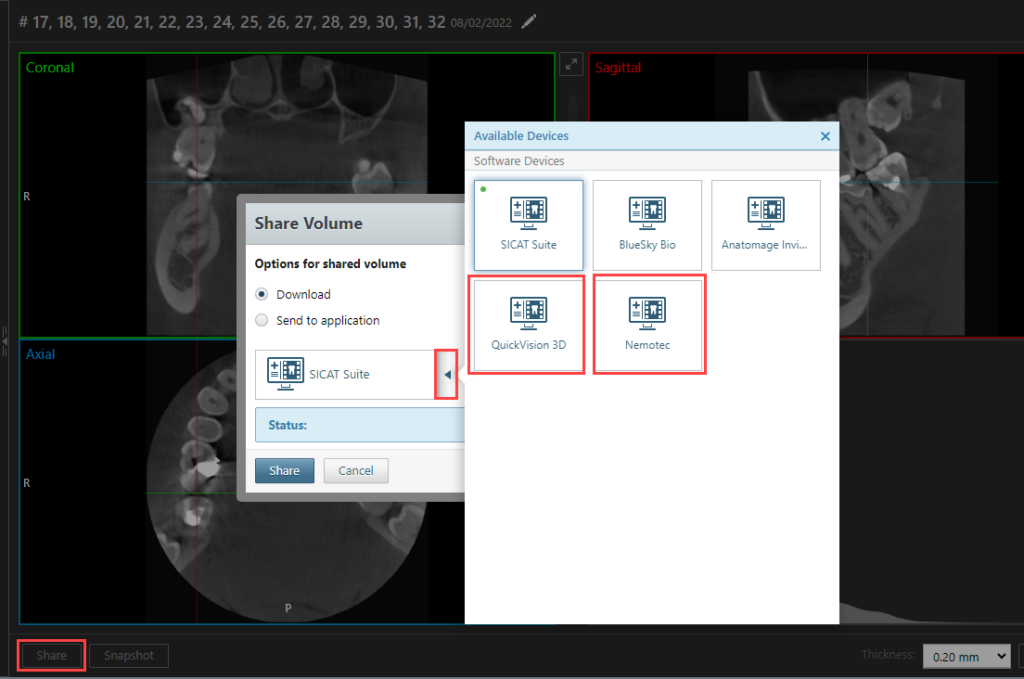
New Share Volume Software Devices
With this release, Owandy QuickVision3D and Nemo Studio Nemotec have been added as software device options for sharing 3D volumes.
When you click Share, on the Available Devices menu, QuickVision 3D and Nemotec are now available as software devices.
New Supported Imaging Acquisition Devices
The imaging module now provides direct integration with the following devices:
- SoPro Camera – macOS Catalina Support
- When you install SoPro Imaging 1.13 for Mac, you can capture images from the SoPro Camera using a new application called: MAV2M (which replaces SoPro Capture).
- The MAV2M application launches automatically after you click Start Acquisition.
December 12, 2023
Electronic Remittance Advice (ERA) Enhancements
An ERA (Electronic Remittance Advice) is an electronic transaction that provides insurance carrier claim payment information. Prior to this release, you could review the claim and click Enter Claim Payment to open each patient’s ledger and post the payment, or you could make use of the quick-post options. This next phase of the feature adds automation as an option for posting payments based on your insurance carrier notifications.
Note: Electronic Remittance Advice is included with your Dentrix Ascend subscription. To configure ERA payment options your user role must include the Manage ERA Payment Options right.
Automated Posting
An automated ERA reconciliation experience reduces time needed to process insurance remittance information by removing manual intervention. When Dentrix Ascend receives an ERA, it will evaluate the remittance amount; and if the confidence level is high enough (which you control), the payments will automatically post to the patient’s ledgers. Automation avoids the inevitable pitfalls of manual data entry. Of course, only clean ERAs will post automatically; you will still need to stay on top of ERAs needing further attention.
To enable and configure automated ERA payment posting, click Manage ERA Payment Options in the upper right of the ERA Payments page.
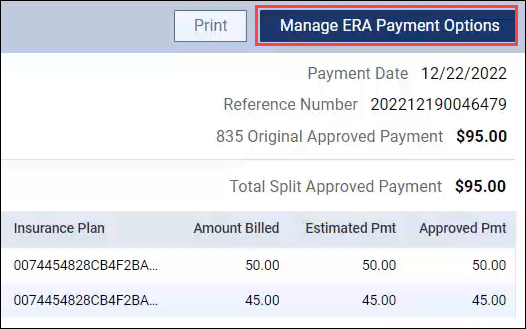
The ERA Payment Options window gives you the opportunity to specify that only those payments which meet the criteria will post automatically.
To enable the feature, toggle the “Enable fully automated posting of ERA payments…” switch to On and then enter a value in the percentage field. In this example, the payment from the carrier (approved payment amount) must be within 98% of the estimated payment.
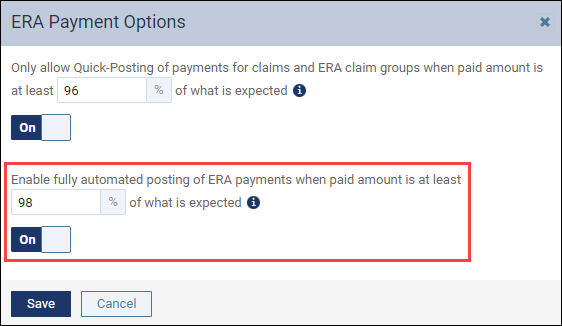
When the option is turned on and a payment does not meet the expectation, that claim payment will have to be handled via quick-post or manually. To learn how to do this, read Manually posting a payment for a claim on an ERA.
A future enhancement to this feature will include notifications when new ERAs have been received and either been processed or need attention. These notifications will be located in the Inbox.
December 8, 2023
This release introduces a text message update, another update to logout and login behavior, CDT Updates for 2024, and changes to the Settings menu and the Custom Pick Lists page. This release also includes a new Billing Type setting for a billing feature that is under development and a new location-specific switcher for default provider selection logic.
Patient Communications
Text Message Update
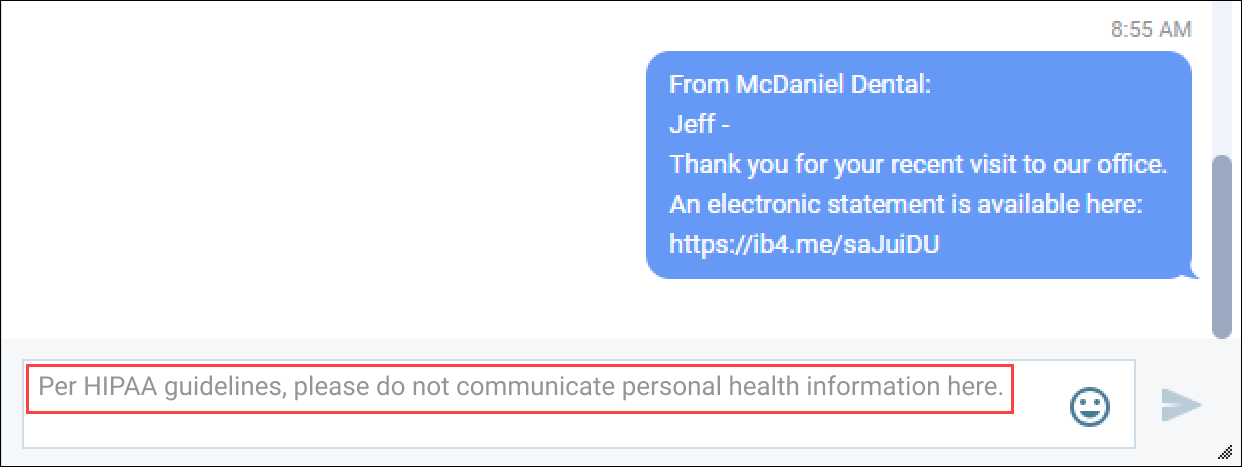
This release introduces a two-way text message warning placeholder so that staff members read the HIPAA warning before sending a text message.
The warning placeholder message is: “Per HIPAA guidelines, please do not communicate personal health information here.”
Note: The warning placeholder message appears in the following areas of Dentrix Ascend that you can access text messaging from:
- Inbox
- Routing panel (blue text messages hyperlink)
- Calendar- patient appointment panel (blue text messages hyperlink)
- Patient Ribbon (Message icon)
- Patient Connection page (accessed from the Home menu)
Usability
Return to Page After Logout Update
This update introduces an additional update to logout and login behavior. With the last release, if you are on a patient-specific page when you manually log out of Dentrix Ascend and then log back in within two hours of logging out using the same device and browser, you will return to that same page. After the two-hour window, logging in will return you to the Schedule.
With this release, if you are on a non-patient-specific page when you manually log out of Dentrix Ascend and then log back in using the same device and browser, you will return to that same page. (The two-hour limitation only applies to patient-specific pages.)
CDT Update 2024
Procedure Code Updates
The American Dental Association (ADA) is authorized as the national standard keeper of the codes that define all dental procedures. Your office uses these codes every day for proper record keeping and communication with insurance carriers, laboratories, and more.
Henry Schein One maintains a licensing agreement with the ADA that allows us to bring those changes to your practice management system as a software update. We are happy to provide this service to you as part of your active customer service plan so that your office can transition to using these resources in the new year without interruption to your work.
To learn more about the changes to the ADA codes, visit the ADA website.
Fee Schedule Impact
We recommend that you update your fee schedules to account for the upcoming procedure code changes.
This update will insert the new procedure codes into your existing fee schedules and update your fee schedule templates. The charge for all new codes is $0.00, so you will want to visit your fee schedules and update them after researching what you would like to charge for those procedures (if applicable for your office). If you have been importing fee schedules from a spreadsheet, you will want to update your spreadsheet template as well.
Patient Information
Settings Menu and Custom Pick Lists Page Updates
This release introduces a change to the Settings menu and the Custom Pick Lists page. The Custom Pick list page is now called the Patient Settings page. Prior to this release, the Custom Pick Lists option was under Location on the Settings menu.
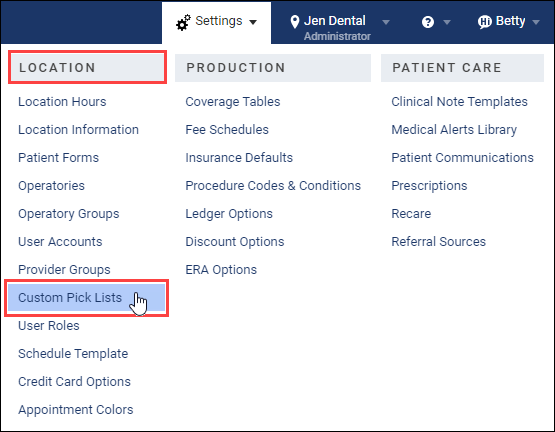
With this release, the Custom Pick List option has been renamed to Patient Settings and is now located under Patient Care on the Settings menu.
New Billing Types Setting
The Patient Settings page includes Race and Ethnicity just like the Custom Pick Lists page did, but it also includes a new Billing Type setting. This is a feature that is currently under development; with this release you can define your billing types and start assigning them to patients. There is nothing else to do at this time.
Assigning billing types is a great way to categorize patient accounts, and eventually you will be able to apply them to reports as well as generating billing statements.
Dentrix Ascend will have several billing types prebuilt, with one labeled “Standard Billing” which is selected as the default billing type. As part of this update, all of your existing patients will be already assigned to the Standard Billing type, which keeps things functioning normally until you make changes.

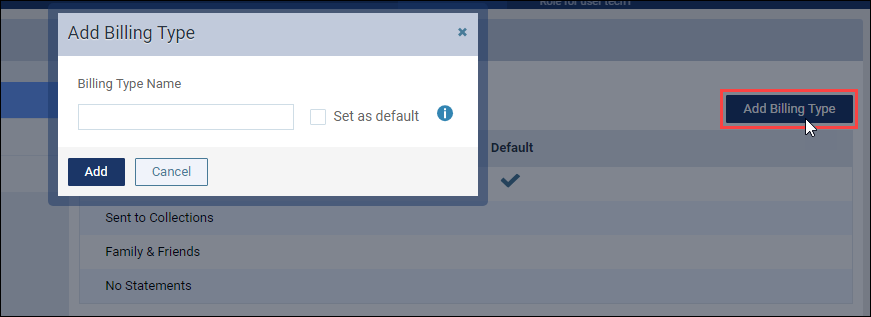
To add a new billing type, click Add Billing Type (your user role must have the Manage Patient Settings right). The Add Billing Type window opens where you can add a Billing Type name and choose to set the new billing type as the default billing when you select the Set as default checkbox.
Note: When you select the Set as default checkbox, it will set the new billing type as the default for new patients only. It will not change the billing type for patients that are already set.
When you are done, Click Add.
Assigning Billing Types
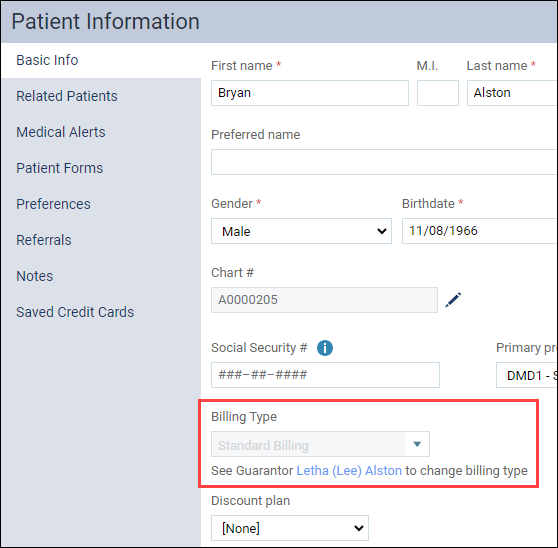
Billing types are assigned by guarantor, and all patients in a guarantor account are required to share the same billing type. To assign a different billing type to a guarantor, open their Patient Information Basic Info tab. Billing Type is a drop-down selection. The dropdown is disabled for patients but includes a link to the guarantor.
Patient
Guarantor

The ability to generate billing statements and filter reports by billing type will appear in future updates.
Clinical
Location-Specific Switcher for Default Provider Selection Logic
In the back office you want to post procedures, conditions, clinical notes, etc., to patients using a consistent default provider based on the habits and practices defined by our office, which may be different from other offices.
The logic that was introduced in a recent release interrupted the flow of customers who relied on the alphabetical sorting of provider IDs. To mitigate this effect, Dentrix Ascend has implemented a new location-specific switch that will allow you to optionally use or not use the new logic. It is located on the Settings > Location Information page.

For each location, select one of the following options:
Patient’s Primary (if any) → Appointment Provider (if any) → Alphabetical
The method for selecting the default provider for a procedure, condition, clinical note, etc. is:
- If the patient has a Primary Provider specified in the Basic Info tab of Patient Information, that provider is selected as the default provider.
- If the patient has no Primary Provider specified, but the patient has an appointment today, the appointment provider is selected as the default provider.
- If the patient has no Primary Provider and has no appointment today, the provider shown first in the list alphabetically is selected.
Patient’s Primary (if any) → Alphabetical
The method for selecting the default provider is:
- If the patient has a Primary Provider specified in the Basic Info tab of Patient Information, that provider is selected as the default provider.
- If the patient has no Primary Provider, the provider shown first in the list alphabetically is selected.
In all cases, you will be able to change from the default provider selection by using the provider pick list when posting procedures, conditions, clinical notes, perio exams, image exams, Quick Exam, etc.
December 6, 2023
This release introduces the new Dentrix Ascend Pay Recurring Payments feature to help you implement a successful recurring payment program.
Revenue Cycle Management
Dentrix Ascend Pay Recurring Payments
Saving cards on file and implementing plans for recurring payments can offer several benefits to a dental practice. The billing coordinator will enjoy saving time on billing and administrative tasks. Patients also will enjoy the convenience, which can contribute to a positive experience and strengthened loyalty. Practice owners will appreciate reducing missed or late payments and improving cash flow due to collection efficiencies.
If your practice extends credit to patients through an in-house payment plan, Dentrix Ascend Pay can help you implement a successful recurring payment program.
Note: Dentrix Ascend Pay is included with your subscription. You must, however, separately obtain a merchant service account with our partner, WorldPay, to process credit card payments. To get started, visit the Dentrix Ascend Pay Getting Started Guide.
Adding a Saved Card to a Payment Plan
To add a saved card to a payment plan, the card must saved on file as part of the payment process. To see how this works, watch Adding a Saved Card.
Once a guarantor has a saved card, either open an existing payment plan, or create a new one. Dentrix Ascend automatically detects when a guarantor has a saved card, and a new Select card to use for this plan dropdown appears in the Review Payment Plan window.
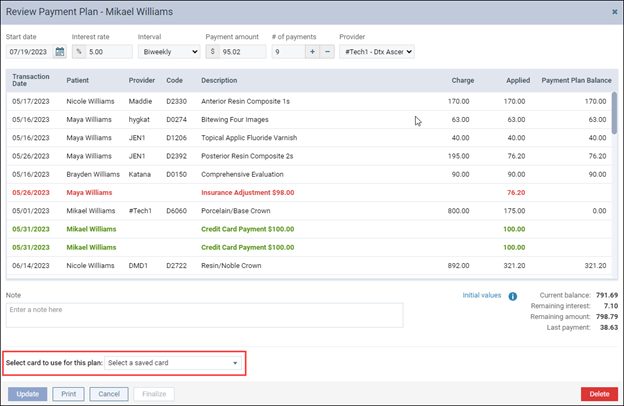
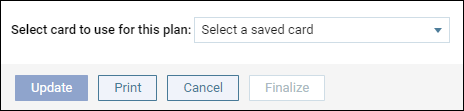
Open the dropdown menu and select a card for this payment plan. Then, select the Guarantor has signed printed authorization with a copy being put on file checkbox.
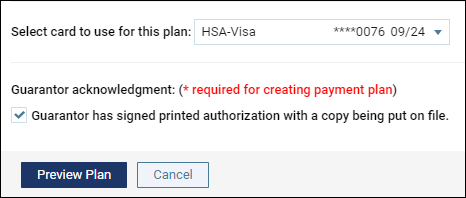
Click Preview Plan to open the agreement. Print the agreement for the guarantor to sign and date.
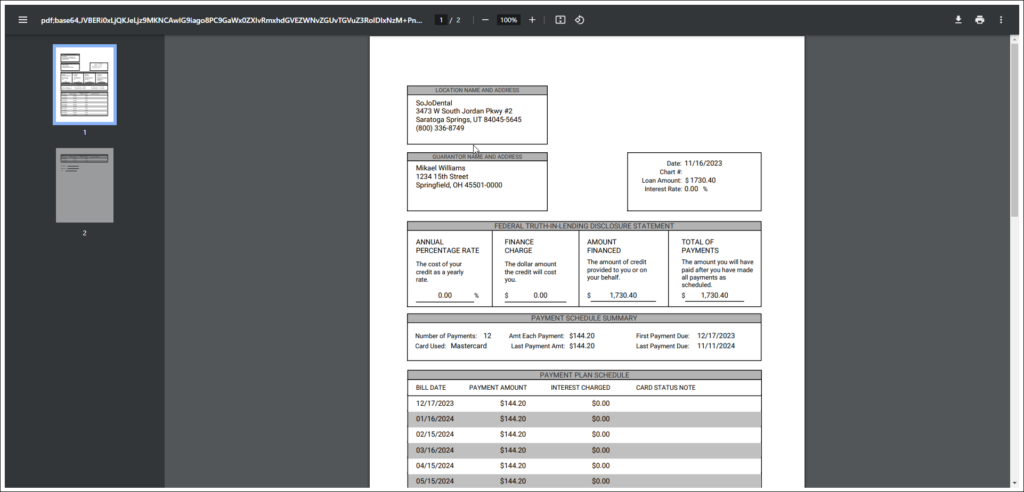
Afterward, the agreement can be scanned and added to the guarantor’s Document Manager.
Click Create or Update to save the payment plan with an associated card.
Processing Recurring Payments
In Dentrix Ascend payment plans include a payment frequency setting where payments can be processed on a bi-weekly, monthly, or quarterly basis according to the patient agreement. When a payment comes due, it is ready to be processed. A pending payment is referred to as “unprocessed” until the payment posts. There are two ways to see unprocessed payments: the new Payment Plan Report page and the Unprocessed Recurring Payments widget, which is a shortcut to get to the Payment Plan Report page.
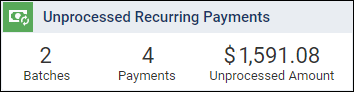
Unprocessed Recurring Payments widget
The Home Overview page now includes a widget named Unprocessed Recurring Payments when you have signed up for Dentrix Ascend Pay. The widget includes:
- The number of batches (pending payments that share a due date)
- The number of payments
- The Unprocessed Amount
You will want to make a habit of checking here regularly. Any non-zero value means it is time to process recurring payments.
Click the widget to open the Payment Processing tab of the Payment Plan Report.
Payment Plan Report
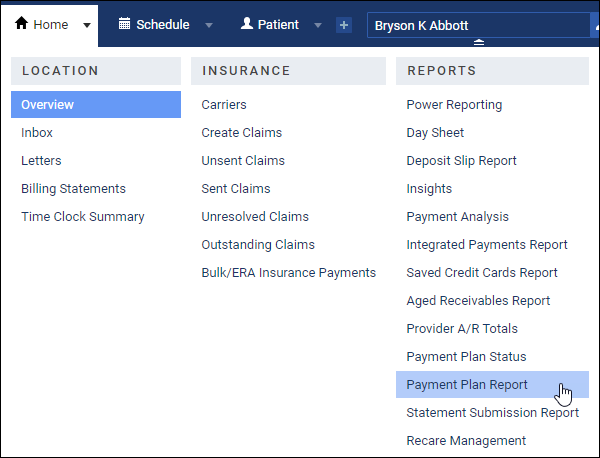
This update introduces a new page, the Payment Plan Report. To open the page, open the Home menu and click Payment Plan Report.
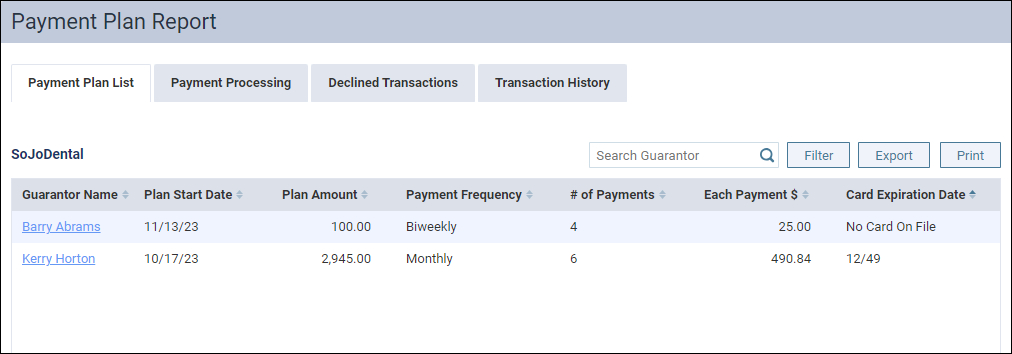
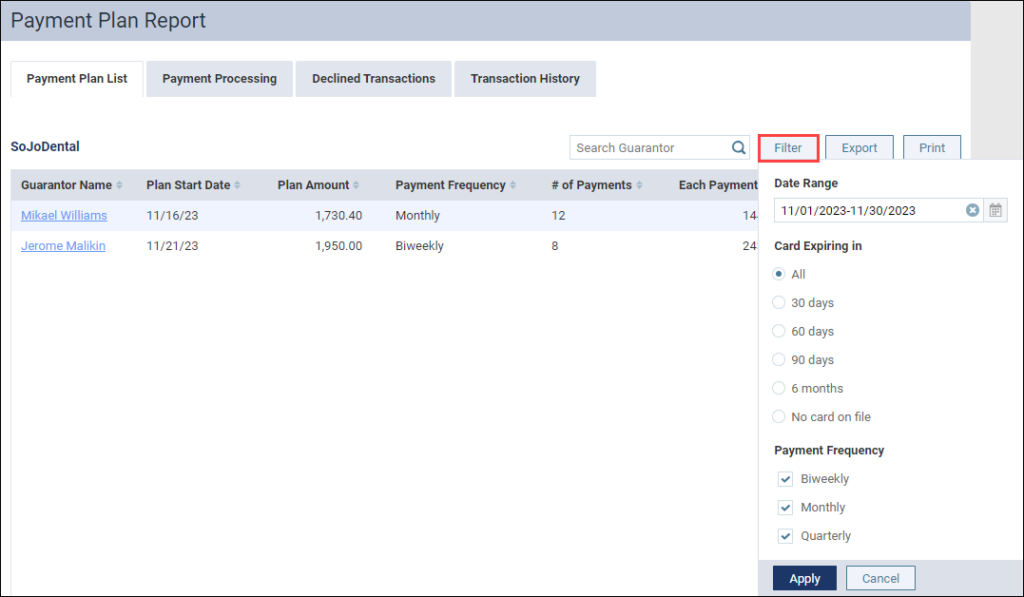
On this page, the Payment Plan List tab is selected by default. This tab is informational and shows all the currently active plans. Note that the list only includes guarantors, not patients. The tab lists all the payment plans created in this location, including plans that don’t have a card on file. On this tab you can search for a guarantor, filter the list, export, and print. When you click the guarantor name link, it opens the guarantor’s ledger.
To process payments, select the Payment Processing tab.
IMPORTANT: The Payment Processing tab only lists payment plans that have a saved card.
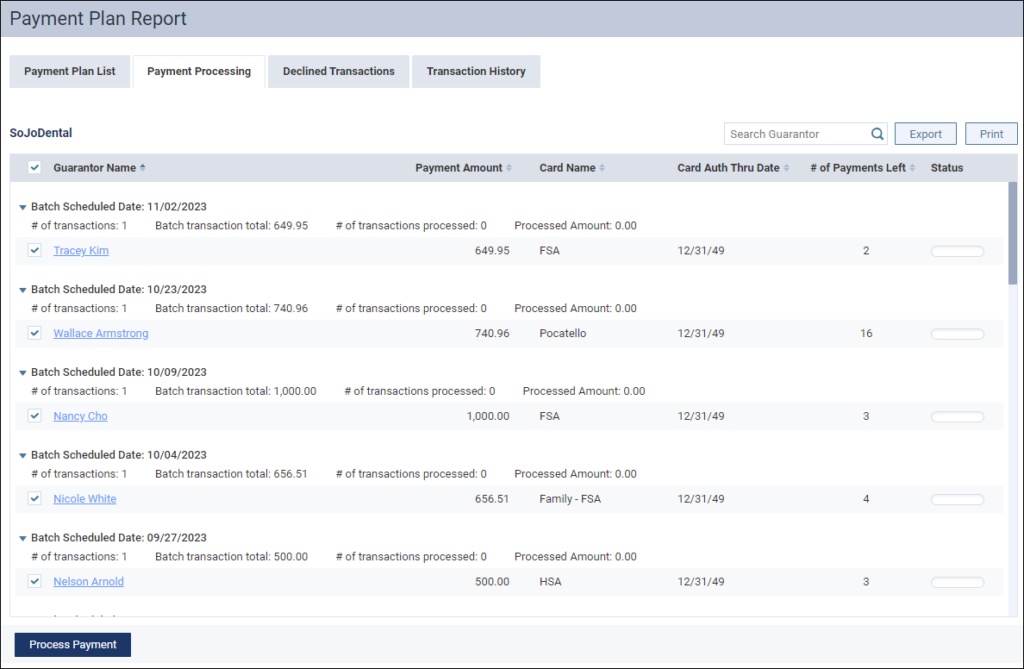
IMPORTANT: The first person to open the Payment Processing tab locks it, meaning only one person can process payments at a time. There is a timer on the first person; the lock comes off when the first user is inactive on the page for more than 15 minutes. A second person could then take over and relock the tab.
By default, all the payments due for processing are selected. The guarantors are grouped into “batches” according to their due date. After reviewing the list and deselecting any guarantors that you don’t want to process now, click Process Payment. All the included cards get submitted for payment. You can view the progress in the Status column. Payments are automatically posted to the guarantor ledger as they process.
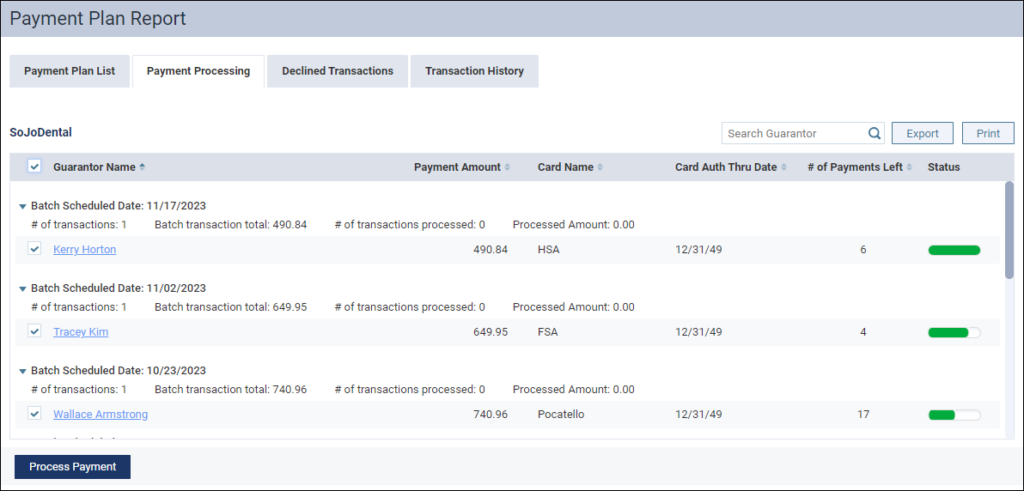
You can export or print the information on this tab, either before or after processing payments. Note that once a payment has been processed, if you navigate away from the page or refresh your screen, that guarantor will no longer appear on this tab (until the next time they are due).
If any payments are declined or fail to process, they appear on the Declined Transactions tab.
It may be particularly useful to have a report for a working reference, because you will need to address declined transactions individually. The specific method will depend on whether the problem is an expired card, an insufficient balance, or simply a processing failure on the first attempt.
Once you have obtained payment, return to the Declined Transactions tab and select the checkbox next to the transaction you have successfully processed (in the Mark as Fixed column). Like the other tabs in this report, you can export or print the current information; once you navigate away or refresh the page, the fixed transactions no longer appear.
The Transaction History tab contains your history of all recurring payment transactions, including any declined payments.
By default, the report shows the last 30 days of activity, but you can adjust that by using the filter, which includes not only the date range but also the payment status.

In addition to exporting and printing this report, you can also use this tab to print a patient receipt on demand. Once you have located the guarantor and their payment, click the Receipt link to open a PDF receipt of the credit card payment. You can print (or save and email) the receipt.
Like all credit card transactions, you can void or refund recurring payments in the guarantor’s ledger.
Last Payment Update
Note: The final (or last payment) balance due on the plan will automatically update for a recurring payment if there have been any payments in the ledger outside of the payment plan. This prevents guarantors from overpaying.
This release of the recurring payments functionality for Dentrix Ascend Pay is just the first. Later enhancements to this feature will include more automation and the ability to save a card without having to make a payment first.
New Learning Content
Videos
Charting conditions is a task that every dental professional performs during a patient examination. Dentrix Ascend makes it easy for you to quickly document conditions in the patient’s chart. Watch this video to see the new watch note and class 5 switch enhancements introduced in an earlier release.
Saving a patient’s card on file can have benefits both to your practice and to your patients. For your practice, it can streamline the payment process and reduce the risk of non-payment or delinquent accounts. Watch this updated video to learn more about recurring payments using Dentrix Ascend Pay.
Blog Posts
Accessing Detect AI Images from Within the Chart
Did you know that you don’t have to open the Imaging tab to access a Detect AI image when you are in the patient’s chart? With a couple of clicks, you can quickly access an image with Detect AI indications from within the chart. Read this blog tip to find out how.
10 Most Popular Dentrix Ascend Blog Posts for 2023
As we wrap up 2023 and look ahead to all the things to come in 2024, now is the perfect time to catch up on the most popular Dentrix Ascend blog posts that were published in 2023. To save you time, we’ve rounded up the best of the best for your review. Check them out.