Release 396 introduces the insurance credit card payment method to Dentrix Ascend. A new power report allows you to see aged receivables for multiple locations in one place. There are several enhancements to the Imaging module.
Insurance
Insurance Credit Card Payment Method
Dentrix Ascend now allows you to enter insurance payments by credit card and to distinguish this type of payment from other insurance payment types. In your workflows, an insurance credit card payment will be just another payment type. If you have implemented additional steps to track this type of payment, you will no longer need to do so.
In this first phase of the feature, there is no integration with third parties to process the credit card payment. Until we implement that portion of this feature, follow the workflow established between your practice and your merchant account to get the money into your bank account.
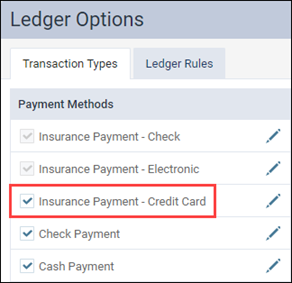
Enabling the Payment Type
Before you can select Insurance Payment – Credit Card as the payment method, you must first enable that payment type on the Ledger Options page. A user with the Manage ledger options right can open the Settings menu and select Ledger Options. Under Transaction Types, select the check box next to Insurance Payment – Credit Card.
Ledger Payments
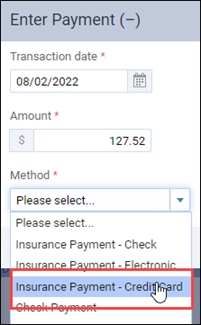
Once the payment type is active, you may select it as a payment method and optionally enter a value in the new Transaction ID field. The Transaction ID can be helpful in distinguishing between multiple payments of the same type during the same day.
Payments of this type are clearly labelled on the Ledger page just like other payment types.

Bulk Insurance Payments
The same payment method behavior is true of the Bulk Insurance Payment utility.

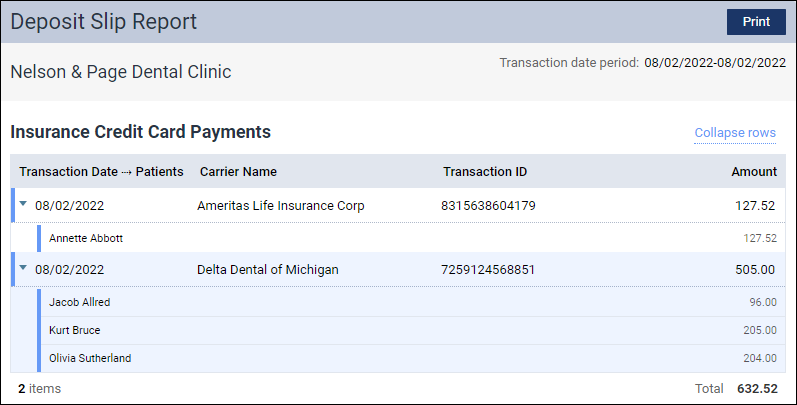
Payment Method in Reports
The following reports now reflect insurance credit card payments:
- Payment Analysis
- Day Sheet
- Deposit Slip
- Aged Receivables
- Provider A/R Totals
- Walkout Statement and Billing Statements (activity detail)
Reporting
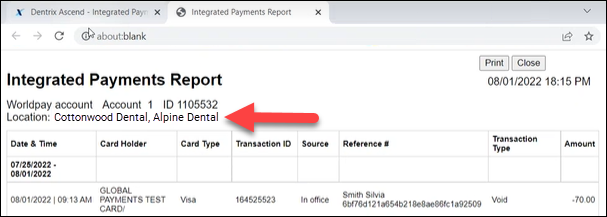
New Location Filter in the Integrated Payments Report
When you access the Integrated Payments Report from the Home menu, you first select which Worldpay account you would like to view transactions for. New with this release is the ability to add a secondary filter to sort the report by location.
When you expand the Location filter, you are now able to select which locations you would like to see. You can select a specific location, multiple locations, or all locations. Once you select the locations you would like to see, click Apply Selected, or simply click anywhere on the page to load the report with the new filter.

Please note that you will only see locations that you have access to. If you do not have access to all locations in your organization, you will see an information icon informing you that some locations are hidden from the Location list.
The printed version of the report has also been enhanced to list the Locations included at the top of the report.
New Date Range Option for Provider A/R Totals Report
As a matter of convenience, the Provider A/R Totals report now includes Yesterday as a predefined date range choice.

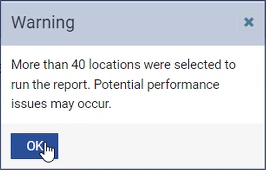
Alert for Aged Receivables Report
If your user account has access to 40 or more locations, when you go into the Aged Receivables report, you will now find that the Include Summary option is disabled. You will also see a warning if you run a report for more than 40 locations. It is just a warning; the report will run once you acknowledge the warning.
Power Reporting
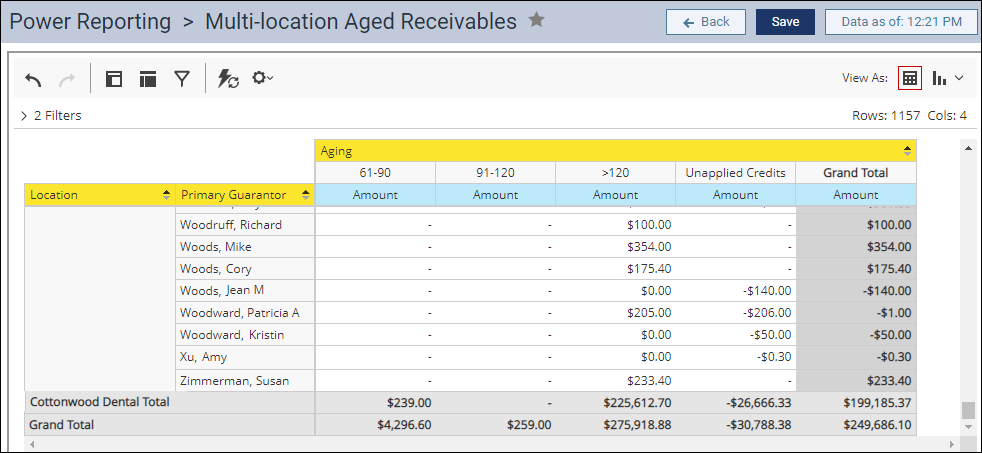
Multi-Location Aged Receivables Report
With this release, you can now see aged receivables data for multiple locations with the new Multi-Location Aged Receivables report. This report allows you to see outstanding credits or receivables by guarantor. The report shows subtotals for each location and a grand total for all included locations.
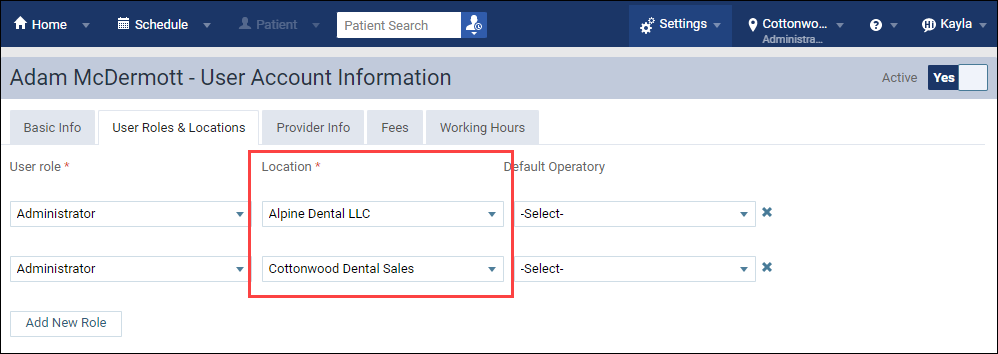
Please note that you will only be able to see aged receivables information for locations that you have access to. You can verify which locations you have access to by clicking the Settings menu and selecting User Accounts. Then, verify the location on the User Roles & Locations tab.
Date Field Naming Improvements
As part of the effort to bring more clarity to field naming conventions, the following changes were introduced to fields whose names were simply “Date”:
- The Analysis Patient Report Builder Date of Birth Date field is now Date (DOB)
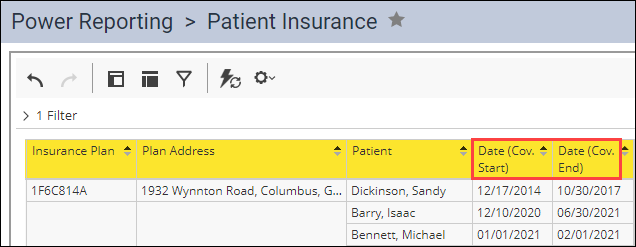
- The Patient Insurance Coverage Start Date field is now Date (Cov. Start)
- The Patient Insurance Coverage End Date field is now Date (Cov. End)
Imaging
Freehand Drawing Annotation
Included in this release is the new Freehand Drawing tool in the Imaging module. This feature is available on the Tools tab as another type of annotation. The free hand drawing tool gives dentists the ability to draw on images in the image viewer so they can quickly notate a finding.

Note: The original image is saved and is not altered when an annotation is added.
To begin using the freehand annotation tool, click the Annotations category from the Tools tab, and select the freehand drawing option. Click and drag on the image where you want to draw. When you release the left mouse button, the drawing operation stops.
Freehand drawing shares the same functionality as the other annotation tools, such as colors, outline width, and the ability to undo and clear all. Freehand annotations also use the same workflow for all other annotation actions, such as exporting images.
Snapshot Enhancements
There are multiple enhancements to the Snapshot feature with this release.
The choice to Acquire a volume snapshot only has been added under the Acquisition type to allow you to capture a snapshot of a 3D volume procedure so that you can attach it to an insurance claim. This feature will only appear when you update the acquisition agent and if the device supports it.
When you select the Acquire a volume snapshot only check box, it is important to understand that you will only acquire a volume snapshot instead of getting the full 3D CBCT volume acquisition. To acquire the full volume, clear this check box; you can capture a 2D snapshot of the volume later.
Note: By default, the Acquire a volume snapshot only check box is selected. Also, Dentrix Ascend remembers the state of this check box for future 3D volume images.

With this release, other Snapshot enhancements are included to supply more feedback during the snapshot process:
- Added a spinning indicator and green check/error icon to header when taking the snapshot.
- Added a “Snapshot Upload Succeeded” message to the header with a Dismiss option. This message automatically disappears after a few seconds.
- Added a red error dialog box with a message, “The snapshot upload failed. Please check your internet connection.” when an upload fails.
New 3D Software Bridge
In this release, Dentrix Ascend has added the Vatech Ez 3D-i software bridge as a choice for acquiring 3D images when you select 3D volume under Imaging Procedures.
User Rights
No new user rights were introduced in this update.
New Learning Content
The Education Team continuously adds to and updates content in the Dentrix Ascend Resource Center. Below are the latest videos. Click the title to get more information about these topics.
Essentials Videos
Dentrix Ascend provides an online portal where patients can complete questionnaires and consent forms. You decide which forms are sent to your patients. When a patient completes a form, Dentrix Ascend automatically saves it to the patient’s Document Manager.
Office events should be scheduled just like you schedule appointments. Dentrix Ascend allows you to schedule an event as easily as you would an appointment. Find out how to block out intervals of time in your Calendar for staff meetings, vacation schedules, operatory repairs, and more.
Patients give us so much information about their schedules and preferences. Wouldn’t it be nice to note that this patient prefers Monday and Wednesday mornings and would like a text message? Dentrix Ascend allows you to record these patient preferences and more.