
Released 8/12/26
Dentrix Ascend provides a powerful drag-and-drop editor for creating email campaigns, but you can encounter several challenges:
- Every email campaign begins with a blank design.
- Creating professional-looking emails can be time-consuming.
- Users without marketing or design experience may struggle with layout and formatting decisions.
- Multi-location organizations often recreate similar campaign designs across locations.
- New users can experience friction when first adopting campaigns due to the effort required to create an initial email campaign.
To address these challenges for creating an email campaign, instead of beginning with a blank email, you can now browse professionally designed email templates, select a design that aligns with your outreach objective, and immediately begin customizing the content to suit your needs. Templates serve as starting points only—you retain full flexibility to modify layouts, images, text, colors, links, and other email components using the existing drag-and-drop editor.
Key benefits:
- Faster campaign creation – Users no longer need to build every campaign from scratch, allowing them to launch campaigns in less time.
- Easier user adoption – Templates provide guidance for users who may be unfamiliar with email design or marketing best practices.
- Improved communication quality – Professionally designed templates help you create visually appealing email messages that maintain a polished appearance.
- Greater consistency – Practices and multi-location organizations can leverage consistent layouts and communication styles across campaigns.
- Increased campaign usage – Reducing effort and complexity lowers barriers to email campaign adoption and utilization.
Note: The Campaigns feature is available only with a Dentrix Ascend Pro or Accelerate subscription. It is not available with an Essentials subscription.
To create an email campaign using a template
1. On the Settings menu, under Patient Care, click (or tap) Patient Communications.
The Patient Communications page opens.
Note: As in previous versions, accessing this page requires the “Review Communications setup” security right (in the “Settings” category).
2. Select the Campaigns tab.
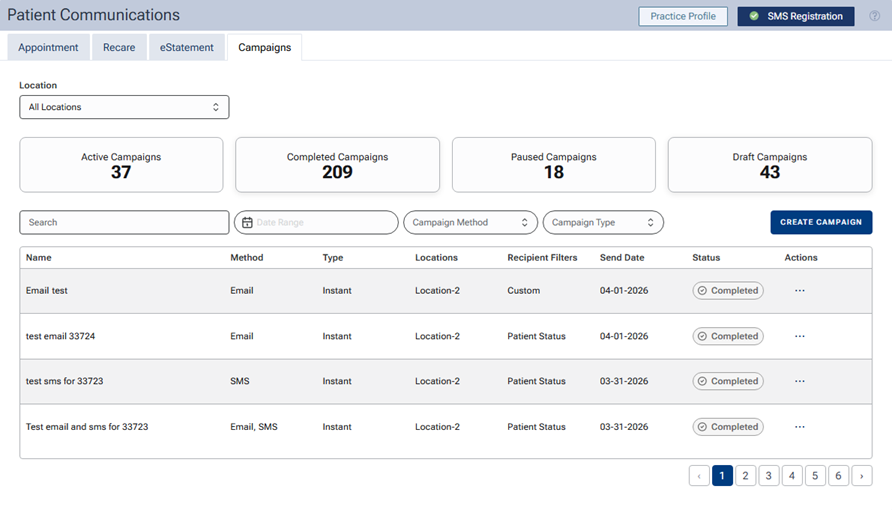
3. Click Create Campaign.
The Start Your Campaign options appear.
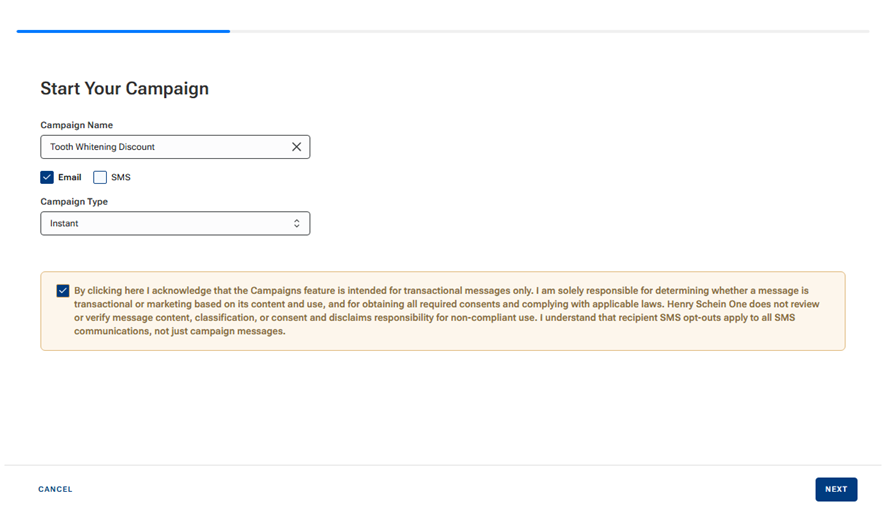
4. Set up the following options:
- Campaign Name – Enter a name to identify the campaign in the list.
- Email – To have the message be delivered by email, select this checkbox.
- Campaign Type – Select Instant or Scheduled to have messages delivered immediately after you complete the creation of the campaign or to have messages delivered on a specific date and time.
- By clicking here I acknowledge… – Select this checkbox to acknowledge the disclaimer.
5. Click Next.
The Compose Email Campaign options appear.
6. Browse for and select a template.
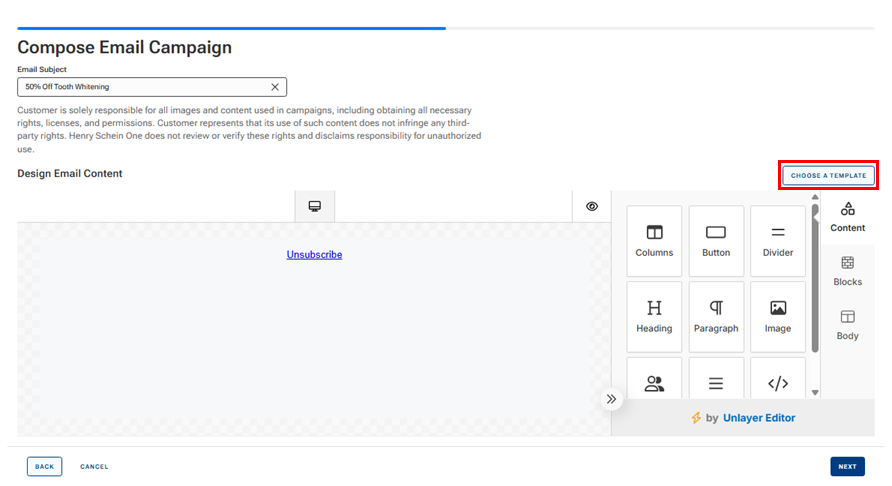
a. Click CHOOSE A TEMPLATE.
The Select Template dialog box appears.
b. Select a template. Several template options are presented, so you can select the layout that best aligns with your campaign objective.
c. Click APPLY.
After you choose a template, the selected design is loaded into the editor. The template serves as the campaign foundation and includes pre-configured layouts, content sections, imagery placeholders, and design structure.
7. Customize the content as needed. You can modify the following:
- Text content
- Images
- Colors
- Buttons
- Links
- Branding elements
- Layout components
8. Click Next.
9. Set up the Select Locations and Recipients options, and then click Next.
The Review Campaign Summary appears.
10. Click Submit.