
EARLY ACCESS ONLY
In a patient’s document manager, when you scan multiple documents, you can now choose to combine them into one PDF document.
To scan a multiple-page document
1. If the correct patient is not already selected, use the Patient Search box to access the patient’s record.

2. On the Patient menu, under General, select Document Manager.
The patient’s Document Manager page opens.
3. Click Scan.

The Select a Scanner dialog box appears.
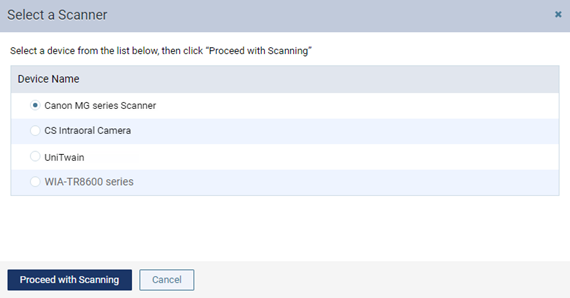
4. Select a device in the Device Name list.
5. Click Proceed with Scanning.
The third-party application for the selected device opens.
6. Scan documents, and then close the third-party application.
The scanned documents appear in the Scan Files dialog box.
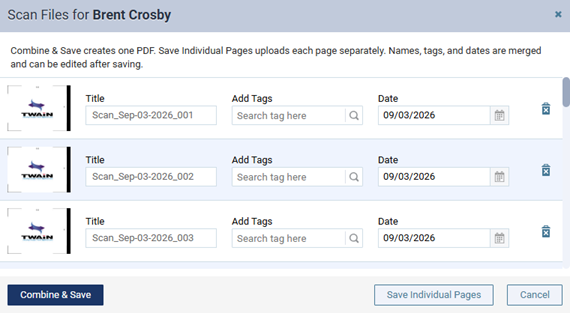
Note: You cannot import any of the scanned documents into the document manager if more than 20 documents were scanned. You must delete some scanned documents (by clicking the corresponding trash can icons) until there are no more than 20 documents, and then you can proceed.
7. Do one of the following:
- If the scanned documents can be combined into one document (a .pdf file), click Combine & Save.
- If you do not want to combine the scanned documents, to save the scanned documents as individual images (.jpg files), click Save Individual Pages.
- If the scanned documents cannot be combined because the resulting combined document would exceed the allowed size limit (20MB), do one of the following:
- To save the scanned documents as individual images (.jpg files), click Save Individual Pages.
- To discard all the scanned documents and rescan them at a lower resolution (and/or scan fewer pages), click Rescan (which appears instead of the Combine & Save button). Repeat step 6 to rescan the documents.
- To save the scanned documents as individual images (.jpg files), click Save Individual Pages.
Note: If there is only one scanned document, the Combine & Save button is not available, but you can save the scanned document as an image (.jpg file).