This release introduces the new Detect AI show/hide feature so you can view AI indications separately and/or view indications for an individual tooth. Also, a new Dentrix Ascend Status page is available for checking whether your tier is experiencing slowing issues or is down.
Software Communication
Dentrix Ascend Status Page
As a customer, you need a way to find accurate and up-to-date information about outages and service downgrades, so that you can stay informed about the current status of Dentrix Ascend services without needing to call the Support center.
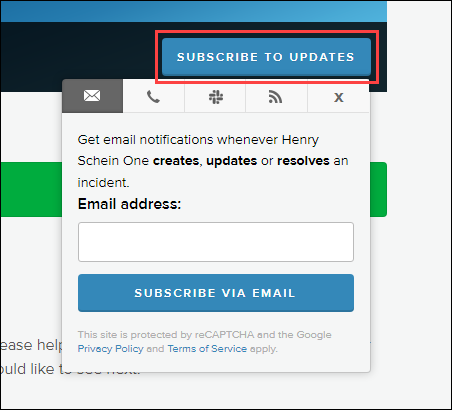
This release introduces a new Status page so you can see the status of Dentrix Ascend in real-time. We want to make Ascend and its offerings the best they can be. If you receive an error message in Dentrix Ascend, click the Ascend Status Page link to view details and stay updated about the status of Dentrix Ascend.


You can either bookmark this link in your browser or click Subscribe to Updates and enter your email address, so you can get email notifications whenever Henry Schein One creates, updates or resolves an incident.
Imaging
Detect AI Show Hide Enhancement
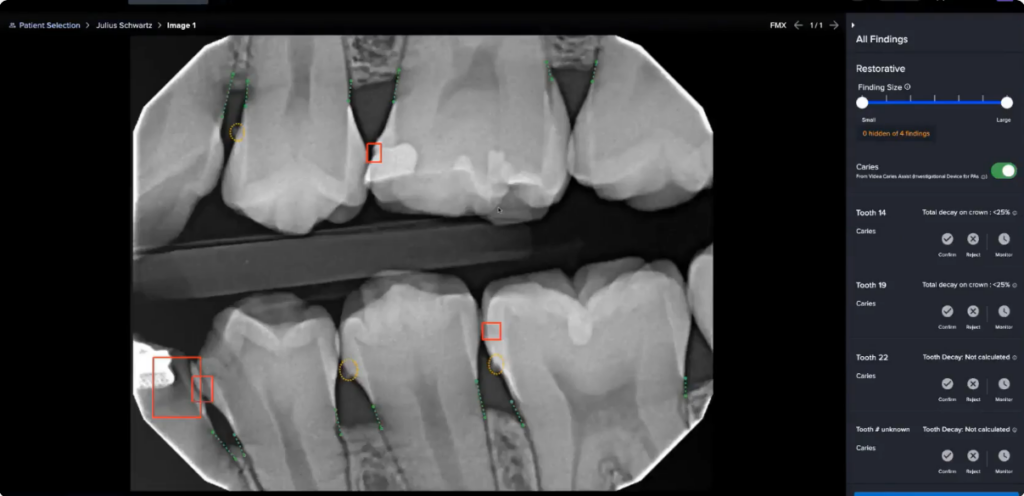
This release introduces the ability to show only caries detections, RBL measurements, or root tips individually. This release also gives you the ability to show or hide indications for all teeth and the ability to show or hide indications for an individual tooth. These enhancements help you focus on the AI indications you want patients to see when you are presenting treatment plans, so you use Detect AI as a patient education tool.
When you click on the image, you will see an updated AI menu. You have the options to:
- Hide all findings/ Hide this finding
- Show all findings/ Show only this finding
- Show Caries
- Show RBLs (Radiographic bone measurements)
- Show Root Tips
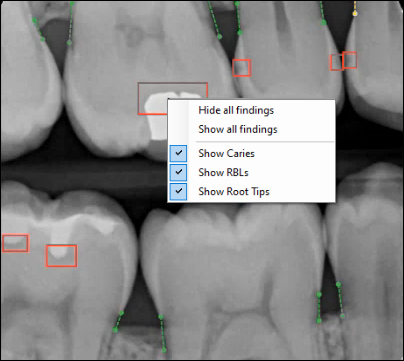
Note: By default, all AI indications are selected.
Show or Hide Specific AI Indications
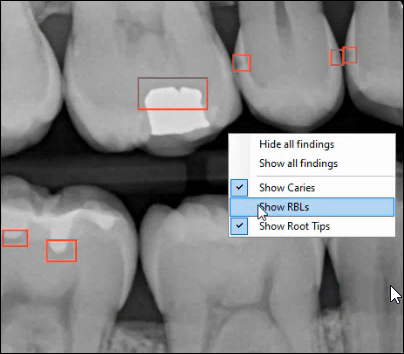
By default, all AI indications show for an image. To hide specific AI indications, click on the image, and deselect Show Caries, Show RBLs, or Show Root Tips.
For example, if you want to see only caries indications and root tips, you can deselect Show RBLs.
Hide or Show Findings
In addition to the ability to show or hide specific AI indications, you also can:
- Hide all or show all findings (indications) for all teeth in the image.
- Hide a finding (indication) or show only a finding for a tooth in the image.
Note: The menu options change slightly depending on whether you click on a finding or anywhere on the image.
Click Anywhere to Hide All or Show All Findings
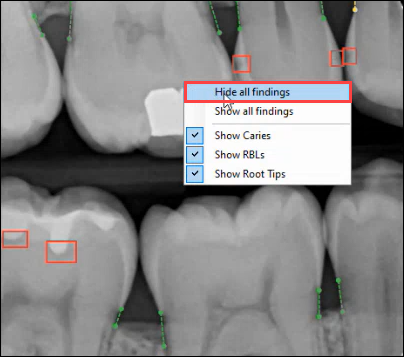
To hide all indications for the image, click anywhere on the image (not on a finding), and select Hide all findings. To show all indications again, click anywhere on the image, and select Show all findings.
Click on a Finding to Hide This Finding or Show Only This Finding
To hide one finding (indication), click on the indication you don’t want to see, and select Hide this finding. This will hide this one indication, and all other indications will still show.

To show only one finding (indication) on this image and hide all the others, click an indication you want to see alone, and select Show only this finding. This will hide all other indications so that you can better focus on this one indication, especially if you are discussing this specific finding with your patient.

If you are not currently enrolled for Detect AI and would like to know more, click here to request a demo.
New VideaHealth AI Link Token
This release introduces a new VideaHealth AI link token to automatically log you into their website when you click the Launch Videa AI link in Dentrix Ascend Imaging. Prior to this release, when you clicked this link, you were required to log into Videa Health’s website manually. This enhancement helps you access the VideaHealth website quickly because you no longer need to enter a username and password.

When you click the Launch Videa AI link from the imaging viewer, it automatically opens the images in Videa Health’s website, so you view the images in greater detail and use some additional tools, such as compare two images to see the historical differences and use the severity slider to filter caries according to size.
Note: Access to Videa Health’s website is included in your Detect AI subscription.
New Mirrored Exam View
This release introduces the new mirrored exam view, also known as Military View.
In the current view, the template images are viewed as if you are looking at the patient’s face, where the images are displayed from the right side to the left side. With mirrored exam view, the template images are viewed as if you are looking at the patient from behind, where the images are displayed from the left side to the right side.
To view images using the new mirrored exam view, you must first create a custom imaging procedure template. To learn how to do this, read Creating custom imaging procedures. After you set up your custom imaging procedure, select the Mirrored Exam checkbox. Then, click Save.


The following imaging devices are now supported in Dentrix Ascend and have been added to the Available Devices menu for acquiring images:
- 3D – Anatomage/TxStudio One-Way Bridge Integration for sharing 3D Volumes:
- Added an Anatomage integration for Sharing Feature (exactly like SICAT and BlueSkyBio).
- When a 3D volume is loaded, the integrations should be available for selection in the Share window.
- When selected, it will bridge to Anatomage and send the 3D Volume.
- VistaScan – Support VisionX Connect:
- VisionX Connect is how users are supposed to acquire images on a Windows 11 PC, so this improvement is intended to support VisionX Connect acquisitions for a VistaScan device.
- DTX Studio Clinic SW Bridge on macOS.
User Rights
No new user rights have been added with this release.
New Learning Content
The Education Team continuously adds new and updated content for Dentrix Ascend. Below are the latest examples. Click the titles to get more information about these topics.
Dentrix Ascend makes the reconciliation processes easier and faster by providing electronic versions of EOB information with new, simpler workflows for approval and payment posting. Before you can start enjoying the advantages of ERAs, you must go through an enrollment and registration process with the clearinghouse and each of your in-network carriers. Watch this video to get an overview of the ERA enrollment process.
Have you wondered what’s the big deal about ERAs? ERAs increase cash flow, reduce time spent on paperwork, and improve data accuracy. Watch this video to understand what the feature is and why your practice should enroll and register for ERAs.
