Released 4/22/26
We are offering a new online book service that integrates with Dentrix Ascend. On a location-by-location basis you can opt in to using the new online booking service.
Key changes:
- An Upgrade to the new Online Scheduler switch has been added to the Schedule Template page (go to Settings > Schedule Template).
- The Book on your website button has been renamed to Online Booking Setup. Clicking this button now opens the Online Booking Setup dialog box.
- With the Upgrade to the new Online Scheduler switch turned On, the Online Booking Setup dialog box displays the options for the new online booking service.
- With the Upgrade to the new Online Scheduler switch turned Off, the Online Booking Setup dialog box displays the options for the legacy online booking experience.
- With the Upgrade to the new Online Scheduler switch turned On, the Online Booking Setup dialog box displays the options for the new online booking service.
- With the Upgrade to the new Online Scheduler switch turned On, a warning icon appears next to the Online Booking Setup button, reminding you to update your website with the new links.
Other Considerations:
- Switching on the new online booking service does not immediately disable the legacy booking links. Patients will still be able to book using a legacy or new booking link to ensure no patient appointments are lost.
- Be sure to communicate with your website manager that they will need to assist you in updating the booking links or widget on your website. More information on that process can be found here: https://scheduler-doc.jarvisanalytics.com/docs/installation/quick-start.
- When you switch to the new online booking service, recare text messages are updated automatically with the new booking links.
Upgrading to the New Online Scheduler (If Using Legacy Service; Per Location)
If your organization did use the legacy online booking service prior to April 22, 2026, your locations are still using the legacy online booking service (the Online Booking switch is still available and turned On). To upgrade to the new online scheduler, you must turn on the Upgrade to the new Online Scheduler switch and perform other configuration steps. Do the following:
1. In Dentrix Ascend, with the correct location selected, expand the Settings menu, and then click Schedule Template to open the Schedule Template page.
2. At the top of the Schedule Template page, set the Upgrade to the new Online Scheduler switch to On.

Notes
- The switch is Off by default. The legacy online booking service continues to be used until you turn the switch On.
- With the new online scheduler enabled, a warning icon appears next to the Online Booking Setup button. The warning icon serves as a reminder that, with the new online scheduler enabled, you must complete the online booking setup by updating the booking links on your website and in your electronic communications.
Enabling Online Scheduling (If Not Using Legacy Service; Per Location)
If your organization did not use the legacy online booking service prior to April 22, 2026, your locations have been switched automatically to the new online scheduler (the Online Booking switch is no longer available). You use the Online Scheduling switch to enable or disable online scheduling and perform other configuration steps. Do the following:
1. In Dentrix Ascend, with the correct location selected, expand the Settings menu, and then click Schedule Template to open the Schedule Template page.
2. At the top of the Schedule Template page, set the Online Scheduling switch to On.

Note: With online scheduling enabled, a warning icon appears next to the Online Booking Setup button. The warning icon serves as a reminder that you must complete the online booking setup by configuring the booking links on your website and in your electronic communications.
Configuring Online Booking Links
To get links for your website and activate Reserve with Google (available only for practices with a Pro or Accelerate subscription to Dentrix Ascend), do the following:
1. On the Schedule Template page, click Online Booking Setup to open the Online Booking Setup dialog box.
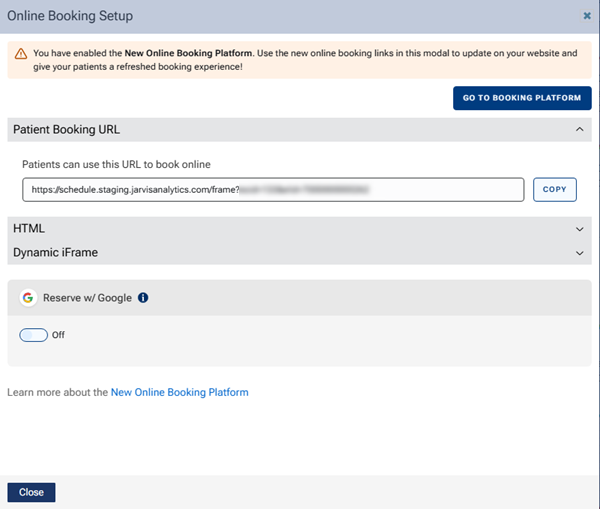
2. Do any of the following:
- Enable Reserve with Google (if available for your practice).
- To add or update the scheduling links on your website, copy the applicable URL or HTML, and provide it to your website manager.
Share the following setup guide with your website manager for more information on how to configure your website: https://scheduler-doc.jarvisanalytics.com/docs/installation/quick-start.