
Released 9/16/26
Previously, you could manage treatment plan consent messages only at the location level. Any additions or changes that were made in one location had to be made manually in other locations individually.
To help reduce the time-consuming and error-prone administrative task of maintaining consistent treatment consent messages across all locations of your organization, you can now copy treatment consent messages from one location to other locations.
Note: This functionality does not remove the ability for an organization to allow for the management of treatment consent messages per individual location (existing functionality).
New security right: Distributing treatment consent messages requires the “Distribute Treatment Consent Messages” security right, which is a new right in the “Settings” category. This new security right is assigned to user roles automatically according to the following criteria:
- For new customers, this security right is selected by default for the “Administrator” user role.
- For existing customers, this security right is selected automatically for any roles that have been granted both of the following security rights: “Manage Location Forms” and “Distribute Clinical Note Templates.” This automatic assignment happens only once—when the feature is enabled for your organization.
Note: To select the “Distribute Treatment Consent Messages” security right for a user role, the “Manage Location Forms” right must be selected.
To distribute a treatment consent message
1. On the Settings menu, select Treatment Plan Settings.
The Treatment Consent Messages page opens.
2. Do one of the following:
- Select Insured/Uninsured Disclaimers.
- Select Consent for Dental Treatment.
- Select a custom treatment consent message.
- Create a custom treatment consent message, and after creating it, leave it selected.
- Edit any of the treatment consent messages, and after editing it, leave it selected.
3. Click Distribute.
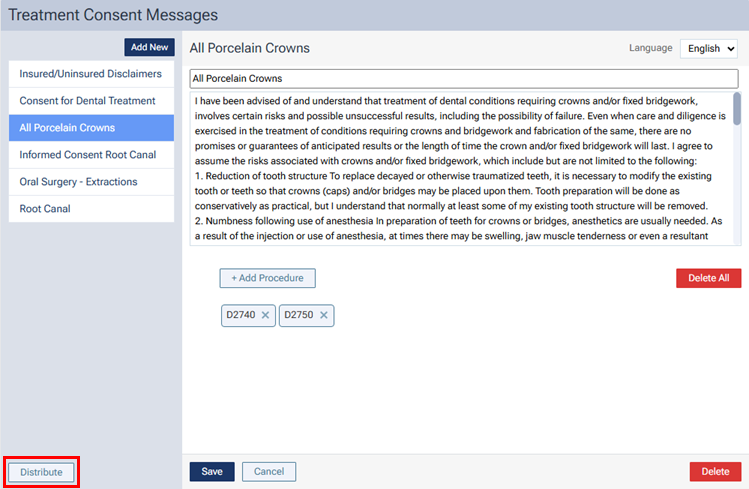
Note: This button is available only if your user role has been granted the “Distribute Treatment Consent Messages” security right.
The Distribute “[Treatment Consent Message Name]” dialog box appears.
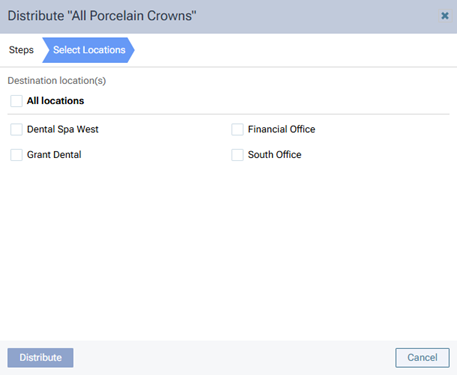
4. For the Select Locations step, either select the All locations checkbox to copy the selected treatment consent message to all listed locations, or select the checkbox of each location that you want to copy the selected treatment consent message to.
Note: For a location to be available for selection, your user account must have been granted access to that location, and your user role for that location must have been granted the “Distribute Treatment Consent Messages” security right.
5. Click Distribute.
6. If an English language version of a treatment consent message with the same name as the one being copied exists in one or more of the selected locations, the Consent Message Conflicts step becomes available.
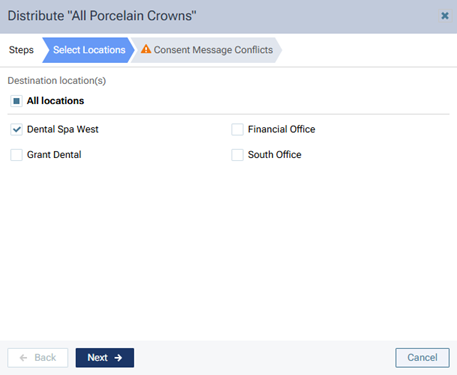
Do the following:
a. Click Next.
The options for the Consent Message Conflicts step appear.
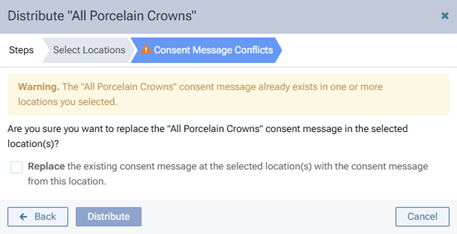
b. Select the Replace checkbox to have the same-named treatment consent message in each of the applicable locations replaced with the one from the current location.
c. Click Distribute.
Notes:
- All aspects of the selected treatment consent message are copied to the selected locations (replacing existing messages where applicable):
- Title (for the English and Spanish versions)
- Content (for the English and Spanish versions)
- Procedures (if any are attached)
- Title (for the English and Spanish versions)
- The distribution of treatment consent messages is recorded in the audit log.