
Released 9/23/26
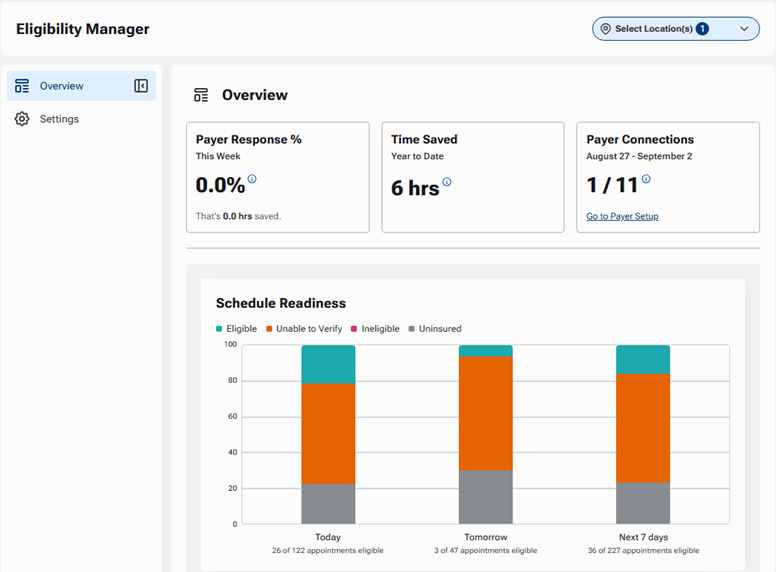
The eligibility manager provides a centralized dashboard within Dentrix Ascend for monitoring insurance eligibility, tracking response rates, identifying connection issues, and evaluating upcoming schedule readiness. This overview shows you what using eligibility features is doing for you and what needs to be done to ensure your patients are eligible for insurance. Also, you can edit only your location’s eligibility settings or edit them for multiple locations at once.
New security right: Accessing the eligibility manager requires the “Review Eligibility” security right. This new security right is assigned to user roles automatically according to the following criteria:
- For new customers, this security right is selected by default for the following user roles: Receptionist, Billing Coordinator, Provider, and Administrator.
- For existing customers, this security right is selected automatically for any role that has been granted the “Review Schedule” security right. This automatic assignment happens only once—when the feature is enabled for your organization.
To view the eligibility manager
On the Home menu, select Eligibility Manager.
The Eligibility Manager page opens. The Overview is displayed by default.
To collapse the navigation panel on the left, click the Collapse navigation button. The width is reduced so only the icons for the navigation options appear.
To expand the navigation panel on the left, click the Expand navigation button. The width is increased so the names and icons for the navigation options appear.
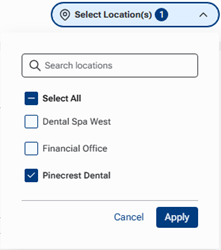
The first time you access the eligibility manager after logging in to Dentrix Ascend, the Overview displays information for the current location only. To include information for additional locations or locations other than the current one, expand the Select Location(s) menu, select the checkbox of each location to include, clear the checkbox of each location to exclude, and then click Apply.
Notes:
- To select or clear all locations at once, use the Select All checkbox.
- The Apply button is available only if at least one location is selected.
- To filter the list of locations, begin typing part of a location name in the Search locations box. The locations with matching text in any part of the name appear. Continue typing as needed to narrow down the results.
- Only the locations to which you have access and in which you have been granted the “Review Eligibility” security right are available.
- The applied location filter is saved until you log out of Dentrix Ascend.
Success metrics (one location only)
Success metrics for the selected location appear according to that location’s eligibility subscription.
Eligibility Pro with connected payers
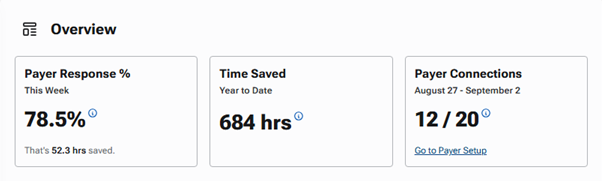
If the selected location has a subscription for Eligibility Pro, and at least one payer connection has been set up, the following Eligibility Pro success metrics appear:
- Payer Response % – This box displays the percentage of requests (Pro and Essentials) that returned a valid response in the past week (today and the previous six days). The box also displays the estimated number of hours that have been saved in the past seven days by using electronic eligibility verifications (20 minutes for each successful Pro reply; 5 minutes for each successful Essentials reply). These metrics help you know how well Eligibility Pro is working and how much staff time is being saved.
Note: Click the “i” icon to see the number of valid Eligibility Pro and Essentials responses and the total number of Eligibility Pro and Essentials requests.
- Time Saved – This box displays the estimated number of hours that have been saved this calendar year (year-to-date; from January 1 of this year to today) by using electronic eligibility verifications (20 minutes for each successful Pro reply; 5 minutes for each successful Essentials reply). This metric helps you estimate how much staff time is being saved.
Note: Click the “i” icon to see the number of hours saved from Eligibility Pro requests and the number of hours saved from Eligibility Essentials requests.
- Payer Connections – This box displays the number of payer connections relative to the number of payers for patients with appointments today and for the next six days. This metric helps you know if any payer connections need attention.
Notes:
– Click the “i” icon to see the number of payers with an active connection and the total number of payers for patients with appointments today and for the next six days.
– To add payer connections, click the Go to Payer Setup link to open the location’s Payer Connection Portal on a new browser tab.
Eligibility Pro without connected payers
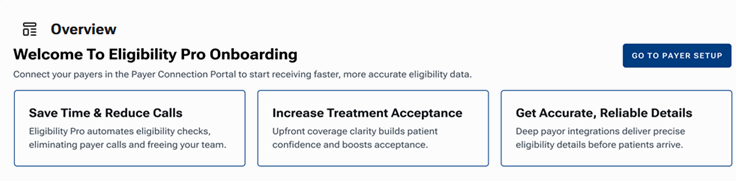
If the selected location has a subscription for Eligibility Pro, and no payer connections are set up, Eligibility Pro onboarding information appears. The Eligibility Pro onboarding boxes explain the benefits of Eligibility Pro and provides a button to take you to the page where you can set up payor connections. To open the location’s Payer Connection Portal on a new browser tab so you can add connections, click (or tap) GO TO PAYER SETUP.
Eligibility Essentials or Eligibility Pro On Demand
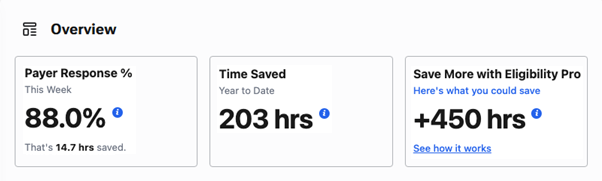
If the selected location has a subscription for Eligibility Essentials or Eligibility Pro On Demand, the following Eligibility Essentials success metrics appear:
- Payer Response % – This box displays the percentage of requests (Pro and Essentials) that returned a valid response in the past week (today and the previous six days). The box also displays the estimated number of hours that have been saved in the past seven days by using electronic eligibility verifications (20 minutes for each successful Pro reply; 5 minutes for each successful Essentials reply). These metrics help you know how well Eligibility Pro is working and how much staff time is being saved.
Note: Click the “i” icon to see the number of valid Eligibility Pro and Essentials responses and the total number of Eligibility Pro and Essentials requests.
- Time Saved – This box displays the estimated number of hours that have been saved this calendar year (year-to-date; from January 1 of this year to today) by using electronic eligibility verifications (20 minutes for each successful Pro reply; 5 minutes for each successful Essentials reply). This metric helps you estimate how much staff time is being saved.
Note: Click the “i” icon to see the number of hours saved from Eligibility Pro requests and the number of hours saved from Eligibility Essentials requests.
- Save More with Eligibility Pro – This box displays the number of staff hours that could have been saved this calendar year (year-to-date; from January 1 of this year to today) by using Eligibility Pro versus Eligibility Essentials (based on 20 minutes for each successful Pro reply versus 5 minutes for each successful Essentials reply).
Note: To see a demonstration of Eligibility Pro, click the See how it works link to open the corresponding webpage on a new browser tab.
Success metrics (multiple locations)
The following success metrics for all the selected locations appear:
- Payer Response % – This box displays the percentage of requests (Pro and Essentials) that returned a valid response in the past week (today and the previous six days). The box also displays the estimated number of hours that have been saved in the past seven days by using electronic eligibility verifications (20 minutes for each successful Pro reply; 5 minutes for each successful Essentials reply). These metrics help you know how well Eligibility Pro is working and how much staff time is being saved.
Note: Click the “i” icon to see the number of valid Eligibility Pro and Essentials responses and the total number of Eligibility Pro and Essentials requests.
- Time Saved – This box displays the estimated number of hours that have been saved this calendar year (year-to-date; from January 1 of this year to today) by using electronic eligibility verifications (20 minutes for each successful Pro reply; 5 minutes for each successful Essentials reply). This metric helps you estimate how much staff time is being saved.
Note: Click the “i” icon to see the number of hours saved from Eligibility Pro requests and the number of hours saved from Eligibility Essentials requests.
- Save More with Eligibility Pro – This box displays the number of staff hours that could have been saved this calendar year (year-to-date; from January 1 of this year to today) by using Eligibility Pro versus Eligibility Essentials (based on 20 minutes for each successful Pro reply versus 5 minutes for each successful Essentials reply).
Notes:
– This box appears if at least one of the selected locations has a subscription for Eligibility Essentials or Eligibility Pro On Demand.
– To see a demonstration of Eligibility Pro, click the See how it works link to open the corresponding webpage on a new browser tab.
Schedule Readiness chart
The Schedule Readiness stacked bar chart summarizes upcoming appointment eligibility for the following periods in the selected locations: Today, Tomorrow, and the Next 7 Days.
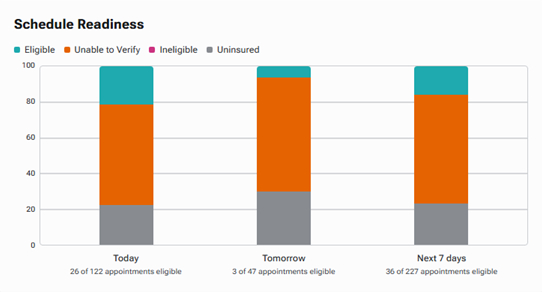
Each period’s bar can include any of the following sections, which break down appointment eligibility verification by status:
- Eligible – Appointments with verified active primary dental coverage. Position your pointer over the section to view the number of appointments with an “Eligible” eligibility status out of the total number of appointments within the period and the corresponding percentage.
- Unable to Verify – Appointments requiring manual review or additional details. Position your pointer over the section to view the number of appointments with an “Unable to Verify” eligibility status out of the total number of appointments in the period and the corresponding percentage.
- Ineligible – Appointments where verification returned inactive or denied coverage. Position your pointer over the section to view the number of appointments with an “Ineligible” eligibility status out of the total number of appointments in the period and the corresponding percentage.
- Uninsured – Appointments for patients without primary dental coverage for the period. Position your pointer over the section to view the number of appointments with an “Uninsured” eligibility status out of the total number of appointments in the period and the corresponding percentage.
Missing Payer Connections list
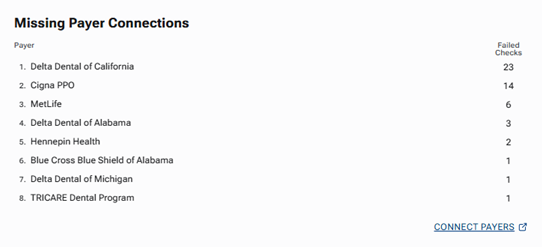
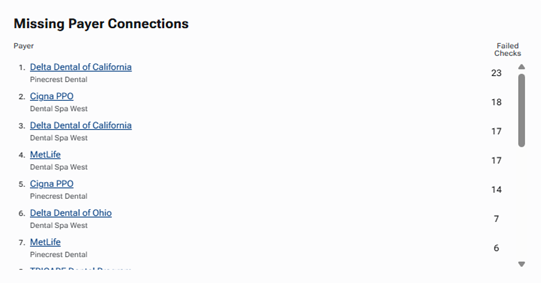
For the selected locations that have a subscription for Eligibility Pro, the Missing Payer Connections list ranks payers with the highest number of failed connection checks for appointments scheduled today and for the previous six days in the selected locations.
With one location selected:
- For each payer on the list, the number of failed checks appears.
- To manage payer connections, click the CONNECT PAYERS link to open the Payer Connection Portal on a new browser tab.
With multiple locations selected:
- For each payer on the list, the corresponding location and the number of failed checks for appointments in that location appears.
- To manage payer connections, click a payer’s name (which is a link) to open the corresponding location’s Payer Connection Portal on a new browser tab.
Benefits Import metrics
The following metrics for insurance information imports for patients with appointments in the selected locations appear:
- Benefits Import Pending – This box displays how many imports are pending review and import based on eligibility responses received within the past 30 days.
- Benefits Imported – This box displays how many times imports occurred during the current plan year and, of those, how many were performed automatically versus manually.
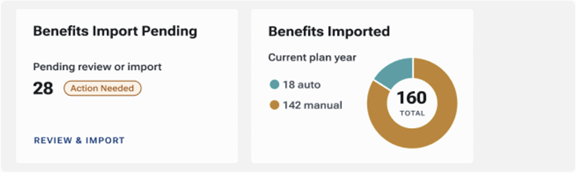
Note: An import can update insurance information at the patient and/or plan level.
Settings
You can configure eligibility settings across all locations in your organization from the eligibility manager.
Note: You can also configure the same settings from any location’s Location Information page (go to Settings > Location Information).
New security rights:
- Manage Location Eligibility Settings (in the “Insurance” category) – Allows the user to view and change settings in the eligibility manager for only the location that the user has been granted this right for.
- Manage Organization Eligibility Settings (in the “Insurance” category) – Allows the user to view and change settings in the eligibility manager for all locations. If the user is granted this right, the user does not need to be granted the “Manage Location Eligibility Settings” right.
These new security rights are assigned to user roles automatically according to the following criteria:
- For new customers:
- The “Manage Organization Eligibility Settings” security right is selected by default for the “Administrator” user role.
- The “Manage Location Eligibility Settings” security right is selected by default for the following roles: “Administrator” and “Billing Coordinator.”
- The “Manage Organization Eligibility Settings” security right is selected by default for the “Administrator” user role.
- For existing customers:
- The “Manage Organization Eligibility Settings” security right is selected automatically for any roles that have been granted both of the following security rights: “Manage Location Information” and “Create/Update Role.”
- The “Manage Location Eligibility Settings” security right is selected automatically for any roles that have been granted the “Manage Location Information” security right.
- The “Manage Organization Eligibility Settings” security right is selected automatically for any roles that have been granted both of the following security rights: “Manage Location Information” and “Create/Update Role.”
Note: The automatic assignment for existing customers happens only once—when the feature is enabled for your organization.
To configure eligibility settings
In the eligibility manager, select Settings on the navigation panel (on the left).
The Settings appear.
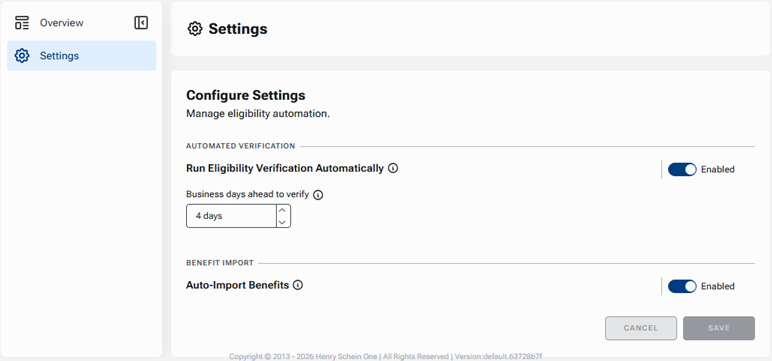
If you have access to edit only one location’s eligibility settings, the page looks like the following image:
If you have access to modify multiple locations’ or the organization’s eligibility settings, the page looks like the following image:
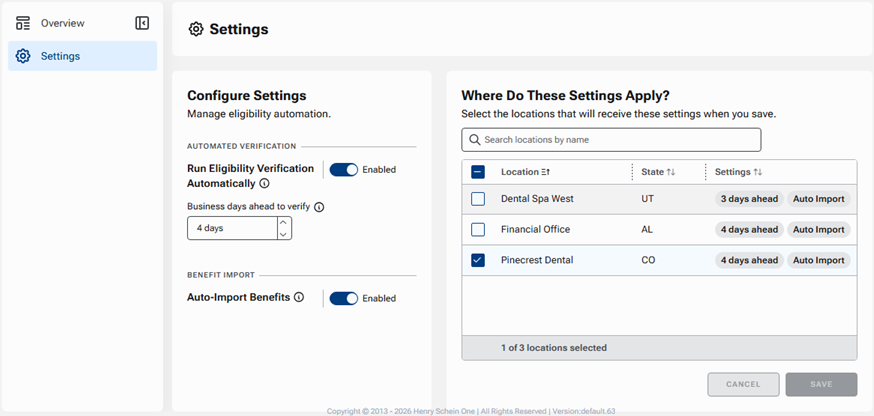
Option 1 (one location only)
With access to only one location, do the following:
a. Change any of the following options:
- AUTOMATED VERIFICATION:
- To enable automatic batch insurance eligibility verification, set the Run Eligibility Verification Automatically switch to Enabled. Then, set the number of lead days for batch eligibility verifications.
- To disable automatic batch insurance eligibility verification, set the Run Eligibility Verification Automatically switch to Off. Eligibility verifications can only be initiated manually.
- To enable automatic batch insurance eligibility verification, set the Run Eligibility Verification Automatically switch to Enabled. Then, set the number of lead days for batch eligibility verifications.
- BENEFIT IMPORT:
- To enable the automatic import of insurance information from a supported payer, set the Auto-Import Benefits switch to Enabled.
- To disable the automatic import of insurance information, set the Auto-Import Benefits switch to Off. Imports can only be initiated manually.
- To enable the automatic import of insurance information from a supported payer, set the Auto-Import Benefits switch to Enabled.
b. Click SAVE.
Note: This button is available only if you have made a change.
Option 2 (multiple locations)
With access to multiple locations, do one of the following:
- Update one location’s settings.
- Update multiple locations’ settings.
Note: By default, the settings for the location that you are currently logged in to are displayed.
Option 2A – To view and update only one location’s eligibility settings:
a. Under Where Do These Settings Apply? (on the right), select the checkbox of only one location to view its settings on the left.
b. Change any of the following options:
- AUTOMATED VERIFICATION:
- To enable automatic batch insurance eligibility verification, set the Run Eligibility Verification Automatically switch to Enabled. Then, set the number of lead days for batch eligibility verifications.
- To disable automatic batch insurance eligibility verification, set the Run Eligibility Verification Automatically switch to Off. Eligibility verifications can only be initiated manually.
- To enable automatic batch insurance eligibility verification, set the Run Eligibility Verification Automatically switch to Enabled. Then, set the number of lead days for batch eligibility verifications.
- BENEFIT IMPORT:
- To enable the automatic import of insurance information from a supported payer, set the Auto-Import Benefits switch to Enabled.
- To disable the automatic import of insurance information, set the Auto-Import Benefits switch to Off. Imports can only be initiated manually.
- To enable the automatic import of insurance information from a supported payer, set the Auto-Import Benefits switch to Enabled.
c. Click SAVE.
Note: If one location is selected, this button is available only if you have made a change.
Option 2B – To view and update multiple locations’ eligibility settings:
a. Under Where Do These Settings Apply?, select the checkbox of each location to which you want to apply the changes you are going to make, and clear the checkbox of each location to which you do not want to apply the changes you are going to make.
Notes:
- To select or clear all locations at once, use the Location checkbox (in the column header).
- To filter the list of locations, begin typing part of a location name in the Search locations by name box. The locations with matching text in any part of the name appear. Continue typing as needed to narrow down the results.
- Only the locations to which you have access and in which you have been granted the “Manage Location Eligibility Settings” security right are available; or if you have been granted the “Manage Organization Eligibility Settings” in the location that you are logged in to currently, all locations are available.
b. Change any of the following options:
- AUTOMATED VERIFICATION:
- If this setting varies across the selected locations, the Run Eligibility Verification Automatically switch is set to Mixed. You must enable or disable the setting.
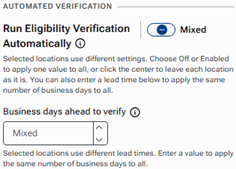
- To enable automatic batch insurance eligibility verification, set the Run Eligibility Verification Automatically switch to Enabled. Then, set the number of lead days for batch eligibility verifications.
- To disable automatic batch insurance eligibility verification, set the Run Eligibility Verification Automatically switch to Off. Eligibility verifications can only be initiated manually.
- If this setting varies across the selected locations, the Run Eligibility Verification Automatically switch is set to Mixed. You must enable or disable the setting.
- BENEFIT IMPORT:
- If this setting varies across the selected locations, the Auto-Import Benefits switch is set to Mixed. You must enable or disable the setting.
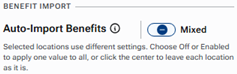
- To enable the automatic import of insurance information from a supported payer, set the Auto-Import Benefits switch to Enabled.
- To disable the automatic import of insurance information, set the Auto-Import Benefits switch to Off. Imports can only be initiated manually.
- If this setting varies across the selected locations, the Auto-Import Benefits switch is set to Mixed. You must enable or disable the setting.
c. Click SAVE.
Notes:
- If only one location is selected, this button is available only if you have made a change.
- If multiple locations are selected and they initially had varied settings, this button is available only if any switch that is set to “Mixed” has been set to Enabled or Off.
- If multiple locations are selected and they initially had the same settings, this button is available only if you have made a change.
- Even if you made changes, if no locations are selected, the changes are discarded, and the SAVE button is not available.
If you made changes to multiple locations that initially had varied settings, the Override Existing Settings? dialog box appears.
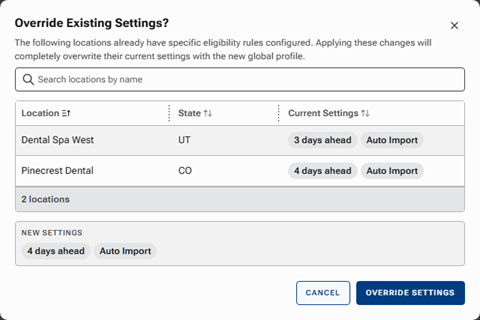
For each of the locations that will be affected by the changes, the current settings appear.
Note: To filter the list if it is long, you can start typing a location name in the Search locations by name box to narrow down the list.
The new settings that will be applied to all locations also appear.
d. Click OVERRIDE SETTINGS.