Released 4/30/25
Important Note: Some of the new features and enhancements will require an updated acquisition agent. For instructions on checking for updates, refer to the “Updating the acquisition agent” Help topic.
Hiding “Check For Updates” for Acquisition Agent
You can now hide the option that allows a user to check for updates for the acquisition agent. This setting provides more flexibility for organizations that prefer to manage software updates manually.
To hide the option
1. Open the Acquisition Agent.ini file (the default installation location is C:\Program Files (x86)\Acquisition Agent).
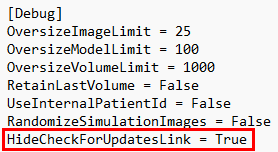
2. In the [Debug] section, add a new line for the HideCheckForUpdatesLink parameter, and set it equal to True.
3. Save the change.
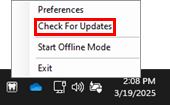
With the HideCheckForUpdatesLink parameter in the .ini file set to True, the Check for Updates option does not appear on the right-click menu that appears when you right-click the Acquisition Agent icon in the system tray.
HideCheckForUpdatesLink = False
HideCheckForUpdatesLink = True
Viewing Black and White Levels in Image Details
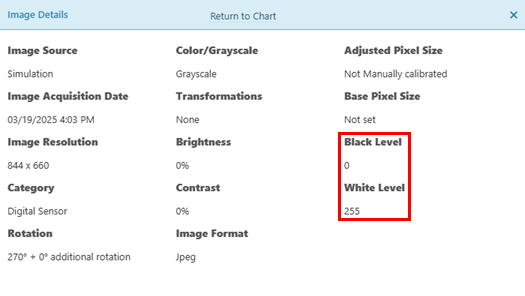
The black and white levels now appear in the Image Details dialog box.
To view the black and white levels
While viewing an image, click the Edit button
![]() .
.
If the image has tooth numbers, the Assign Tooth Numbers dialog box appears; click the Image Details link to view the Image Details. Otherwise, the Image Details dialog box appears.
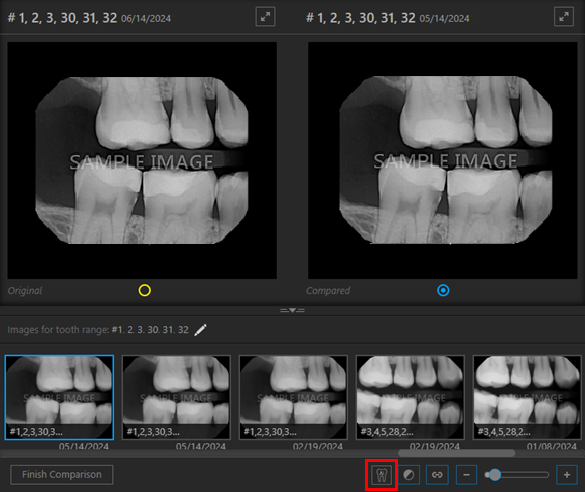
Showing/Hiding AI Findings During Image Comparison
A Show/Hide AI Findings button is now available while you are comparing images.
To show or hide AI findings
1. While viewing an image, click Compare.
2. If AI findings are hidden, to show AI findings, click the Show/Hide AI Findings button (which is gray).
The AI findings appear. The Show/Hide AI Findings button turns orange, and the Show/hide Patient View button (which is gray) appears.
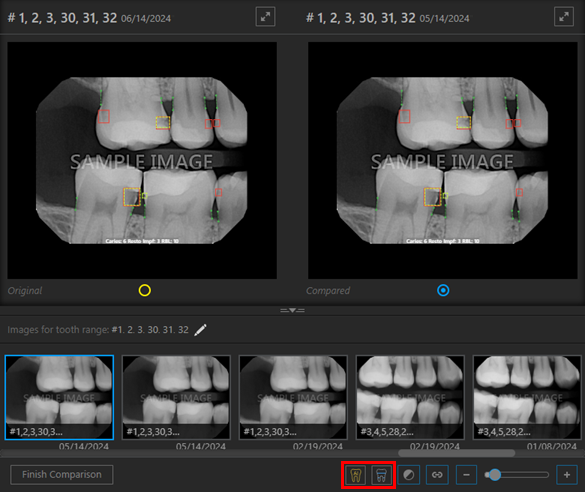
3. With AI findings being shown, to show tooth anatomy, click the Show/hide Patient View button (which is gray).
The tooth anatomy appears. The Show/hide Patient View button turns orange.

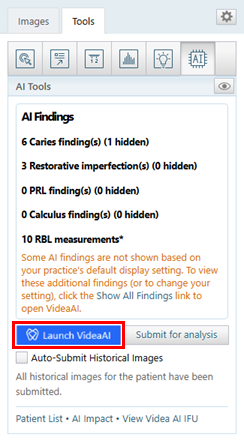
New “Launch VideaAI” Button
While viewing the AI tools for an image, you can now open the Videa AI website by clicking the new Launch VideaAI button.
Filtering Custom Procedures
Note: The user who creates a custom procedure from this point on is now stored in the database. However, a user is not associated with any existing custom procedures, so only the organization and location are associated with those procedures.
On the Custom Procedures tab, you can now filter procedures according to the following options:
- Organization – Displays all custom procedures that were created in your organization.
- Location – Displays only the custom procedures that were created in the location that you are currently viewing.
- User – Displays only the custom procedures that were created by the user whose account you are currently logged in with.
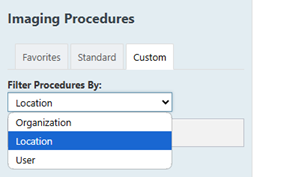
Note: By default, Location is selected the first time you access Imaging. Whichever option you select after that is saved for the next time you view the custom procedures list.
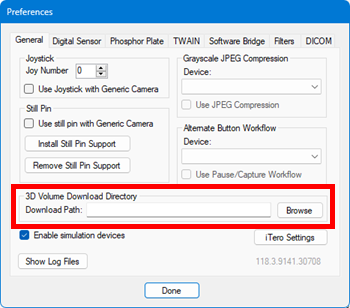
Download Directory for 3D Volumes
In the acquisition agent preferences, you can now specify the directory where you want 3D volumes to be saved.
To specify the directory
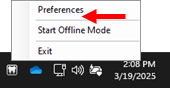
1. Right-click the Acquisition Agent icon in the system tray, and then select Preferences.
The Preferences dialog box appears.
2. On the General tab, under 3D Volume Download Directory, click Browse next to Download Path, and select the correct folder.
3. Click Done.
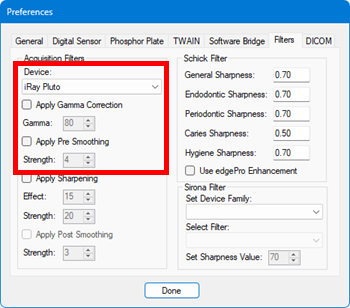
iRay – Default Filters
To improve iRay sensor image quality, the default filters for this device in the acquisition agent have been updated:
- Gamma: 80
- Pre-Smoothing: 4
To specify the directory
1. Right-click the Acquisition Agent icon in the system tray, and then select Preferences.
The Preferences dialog box appears.
2. On the Filters tab, under Acquisition Filters, select iRay Pluto from the Device list.
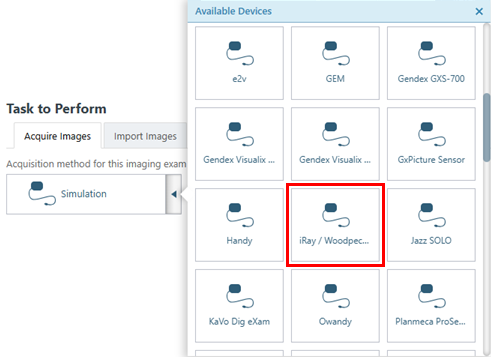
Support for Woodpecker and Eighteeth Sensors
On the acquisition device menu, the iRay option has been changed to iRay / Woodpecker / Eighteeth to indicate that direct acquisition is now allowed for the Woodpecker and Eighteeth intraoral X-ray sensors through the iRay integration.
Miscellaneous
- During a single X-ray, phosphor plate, camera, 3D, import, or template acquisition, if the acquisition agent crashes, resulting in a “Connection Lost” error message, the acquisition agent now restarts automatically, and the acquisition resumes.
- You can now download 3D volumes even if the acquisition agent is not running.
Note: In the Share dialog box, a warning message appears if the acquisition agent is offline. - While you are viewing AI findings, if you turn on the Patient View (to view tooth anatomy), it now remains on as you navigate multiple images within an exam. The Patient View remains on until you turn it off or switch to another exam.
- 19-micron pixel size metadata has been added for e2v direct acquisitions.
- Improved database performance. (AI-3953)
- Improved security and performance. (AI-4021)
- Improved health check. (AI-4038)
- Improved AI error messages to provide more detailed explanations and troubleshooting guidance. (AI-4097)
- The file extension for PostgreSQL (PSQL) backup files was changed from .bak to .pbk to differentiate them from the file extension for Microsoft SQL Server (MSSQL) backup files. (AI-4149)
Fixes
This release resolves that following issues:
- AI Menu Unexpectedly Opens – When you click outside an open dialog box (such as Assign Tooth Numbers) to close it, the AI menu unexpectedly opens if the image has AI results. (AI-3520)
- No Error if RVG Drivers Are Missing – If the Carestream RVG sensor drivers are not installed, an error does not appear during acquisition. (AI-3809)
- Tools Tab Disabled When Toggling Modality View – With an image selected, the Tools tab becomes disabled when you switch to the Modality View but becomes re-enabled when you select a different image. (AI-3892)
- Colorize and Emboss Persist Across Exams – Colorize and Emboss remain enabled while you are navigating an exam as expected, but Colorize and Emboss remain enabled when you switch to another exam. (AI-3893)
- Modality View Not Loading Correctly for CBCT Exams – When you switch to the Modality View with a 3D volume loaded, 2D snapshots are sometimes the only images rendered, and switching modalities can cause images not to load correctly. (AI-3925)
- Incorrect Base Pixel Size – The Image Details dialog box displays ‘0’ instead of ‘N/A’ for Base Pixel Size when the size is not provided. (AI-3964)
- Extraoral X-rays Unexpectedly Show “No Findings Detected” – For extraoral X-rays, the text “No Findings Detected” and the “Show/Hide Patient View” button appear but should not. (AI-4011)
- Errors After Undeleting Tiled Exam Images – Undeleting an image from a tiled exam throws errors, and selecting images in the image navigator afterward may also cause errors. (AI-4013)
- Error Loading Tiled View With “Show Deleted” Enabled – With “Show Deleted” enabled, deleted images do not load in the Image Navigator, and an uncaught type error appears in the console. (AI-4014)
- “Show Deleted” Does Not Persist After Switching from Modality View to Exam View – If “Show Deleted” is enabled in the Modality View, when you switch to the Exam View, deleted exams do not appear in the list, and the “Show Deleted” filter is disabled. (AI-4015)
- Measurement Tool Not Working for 3D Volume – While viewing a 3D volume, if you switch between the annotation and measurement tools, the tool may not load correctly, causing slice axes to change instead of measurements being drawn. (AI-4018)
- Tools Tab Disabled for 3D Volume – Sometimes when you select a 3D volume exam, the Tools tab is disabled. (AI-4019)
- Zoom Not Working & Error When Scrolling Linked Image During Comparison – In Compare more, the zoom does not work when you are scrolling on one of the linked images, and an uncaught type error is thrown. (AI-4020)
- Zoom Not Working When Opening Image in Modality View – In the Modality View, zoom does not work when you switch from the tiled view to the single-image view. (AI-4032)
- Offline Sync Error & Deleted Images – With acquisition agent v87.1, during a sync, errors occur, and offline images are deleted. (AI-4041)
- Chairside Dashboard Images Not in Chronological Order – Images displayed in the chairside dashboard are not sorted by date by default. (AI-4047)
- Scrollbar and Settings Button Are Not Disabled During Comparison – In Compare mode, the scrollbar and Settings button remain enabled but should be disabled. (AI-4066)
- Telemetry Event Triggered Unexpectedly in Compare Mode – The AssignTeethShowImages telemetry event is triggered unexpectedly when you click between compared images. (AI-4067)
- AI Usage Event Not Triggered on First Load of Exam View – The AI Usage event is not triggered on the initial load of the Exam View when an image with AI results is loaded. (AI-4076)
- 3D Volume Not Centered When Collapse Side Menu – The 3D volume being viewed does not remain centered when you collapse the side panel. (AI-4077)
- Memory Leak After Assigning Tooth Numbers – Memory usage increases each time a tooth number is assigned. (AI-4085)
- Gallery View Unexpectedly Shows Deleted Images – Deleted images unexpectedly appear in the Gallery View. (AI-4098)
- Memory Leak Switching Tabs or Modalities or Resetting FMX View – Rapidly switching between tabs or modalities or resetting the FMX view increases memory usage. (AI-4117)
- Error Changing Settings in Modality View – When you change settings, an error occurs in the console, and the settings window remains open. (AI-4127)
- Incorrect Acquisition Time for Imported Exam – Exams that are imported using the “Existing Procedure” option have an acquisition time that is 6 hours earlier than expected. (AI-4146)
- Cannot Recover 3D Volume or CAD/CAM Exam – The recovery option is not available in the exam view after the upload of a 3D volume or CAD/CAM exam fails. (AI-4163)
- Annotations and Measurements Missing During Comparison – Annotations and measurements are not visible in Compare mode, and the show/hide button is missing. (AI-4179)