Released 1/29/25
Important Note: Some of the new features and enhancements will require an updated acquisition agent. For instructions on checking for updates, refer to the “Updating the acquisition agent” Help topic.
New Features and Enhancements
Exam View (Default) Updates
Enhancements have been made to the default Exam view for usability and for consistency with the new Modality view.
Enhanced Header Font and Color
Improved font size and color enhance visibility.
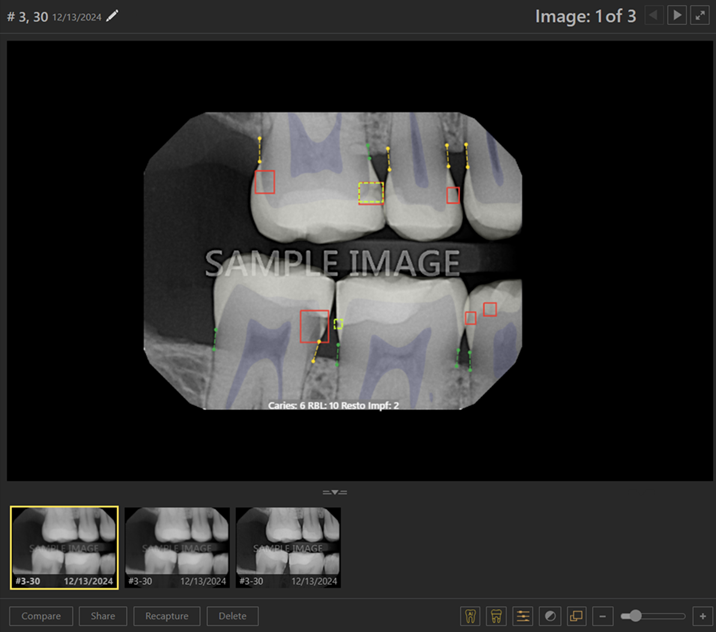
Visual Feedback for Selection
Selected images are highlighted with a distinctive yellow frame, improving clarity and interactivity.

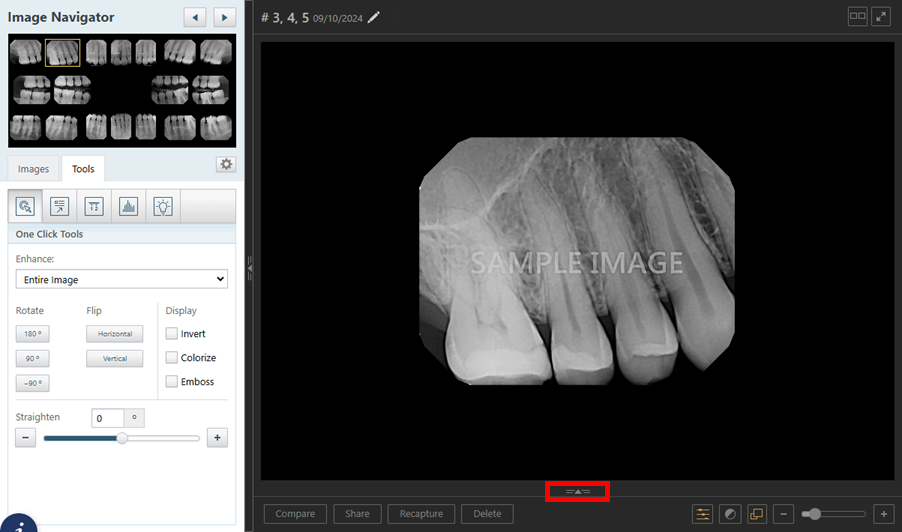
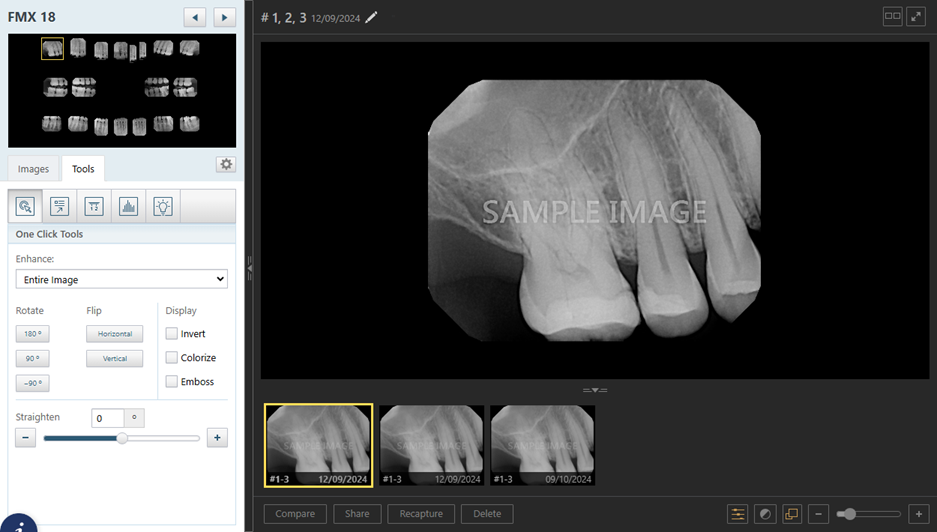
Single-Image View
Double-clicking a yellow-highlighted image opens it in a focused Single-Image view for detailed examination.
Filmstrip Navigator
Navigate through all images in a stack using the filmstrip view for streamlined navigation and image selection.
Single image in a stack (filmstrip view of stack is hidden by default; click the icon to expand the filmstrip view):
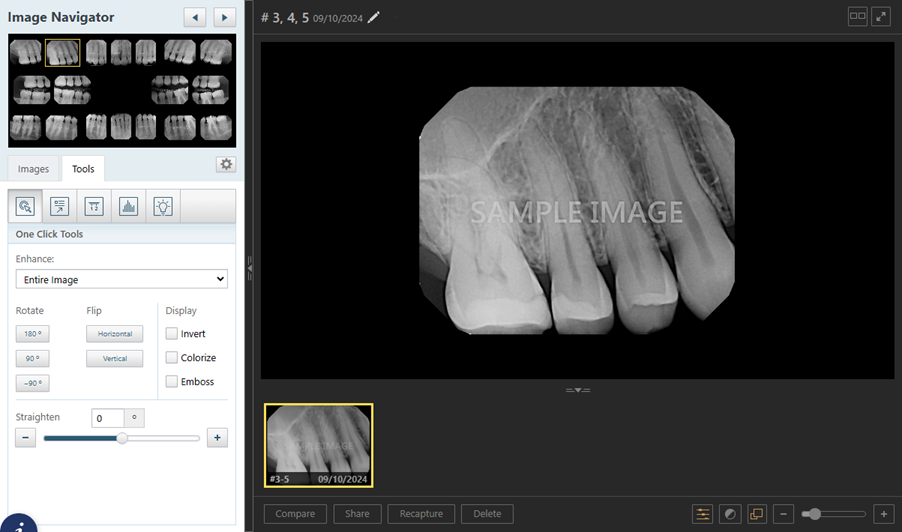
Two images in a stack (filmstrip view of stack is displayed by default):

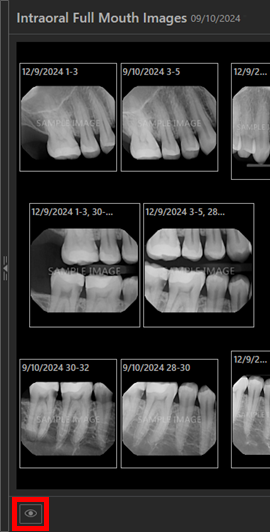
Light Box Mode
The Show/Hide image information button has been relocated and renamed to “Light box mode.” This button is available while viewing images in Series mode (an entire template is displayed). The state of this button still controls whether the date and tooth numbers for each image in the series are available or not.
Previously, the button was at the top (orange icon indicated information was visible; gray icon indicated information was hidden):
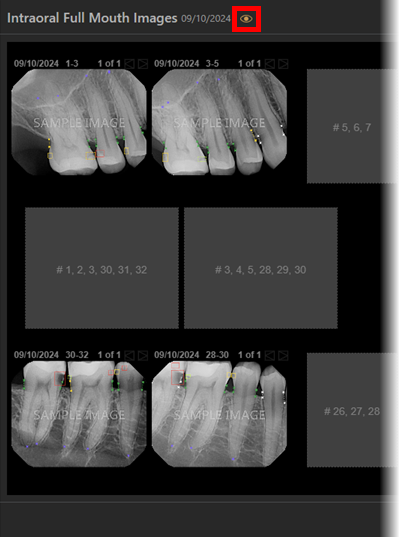
Now, the button in on the left side of the lower toolbar (gray icon indicates information is visible; orange icon indicates information is hidden):
Zoom Functionality Is Temporarily Unavailable
The zoom feature is temporarily unavailable in the template/series view but is planned for reintroduction in a later version.
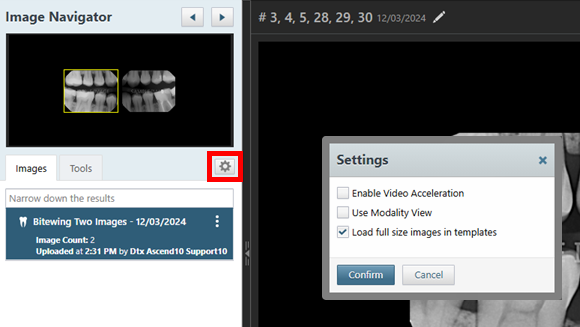
Settings Location and Options
The Settings button has been relocated, and additional options are now available.
Previously, the Settings button was located on the Tools tab; and the only option was Enable Video Acceleration.
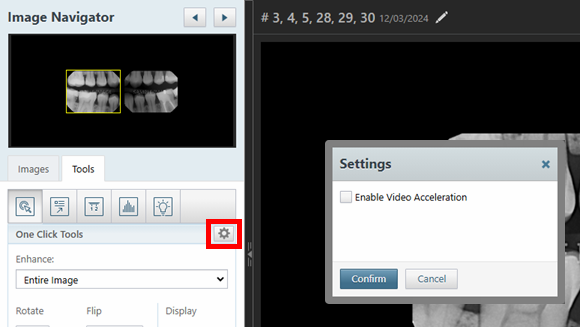
Now, the Settings button is available whether the Images or Tools tab is selected; and the available options are as follows:
- Enable Video Acceleration
- Use Modality View
- Load full size images in templates
Notes:
- Enable Video Acceleration for Faster 2D Image Rendering. The Video Acceleration feature leverages WebGL (Web Graphics Library) to enhance the rendering speed of 2D images. WebGL is a JavaScript API based on OpenGL ES, which enables accelerated rendering by offloading processing tasks to the GPU (Graphics Processing Unit). While 3D images already use WebGL for rendering, this new feature extends the same technology to 2D images, significantly improving performance for filters and rendering tasks. By default, Video Acceleration is turned off to ensure compatibility with hardware that does not support WebGL. If the hardware is incompatible, enabling this feature could result in a black screen. With compatible hardware, enabling Video Acceleration provides a smoother, faster rendering experience for 2D images.
- The Load full size images in templates checkbox is selected by default to ensure that annotations and AI findings are visible in the template/series view.
- Dentrix Ascend Imaging remembers these user preferences for subsequent sessions.
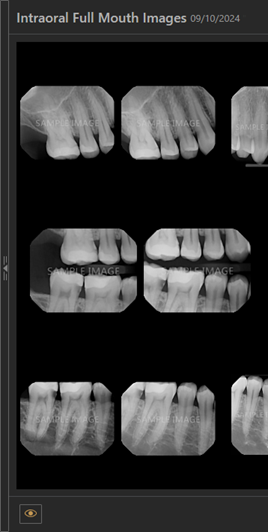
SuperFMX/Modality View (New)
An anatomical workflow, similar to what you experience with DEXIS, is now provided to help improve the functionality, user interface, and overall user experience. The SuperFMX/Modality view introduces a new level of flexibility and efficiency to imaging workflows. You can now choose between the traditional template or exam-based workflow (Exam view) and a newly-developed modality or anatomical workflow (SuperFMX/Modality View). This update accommodates diverse operational preferences and clinical needs, allowing you to select the workflow that best supports your diagnostic processes.
Switching to the Modality View
1. Click the Settings button to open the Settings dialog box.
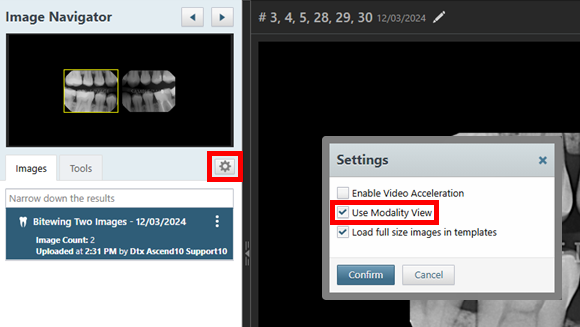
2. Select the Use Modality View checkbox.
3. Click Confirm.
Note: Dentrix Ascend Imaging remembers these user preferences for subsequent sessions.
The Modality view is now active.

Notes:
- The updated font size of image headers and the colors allow for enhanced visibility.
- Yellow corner indicators on image stacks indicate that additional images are available.
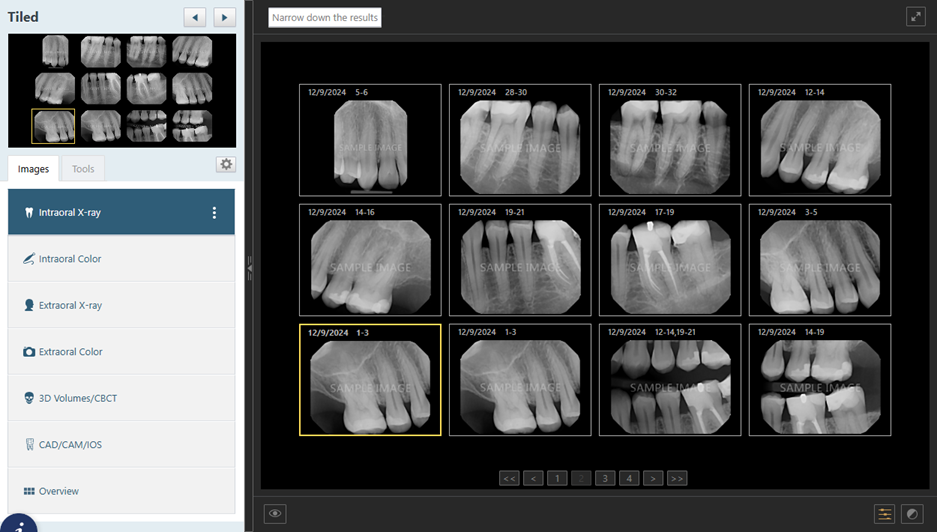
- The Narrow down the results field appears in the header so you can filter by date, tooth number, or deleted images.
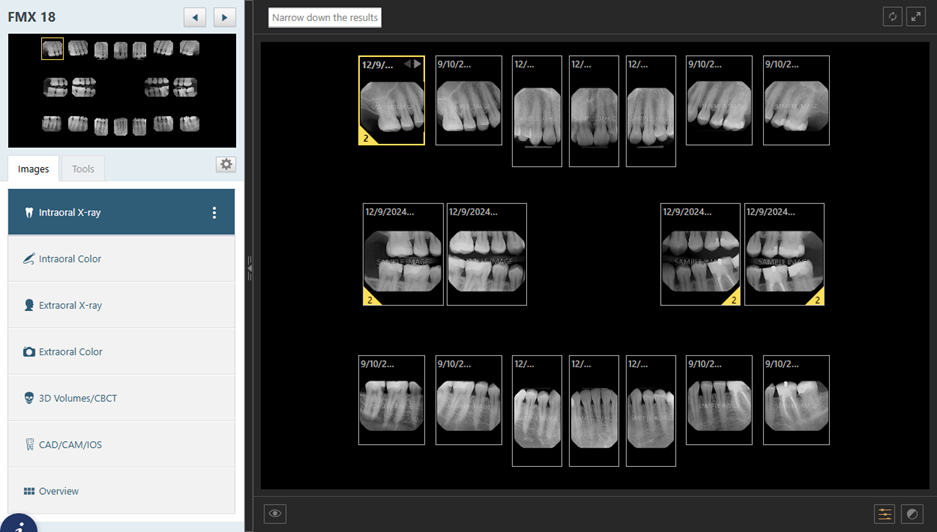
- The tabs on the left navigation panel provide dedicated views for specific imaging modalities:
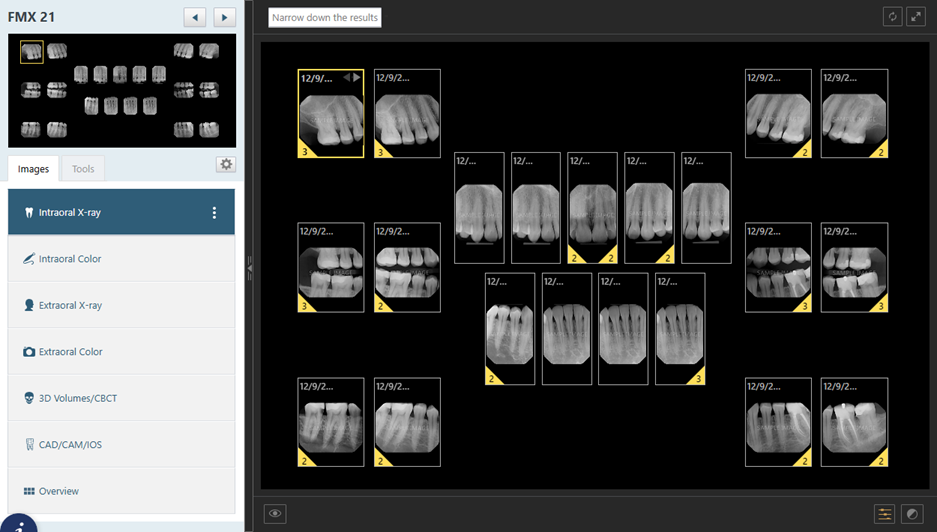
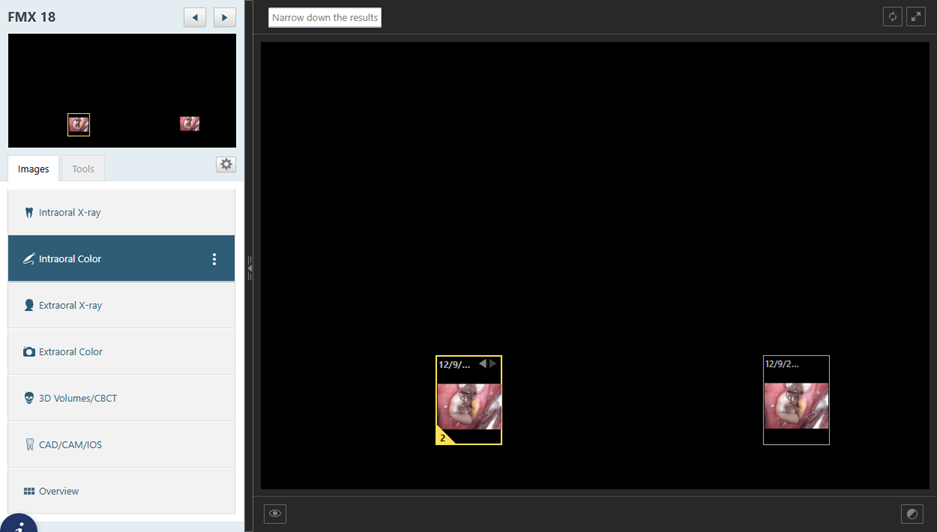
- Intraoral X-ray – Displays all intraoral X-rays for the patient. This modality is selected by default, and the FMX 18 anatomical view is displayed by default. There are options for switching to an FMX 21 anatomical view, using a tiled view, and flipping the view.
- Intraoral Color – Displays all intraoral color images for the patient. The FMX 18 anatomical view is displayed by default. There are options for switching to an FMX 21 anatomical view, using a tiled view, and flipping the view.
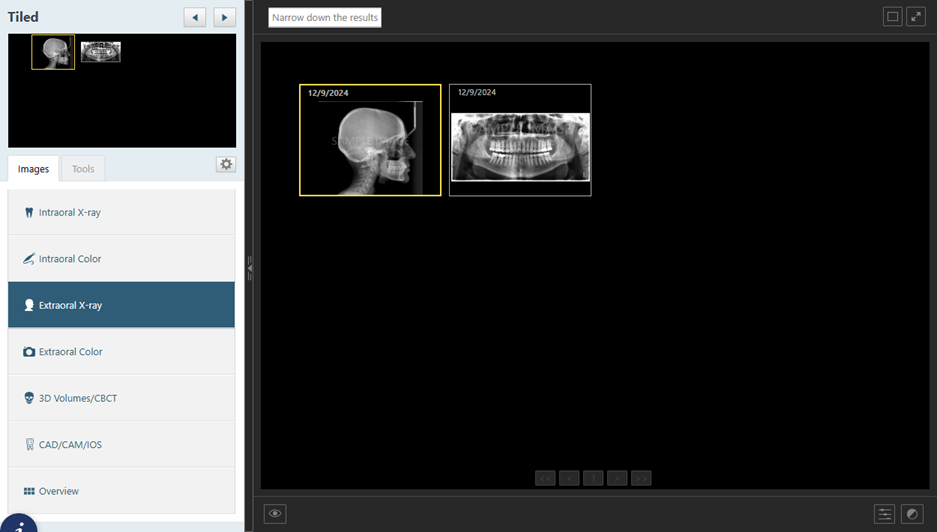
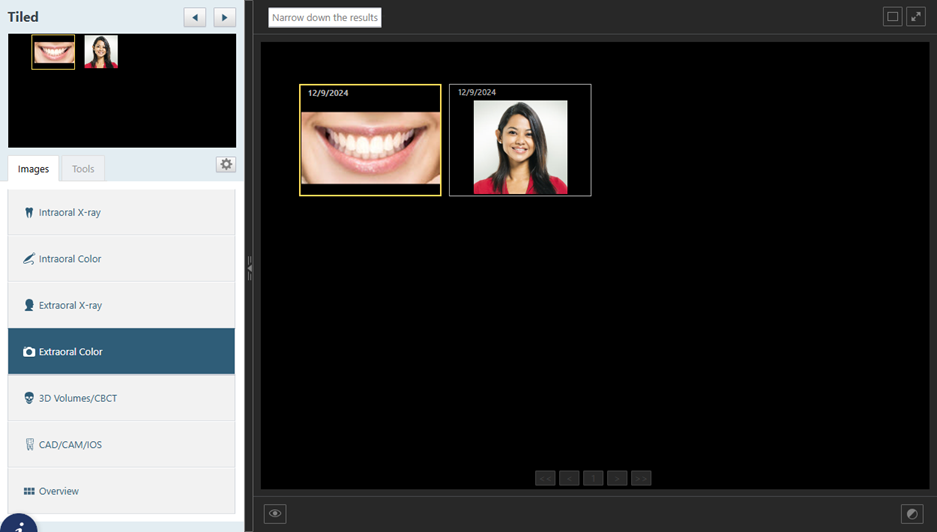
- Extraoral X-ray – Displays all extraoral x-rays for the patient in a chronological tiled view.
- Extraoral Color – Display all extraoral color images for the patient in a chronological tiled view.
- 3D Volumes/CBCT – Displays all 3D Volumes/CBCT images for the patient in a chronological tiled view.
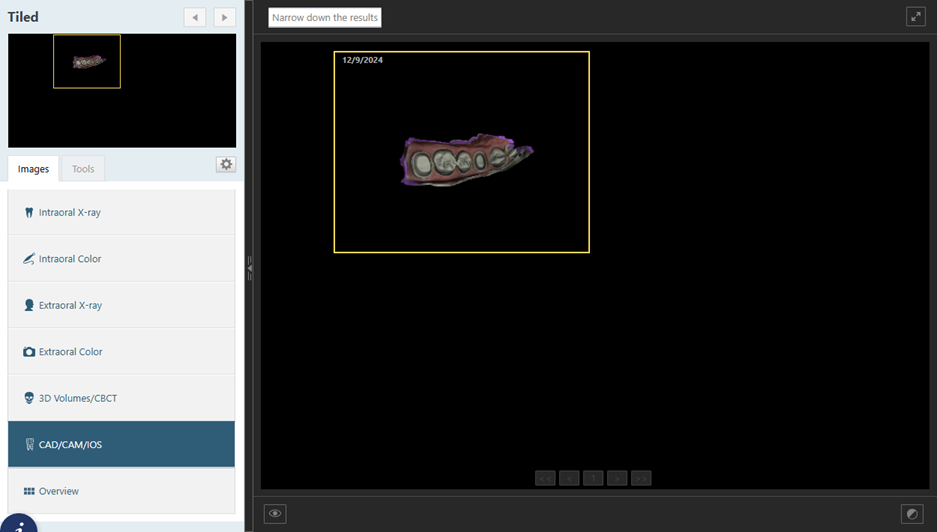
- CAD/CAM/IOS – Displays all CAD/CAM/IOS images for the patient in a chronological tiled view.
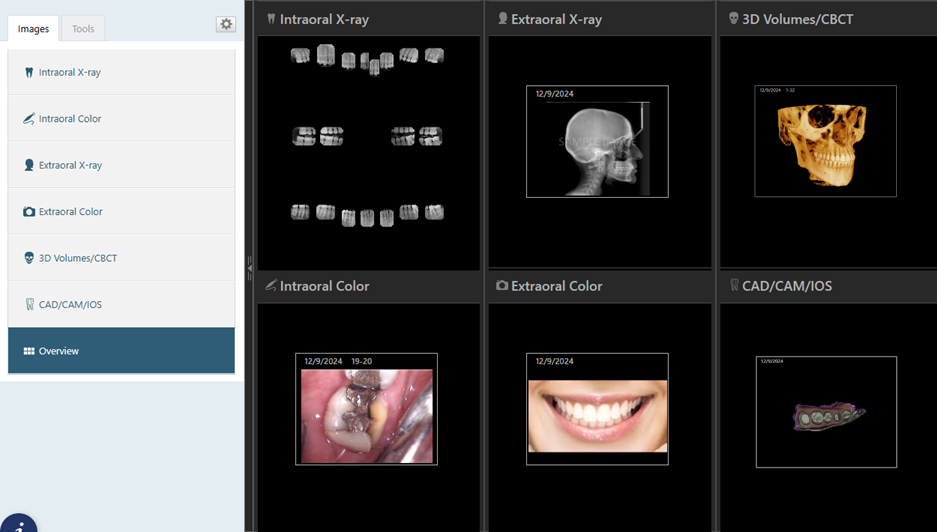
- Overview – Shows a snapshot of all the different modalities for the patient.
- Intraoral X-ray – Displays all intraoral X-rays for the patient. This modality is selected by default, and the FMX 18 anatomical view is displayed by default. There are options for switching to an FMX 21 anatomical view, using a tiled view, and flipping the view.
Narrowing Down the Results
To filter images by specific criteria, do the following:
1. Click in the Narrow down the results field to view the available filters.
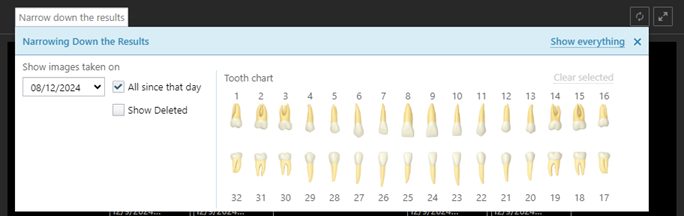
2. Set up any of the following filters:
- Date – To view the images according to a different date, select the desired date in the list under Show images taken on. To view all images that have been acquired on and after the selected date, select the All since that day checkbox. To view the images that were acquired only on the selected date, clear the All since that day checkbox.
- Show Deleted – To view deleted images so you can review or recover them, select this checkbox. To help you easily distinguish between deleted and normal images in the list of images, “Deleted – ” appears before the name of deleted images and series.
Note: Viewing or restoring deleted images is only possible with the use of this filter.
- Teeth – To view images for specific teeth, select the desired teeth on the Tooth Chart. The tooth filter does not apply to intraoral photos that do not have tooth numbers assigned to them, extraoral X-rays (which apply to all teeth), and extraoral photos (which apply to all teeth). To clear all tooth selections, click (or tap) the Clear selected link.
- Show everything – To set the filter options to their default states and display all the patient’s images, including deleted images, click (or tap) the Show everything link.
3. Click the X in the upper-right corner of or anywhere outside of the Narrowing Down the Results menu to close the menu.
Viewing the Intraoral X-ray Modality
With the Intraoral X-ray tab selected, the FMX 18 anatomical view is displayed by default, with images organized by tooth number, and it provides a comprehensive overview of the patient’s dental anatomy. There are options for switching to an FMX 21 anatomical view, using a tiled view, and flipping the view.

Notes:
- Each image is assigned a slot based on the tooth number.
- For a slot with multiple images, the newest image is displayed at the top of each stack.
Changing the View Options for a Modality
With the Intraoral X-ray (or Intraoral Color) tab selected, to change the view preferences, do the following:
1. Click the More Options button (three vertical dots):
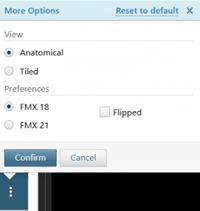
2. Select the following options as needed:
- Anatomical – Displays images in an FMX 18 or FMX 21 layout, organized by tooth number.
With this option selected, specify the following Preferences:- FMX 18 or FMX 21 – Select the layout type based on clinical needs.
- Flipped – To flip the layout for an alternative viewing preference, select this checkbox.
- Tiled – Displays all images for a patient in chronological order with pagination.
3. Click Confirm.
Anatomical view of intraoral X-rays for an FMX 18:
Anatomical view of intraoral X-rays for an FMX 21:
Tiled view of intraoral X-rays:
The Single-Image view provides an isolated, focused view of a selected image. The view includes a filmstrip navigator for scrolling through all images in the stack and enhanced navigation controls for quick image selection.
Viewing the Intraoral Color Modality
With the Intraoral Color tab selected, the FMX 18 anatomical view is displayed by default, with images organized by tooth number. There are options for switching to an FMX 21 anatomical view, using a tiled view, and flipping the view.
Viewing the Extraoral X-ray Modality
With the Extraoral X-ray tab selected, all extraoral radiographs for the patient appear in a chronological, tiled view.
The Single-Image view provides access to a variety of tools for detailed analysis and editing, allowing for precise examination of extraoral radiographic data.
Viewing the Extraoral Color Modality
With the Extraoral Color tab selected, all extraoral color images for the patient appear in a chronological, tiled view.
The Single-Image view provides access to a variety of tools for detailed analysis and editing, enhancing the examination of extraoral photographs.
Viewing the 3D Volumes/CBCT Modality
With the 3D Volumes/CBCT tab selected, all 3D volumetric and cone beam computed tomography (CBCT) images for the patient appear in a chronological, tiled view.

The Single-Image view provides access to a range of tools for detailed analysis and editing, allowing for precise examination of the volumetric data.
Viewing the CAD/CAM/IOS Modality
With the CAD/CAM/IOS tab selected, all CAD/CAM and intraoral scanner (IOS) images for the patient appear in a chronological, tiled view.
The Single-Image view provides access to a variety of tools for detailed analysis and editing.
Viewing the Overview
With the Overview tab selected, a snapshot of all imaging modalities for the patient appear. Each modality is represented visually, allowing you to quickly assess available imaging data. Selecting a modality redirects you to the corresponding tab, enabling seamless access to detailed views and further functionality.
Full-size Image from Vatech EzDenti Software Bridge
The handling of images that are acquired using the Vatech EzDenti SW Bridge has been improved. If the saved file is a DCM file, the system now checks if it contains a 2D image and ensures that the full-size image is pulled into the imaging software. Previously, only a thumbnail image was displayed.
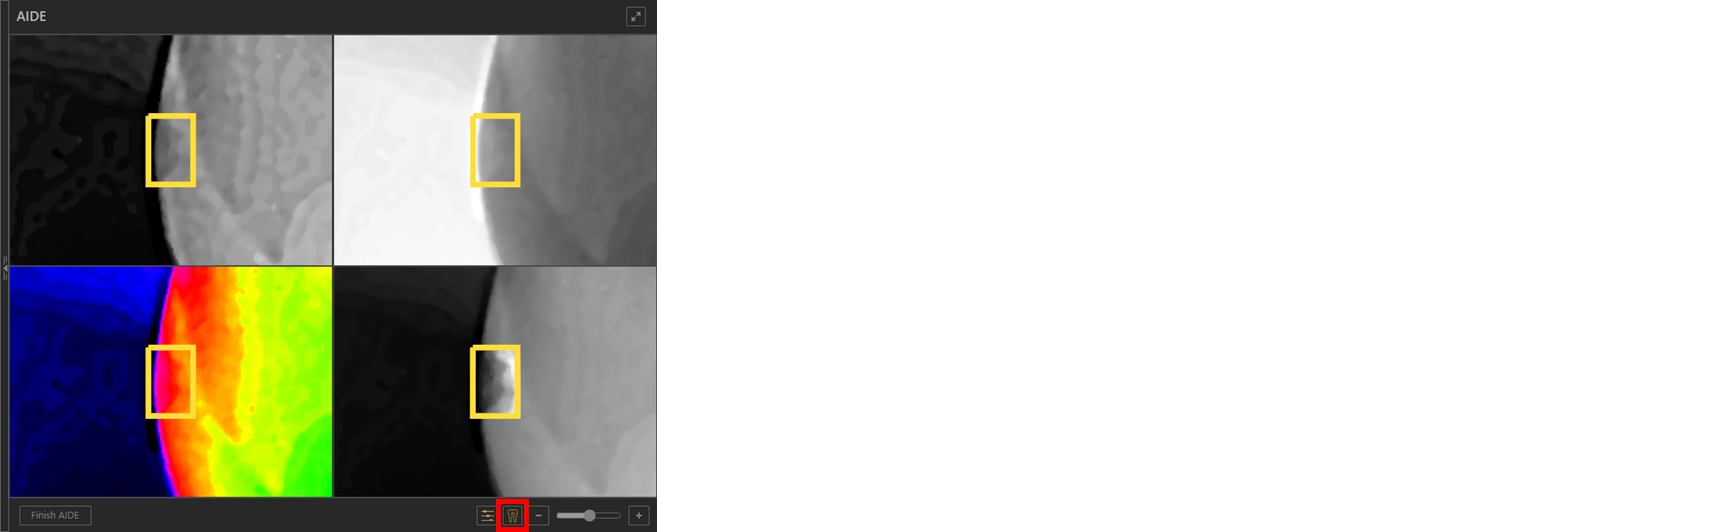
AI Findings Button in AIDE View
In the AIDE view, the icon on the Show/hide AI findings button was replaced to be consistent with the rest of the imaging software. Previously, the button had an eye icon; now, it is a tooth.
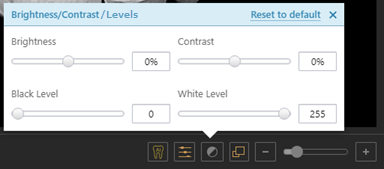
Title for Brightness/Contrast Pop-up Box
The title of the pop-up box that appears when you click the Adjust brightness, contrast, and black/white levels button (two-tone circle icon) was updated to be “Brightness/Contrast/Levels.”
DEXIS Software Bridge Optimization
The efficiency of 3D volume acquisition using the DEXIS software bridge was optimized by prioritizing searches within the patient’s folder. This enhancement significantly reduces processing time while maintaining a full directory scan as a fallback option.
PSPIX and SOPIX Helper Apps for MacOS
The helper apps for PSPIX and SOPIX devices for the MacOS were updated to enhance compatibility and performance across various MacOS versions. The following version of the helper apps were updated:
- SOPIX helper app v1.32
- PSPIX helper app v1.0.31
GxPicture Option Selected Automatically for Existing Users
The new “GxPicture Sensor” is now automatically selected for relevant procedures.
Updated Athlos SDK for DC Air Sensors (Windows Only)
The latest version (2.16.1) of the Athlos SDK for DC Air sensors has been integrated. This update ensures compatibility and addresses breaking changes in prior SDK versions. The changes enhance sensor performance and reliability. This update affects the Windows OS only.
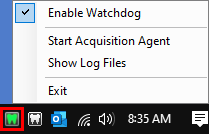
New Watchdog Utility (Windows Only)
A watchdog utility is now installed when you update the acquisition agent. This utility is designed to monitor the agent’s status, restart it as needed, and log incidents. A new icon appears in the notification area of the Windows taskbar when the watchdog utility is installed. The color of the icon indicates the status: green indicates it is enabled, yellow indicates it is disabled, and red indicates there is an error.

You can click the icon to display a menu with the following options:
- Enable Watchdog – Initially there is a checkmark to indicate that it is enabled. To disable the utility, click this option to remove the checkmark (the icon will turn yellow). To enable the utility if it has been disabled, on the menu, click this option to add the checkmark (the icon will turn green).
- Start Acquisition Agent – To manually start the acquisition agent, click this option.
- Show Log Files – To open the folder that contains the log files, click this option.
- Exit – To exit the utility, click this option (the Agent Watchdog.exe process is terminated).
Notes:
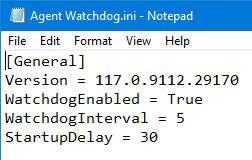
- Agent Watchdog.exe and Agent Watchdog.ini are installed in the same folder as the acquisition agent (by default, this is C:\Program Files (x86)\Acquisition Agent).
- You can change the interval and startup delay in Agent Watchdog.ini to configure the watchdog utility to suit your preferences.
Improved Acquisition Agent Silent Installation (Windows Only)
The silent installer for the acquisition agent has been improved to handle reboots, prevent unnecessary uninstalls/reinstalls, and ensure a smooth installation process.
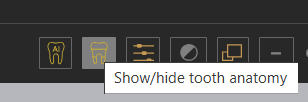
Showing/Hiding Tooth Anatomy (Detect AI)
With Detect AI enabled, you can show or hide tooth anatomy (as provided by Videa).
There is a new Show/hide tooth anatomy button on the lower toolbar. The icon is orange if tooth anatomy is visible or gray if tooth anatomy is being hidden. To view tooth anatomy, click the button.
Bug Fixes
- (AI-2978) Carestream Software Bridge – Acquisition remains on “Waiting for image” when “Acquire a 2D image link only” is selected, and no image is transferred.
- (AI-3309) Handy Sensor Integration – Images captured via direct integration appear like static, significantly lower in quality compared to the TWAIN source
- (AI-3530) Sometimes the “Finish Acquisition” button is enabled while images are still uploading, causing pending uploads to fail if the button is clicked.
- (AI-3568) The highlighted image in the Image Navigator does not always match the currently loaded image when Videa AI is enabled.
- (AI-3575) Double-clicking on an AI result does not reset brightness and contrast levels.
- (AI-3581) The error “Uncaught TypeError: this.drawImage is not a function” intermittently appears.
- (AI-3590) Tooltips are clipped at the bottom toolbar area when the cursor is positioned over an AI finding, especially after zooming.
- (AI-3602) When an exam is rearranged, images with a flip applied rotate in the opposite direction of the selected option.
- (AI-3614) Measurements can be drawn without calibration after straightening an image, resulting in incorrect values (for example, SL shows as 0).
- (AI-3616) Byte data types are not converted properly, leading to inconsistencies in API responses.
- (AI-3647) Rearranging exams fails if a user lacks AI credentials, with the process loading indefinitely and an “Invalid AI credentials” error thrown.
- (AI-3763) DEXIS Software Bridge – Images from the DEXIS Software Bridge arrive in Dentrix Ascend Imaging with incorrect rotations by default.
- (AI-3931) An error may occur when deleting, restoring, or selecting an image in the stack for a single-image exam.
- (AI-3515) Slow image uploads cause delays in acquisition and loading times.
- (AI-3889) You are unable to delete an image from a stack with two or more images.