Released 6/17/26
Future payment plans introduce a streamlined way for practices to schedule and collect patient payments over time with improved accuracy, automation, and visibility. Designed specifically to support offices that manage long‑term orthodontic treatment plans, this feature allows practices to collect a down payment at plan creation and automatically charge future‑dated monthly payments throughout the duration of treatment. All payments post correctly to the ledger, and credits apply to the correct patient account without manual effort. This process utilizes Dentrix Ascend Pay to securely charge a credit card on file, ensuring reliable and automated payment collection.
Future payment plans represent a meaningful enhancement over the standard payment plans in Dentrix Ascend. Standard payment plans can only be created for balances that have already been fully charged to the ledger, requiring all production to be posted upfront. Future payment plans work differently—charges are applied incrementally through down payments and monthly payments. This model aligns more naturally with provider production, reduces large upfront aging balances, and improves financial accuracy across extended ortho treatments.
Also, a dedicated dashboard provides clear insight into active plans, upcoming charges, completed payments, failed card retries, and overall plan status. By reducing manual billing tasks and improving cash‑flow predictability, future payment plans help practices manage long‑term patient balances more efficiently and deliver a consistent, reliable payment experience for orthodontic patients.
Prerequisites
Before setting up a future payment plan, ensure that your practice meets the following requirements:
- The Orthodontics package (an add-on feature that you can purchase separately from your Dentrix Ascend subscription) has been purchased and enabled. This package includes future payment plans.
- Dentrix Ascend Pay is enabled (this is required for charging credit cards on file).
- Provider information, fee schedules, and patient information are complete.
- Insurance details are entered.
- The following security rights have been granted to the applicable users:
- Create and Manage Payment Plans (in the “Ledger” category). This is a new security right. It affects standard and future payment plans.
- Edit Patient procedure amount (in the “Patient Procedures” category).
- Create and Manage Payment Plans (in the “Ledger” category). This is a new security right. It affects standard and future payment plans.
When to Use a Future Payment Plan
Use a future payment plan when the following are true:
- The patient is on a long-term treatment plan (such as for orthodontia).
- You want to charge a down payment now (optional).
- You want monthly charges to be automatically created and collected.
- You prefer not to post the full treatment amount to the ledger upfront.
Creating Future Payment Plans
There are two places where you can create a future payment plan. The steps differ slightly depending on where you begin.
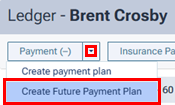
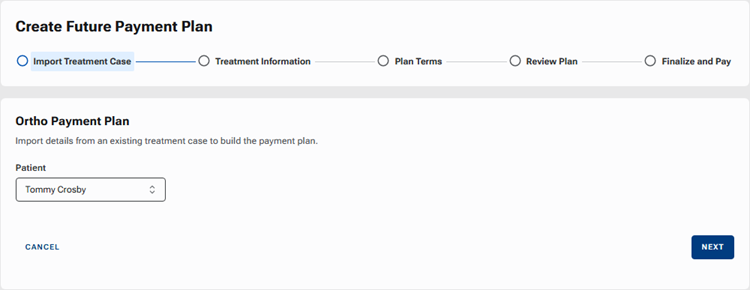
Option 1: From a guarantor’s/patient’s ledger
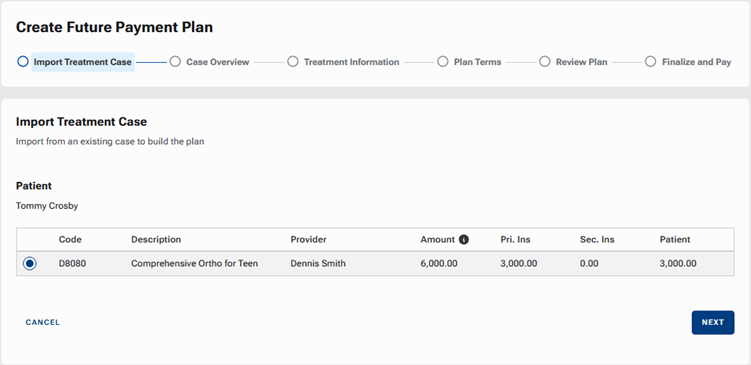
1. Open a patient’s or guarantor’s Ledger page.
2. Expand the Payment menu, and then select Create Future Payment Plan.
The Create Future Payment Plan page opens. The Import Treatment Case step is selected.
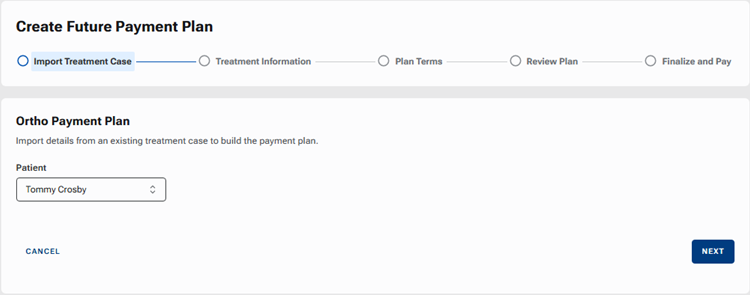
3. Select a Patient.
Note: If you are currently in the ledger of a guarantor, that guarantor and all patients who have that guarantor in common are available for selection. If you are currently in the ledger of a patient (someone who is not a guarantor), only that patient is available for selection.
4. Click Next.
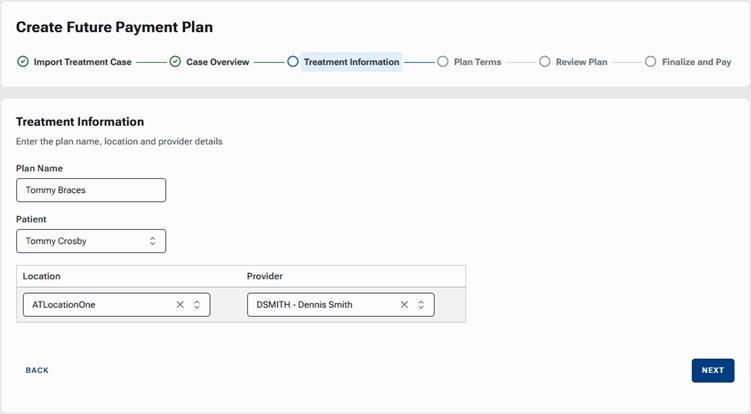
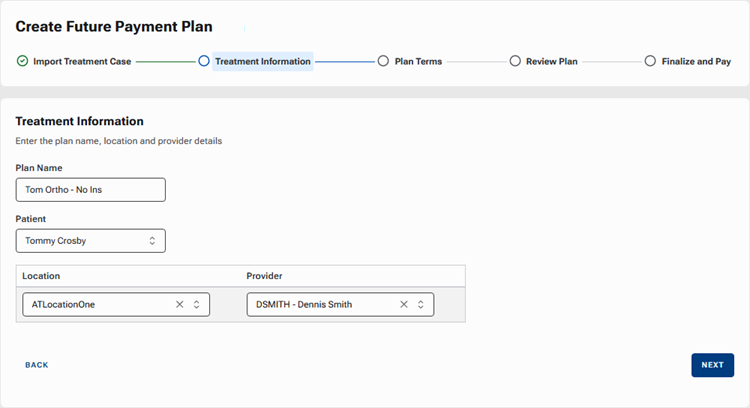
The Treatment Information step is selected.
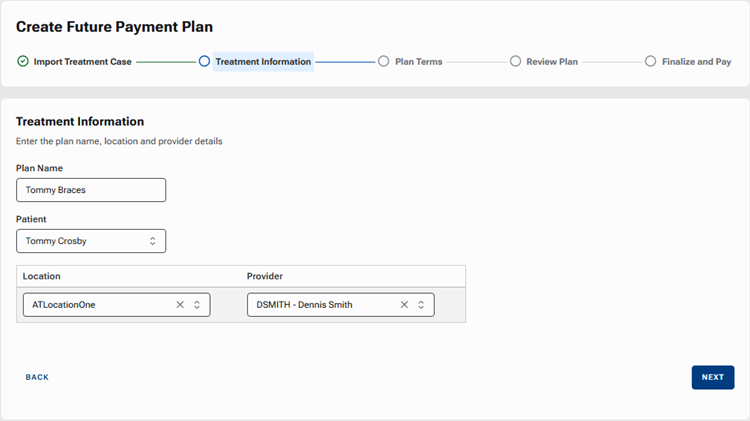
5. Set up the following options:
- Plan Name – Enter a name to identify the plan in Dentrix Ascend, such as on the Future Payment Plans dashboard.
- Location – By default, the location that you are logged in to currently is selected, but you can select a different location if necessary.
- Provider – Select the provider to associate with the plan.
6. Click Next.
The Plan Terms step is selected.
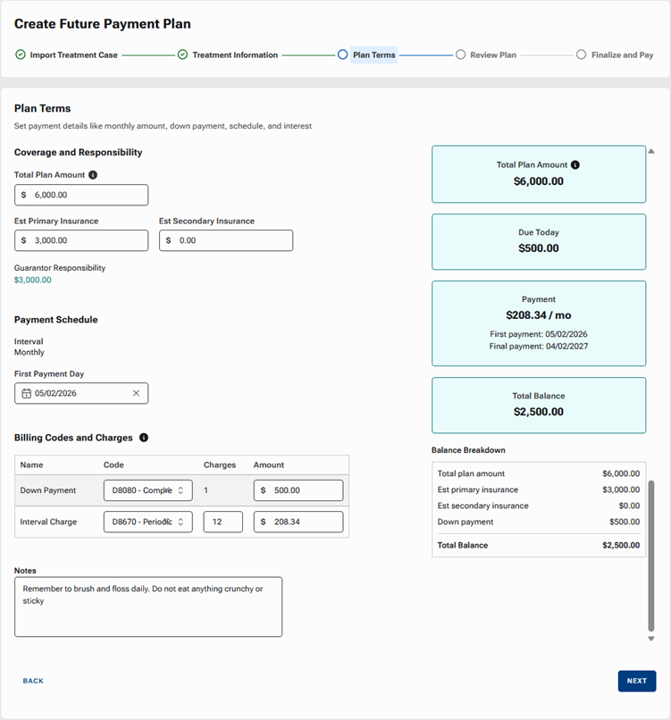
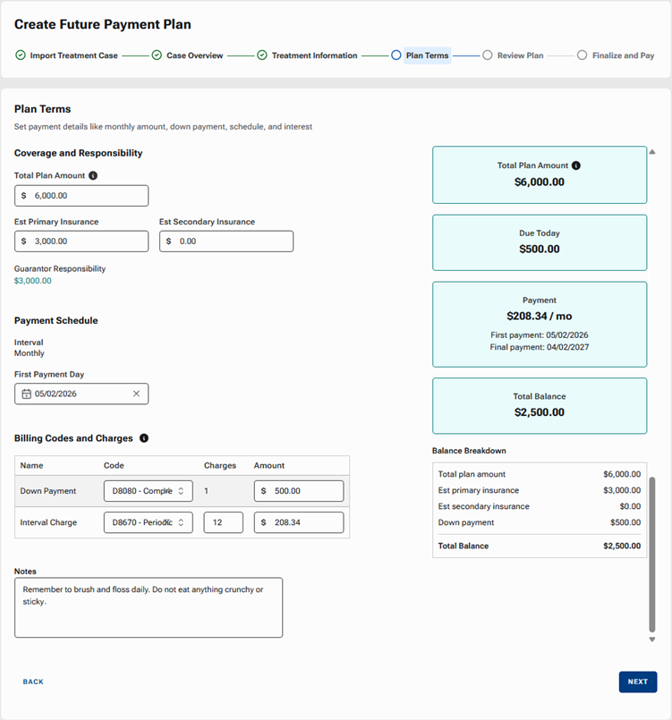
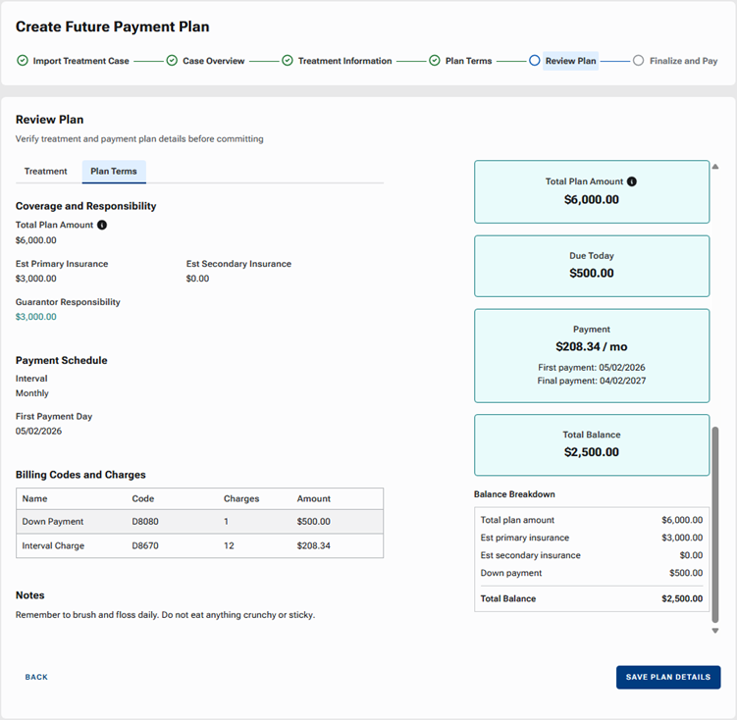
7. Set up the Coverage and Responsibility amounts:
- Total Plan Amount – Enter the sum of the patient portion and the insurance portion.
- Est Primary Insurance – Enter the primary insurance plan’s portion.
- Est Secondary Insurance – Enter the secondary insurance plan’s portion (if applicable).
The Guarantor Responsibility is calculated automatically and appears for your reference.
8. Under Payment Schedule, select the First Payment Day. The first of the recurring monthly payments will be posted on the specified date.
9. Set up the Billing Codes and Charges:
- Down Payment:
- Code – Select the procedure code that you are using for the patient’s treatment (such as D8080).
- Amount – If you are collecting a down payment, enter the applicable amount; otherwise, leave 0.00 entered. The credit card on file that you select in a later step will be used for the down payment.
- Code – Select the procedure code that you are using for the patient’s treatment (such as D8080).
- Interval Charge:
- Code – By default, the procedure code is D8670, but you can select a different procedure code to use for the automatic monthly recurring charges.
- Charges – By default, 1 is entered, but you can change the number. Enter the correct number of monthly recurring payments that you will be charging and collecting for the patient’s treatment.
- Amount – As you change the number of charges, the amount to charge per interval is updated automatically based on the remaining patient portion after the down payment is applied and the number of charges, but you can change the amount. If you change the amount to charge per interval, the number of charges updates automatically.
- Code – By default, the procedure code is D8670, but you can select a different procedure code to use for the automatic monthly recurring charges.
Note: As you complete these fields in this step, the Total Plan Amount, Due Today, Payment, and Total Balance (the blue boxes on the right) and the Balance Breakdown (below the blue boxes on the right) update automatically.
10. Enter any Notes that you want to attach to the plan.
11. Click Next.
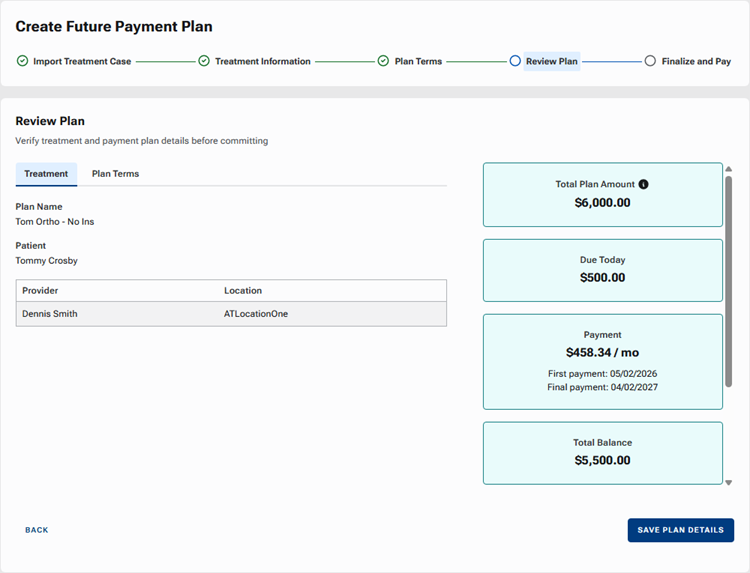
The Review Plan step is selected.
Review the Total Plan Amount, Due Today, Payment, and Total Balance (the blue boxes on the right) and the Balance Breakdown (below the blue boxes on the right).
Review the details on the Treatment tab.
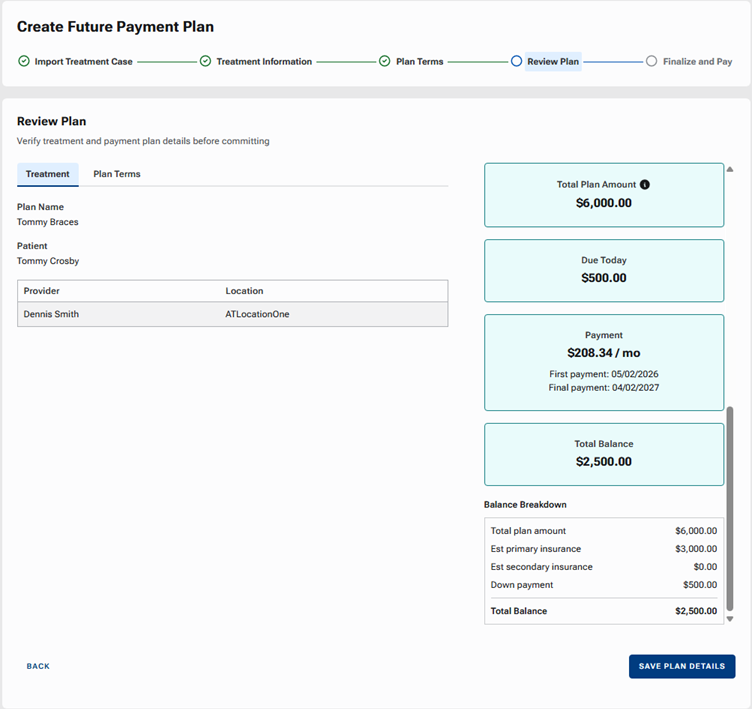
Review the details on the Plan Terms tab.

Note: If changes need to be made, click the Back link and make the necessary changes as needed.
12. If the plan details are accurate, click Save Plan Details.
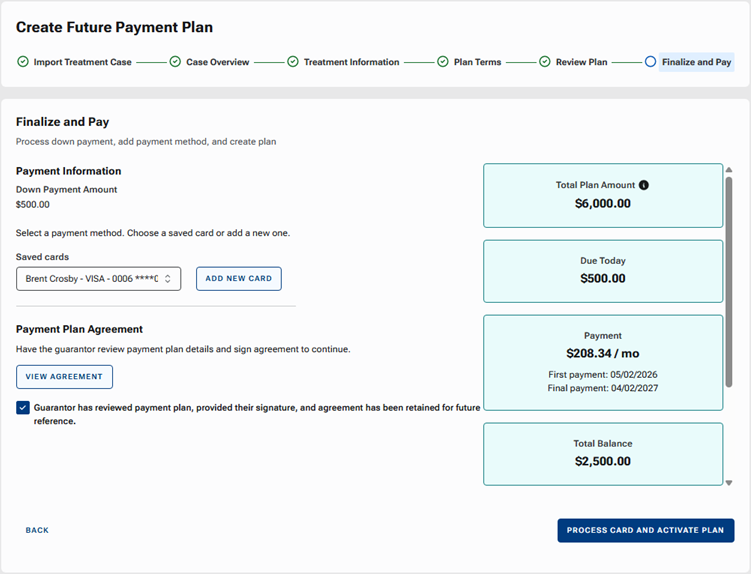
The Finalize and Pay step is selected.
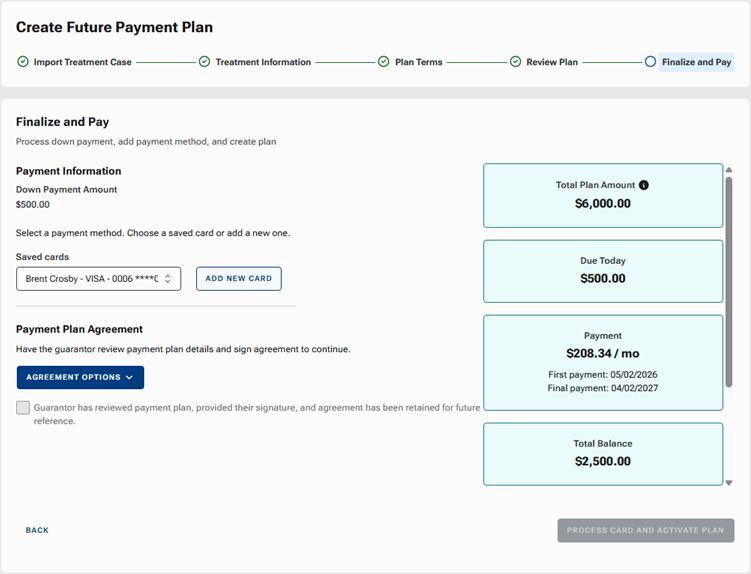
13. For the down payment (if applicable) and recurring monthly payments, you must associate a credit card with this plan. Do one of the following:
- From the Saved cards list, select a card that has already been saved on file.
- If no card is on file or the correct credit is not on file, and if the patient is physically present in the office, click Add New Card to add a new card on file using your payment device.
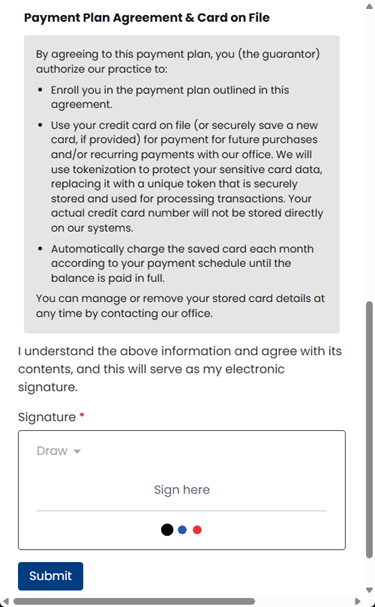
14. To have the guarantor sign the agreement, do one of the following:
- Option 1 – Send the agreement to the online patient forms portal.
- Option 2 – Print the agreement.
For Option 1, do the following:
a. On the Agreement Options menu, select Send To Patient.
The Request Signature from [Patient Name] dialog box appears.
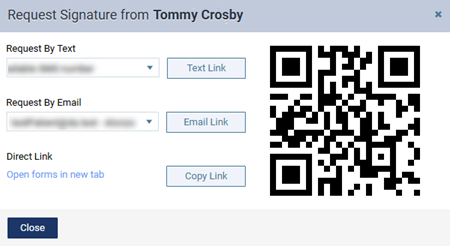
b. Do one of the following:
- To send the portal link to a mobile phone number, select the desired number from the list, and then click (or tap) Text Link. This button is available only if the patient has a mobile phone number entered in his or her record. The mobile phone numbers of the patient and his or her primary contact are available for selection.
- To send the portal link to an email address, select the desired address from the list, and then click (or tap) Email Link. This button is available only if the patient has an email address entered in his or her record. The email addresses of the patient and his or her primary contact are available for selection.
- To copy the portal link to the Windows Clipboard, click (or tap) Copy Link. You can then paste the link in a document or email message for the patient.
- To open the patient’s portal on another tab of your Web browser (for instance, if you are opening it on a practice-owned mobile device that the patient can use to complete forms in the office; be sure to close any other Dentrix Ascend tabs before giving the device to the patient), you can click (or tap) the Open forms in new tab link.
- To access the patient’s portal link on a mobile device, use the camera on that device to scan the QR code, and then tap the link that appears on the mobile device.
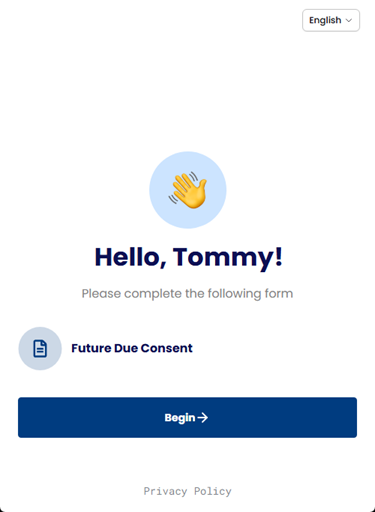
c. The patient/guarantor logs in to the portal.
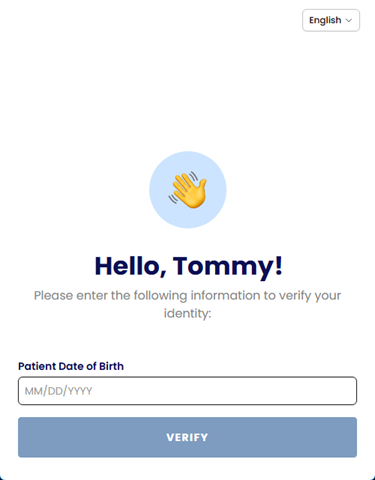
d. The patient/guarantor clicks Begin to start the Future Due Consent form.

e. The patient/guarantor reviews the plan details.

f. The patient/guarantor reads the agreement, signs, and then clicks Submit.

g. Close the Request Signature from [Patient Name] dialog box to return to the Create Future Payment Plan page.
For Option 2, do the following:
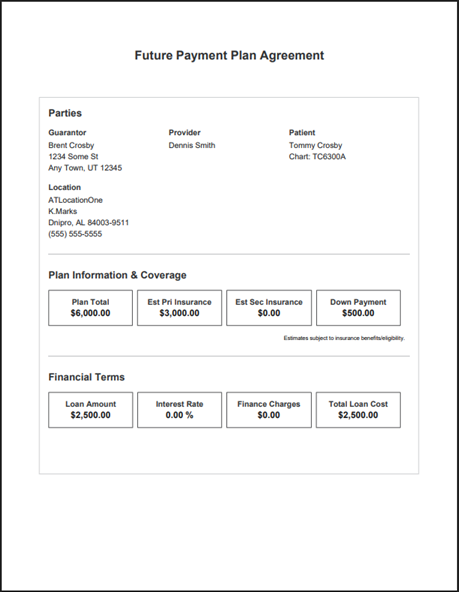
a. On the Agreement Options menu, select View/Print.
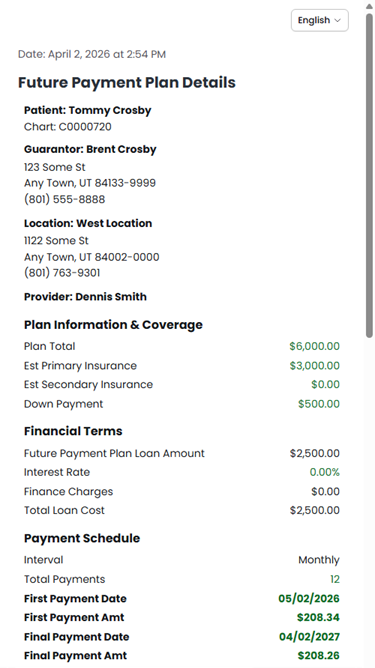
The agreement opens as a PDF document on a new browser tab.

b. Print the agreement.
c. The guarantor signs it.
Note: You can scan the signed document into the patient’s Document Manager record. That way your office and the guarantor both have copies for your records.
d. Close the browser tab that is displaying the agreement to return to the tab that is displaying the Create Future Payment Plan page.
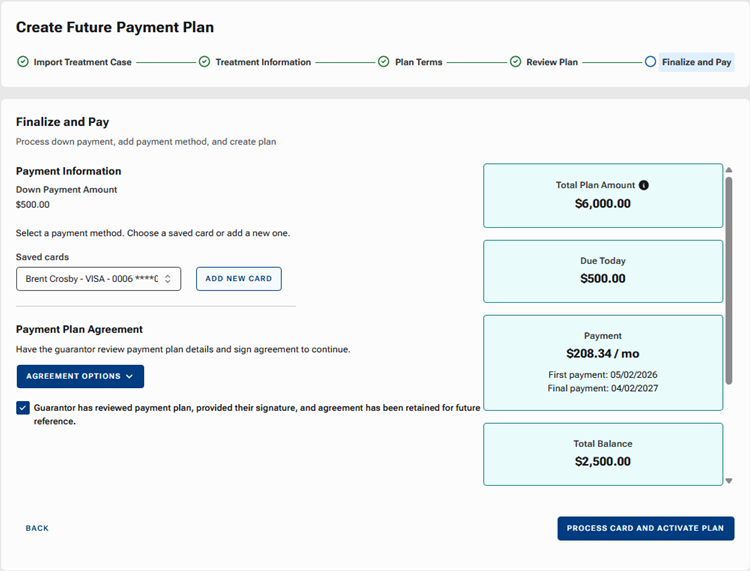
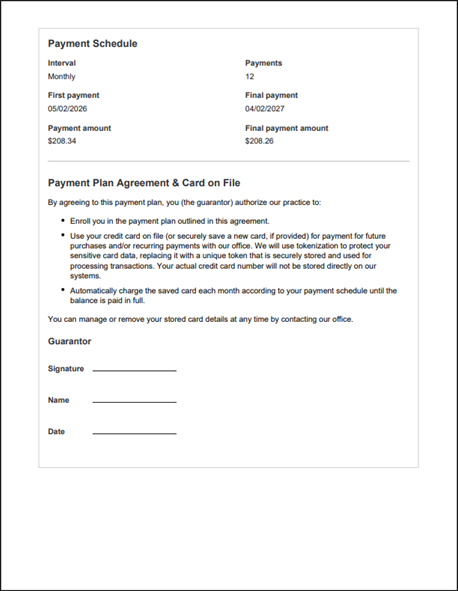
15. Select the Guarantor has received payment plan, provided the signature, and agreement has been retained for future reference. checkbox.
16. Click Process Card And Activate Plan.
The following transactions are posted to the ledger:
- The ortho procedure code (such as D8080). The amount charged is the sum of the specified down payment and the specified estimated insurance portion.
- The credit card payment for the specified down payment. The down payment amount was processed through Dentrix Ascend Pay using the specified card on file.

Option 2: From a patient’s treatment plan preview
Creating a future payment plan from a patient’s treatment plan helps ensure accuracy, reduces manual data entry, and ensures that the plan reflects contracted fees and realistic insurance expectations. When you start from the treatment plan, the system automatically uses fee schedules, max allowable amounts, and estimated insurance benefits. The following details will be automatically populated in the plan: total plan amount, estimated primary insurance portion, estimated secondary insurance portion, and down payment code.
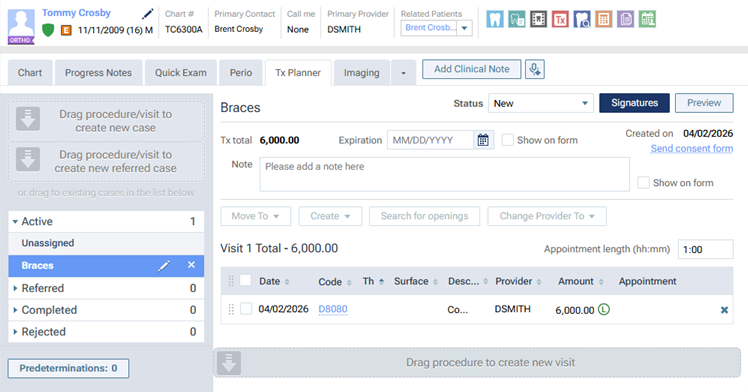
1. Open a patient’s record, and navigate to the Tx Planner tab of the patient’s clinical record.
2. On the left panel, under Active, select a case with an ortho procedure.
3. Click Preview.
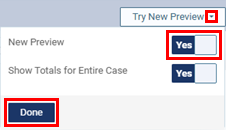
Note: You must be using the enhanced view to complete the following steps. If you are not, expand the Try New Preview menu, set the New Preview switch to Yes, and then click Done.
4. Click + Future Payment Plan.

The Create Future Payment Plan page opens. The Import Treatment Case step is selected.
5. Select the ortho procedure for the plan, and then click Next.
The Case Overview step is selected.
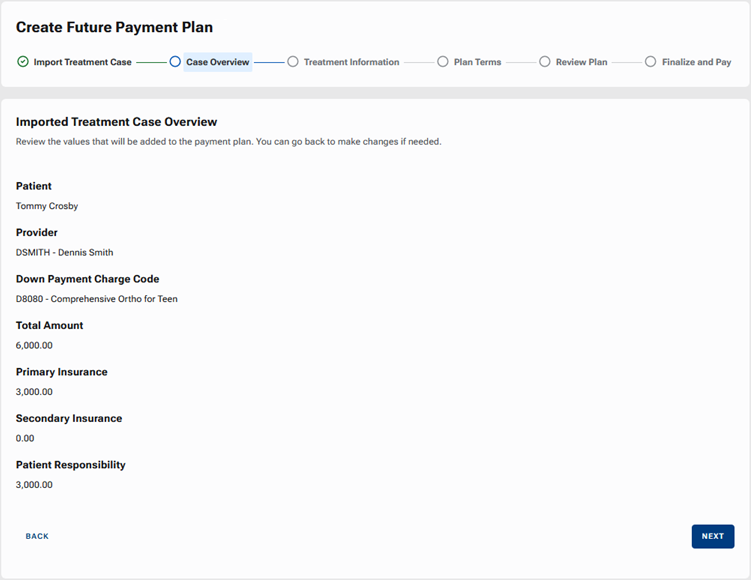
6. Review the pre‑populated financial details, and then click Next.
The Treatment Information step is selected.
7. Set up the following options:
- Plan Name – Enter a name to identify the plan in Dentrix Ascend, such as on the Future Payment Plans dashboard.
- Location – By default, the location that you are logged in to currently is selected, but you can select a different location if necessary.
- Provider – Select the provider to associate with the plan.
8. Click Next.
The Plan Terms step is selected.
9. Set up the Coverage and Responsibility amounts:
- Total Plan Amount – Enter the sum of the patient portion and the insurance portion.
- Est Primary Insurance – Enter the primary insurance plan’s portion.
- Est Secondary Insurance – Enter the secondary insurance plan’s portion (if applicable).
The Guarantor Responsibility is calculated automatically and appears for your reference.
10. Under Payment Schedule, select the First Payment Day. The first of the recurring monthly payments will be posted on the specified date.
11. Set up the Billing Codes and Charges:
- Down Payment:
- Code – Select the procedure code that you are using for the patient’s treatment (such as D8080).
- Amount – If you are collecting a down payment, enter the applicable amount; otherwise, leave 0.00 entered. The credit card on file that you select in a later step will be used for the down payment.
- Code – Select the procedure code that you are using for the patient’s treatment (such as D8080).
- Interval Charge:
- Code – By default, the procedure code is D8670, but you can select a different procedure code to use for the automatic monthly recurring charges.
- Charges – By default, 1 is entered, but you can change the number. Enter the correct number of monthly recurring payments that you will be charging and collecting for the patient’s treatment.
- Amount – As you change the number of charges, the amount to charge per interval is updated automatically based on the remaining patient portion after the down payment is applied and the number of charges, but you can change the amount. If you change the amount to charge per interval, the number of charges updates automatically.
- Code – By default, the procedure code is D8670, but you can select a different procedure code to use for the automatic monthly recurring charges.
Note: As you complete these fields in this step, the Total Plan Amount, Due Today, Payment, and Total Balance (the blue boxes on the right) and the Balance Breakdown (below the blue boxes on the right) update automatically.
12. Enter any Notes that you want to attach to the plan.
13. Click Next.
The Review Plan step is selected.
Review the Total Plan Amount, Due Today, Payment, and Total Balance (the blue boxes on the right) and the Balance Breakdown (below the blue boxes on the right).
Review the details on the Plan Terms tab.
Review the details on the Treatment tab.
Note: If changes need to be made, click the Back link and make the necessary changes as needed.
14. If the plan details are accurate, click Save Plan Details.
The Finalize and Pay step is selected.

15. For the down payment (if applicable) and recurring monthly payments, you must associate a credit card with this plan. Do one of the following:
- From the Saved cards list, select a card that has already been saved on file.
- If no card is on file or the correct credit is not on file, and if the patient is physically present in the office, click Add New Card to add a new card on file using your payment device.
16. To have the guarantor sign the agreement, do one of the following:
- Option 1 – Send the agreement to the online patient forms portal.
- Option 2 – Print the agreement.
For Option 1, do the following:
a. On the Agreement Options menu, select Send To Patient.
The Request Signature from [Patient Name] dialog box appears.

b. Do one of the following:
- To send the portal link to a mobile phone number, select the desired number from the list, and then click (or tap) Text Link. This button is available only if the patient has a mobile phone number entered in his or her record. The mobile phone numbers of the patient and his or her primary contact are available for selection.
- To send the portal link to an email address, select the desired address from the list, and then click (or tap) Email Link. This button is available only if the patient has an email address entered in his or her record. The email addresses of the patient and his or her primary contact are available for selection.
- To copy the portal link to the Windows Clipboard, click (or tap) Copy Link. You can then paste the link in a document or email message for the patient.
- To open the patient’s portal on another tab of your Web browser (for instance, if you are opening it on a practice-owned mobile device that the patient can use to complete forms in the office; be sure to close any other Dentrix Ascend tabs before giving the device to the patient), you can click (or tap) the Open forms in new tab link.
- To access the patient’s portal link on a mobile device, use the camera on that device to scan the QR code, and then tap the link that appears on the mobile device.
c. The patient/guarantor logs in to the portal.

d. The patient/guarantor clicks Begin to start the Future Due Consent form.
e. The patient/guarantor reviews the plan details.
f. The patient/guarantor reads the agreement, signs, and then clicks Submit.
g. Close the Request Signature from [Patient Name] dialog box to return to the Create Future Payment Plan page.
For Option 2, do the following:
a. On the Agreement Options menu, select View/Print.
The agreement opens as a PDF document on a new browser tab.

b. Print the agreement.
c. The guarantor signs it.
Note: You can scan the signed document into the patient’s Document Manager record. That way your office and the guarantor both have copies for your records.
d. Close the browser tab that is displaying the agreement to return to the tab that is displaying the Create Future Payment Plan page.
17. Select the Guarantor has received payment plan, provided the signature, and agreement has been retained for future reference. checkbox.
18. Click Process Card And Activate Plan.
The following transactions are posted to the ledger:
- The ortho procedure code (such as D8080). The amount charged is the sum of the specified down payment and the specified estimated insurance portion.
- The credit card payment for the specified down payment. The down payment amount was processed through Dentrix Ascend Pay using the specified card on file.

Future Recurring Charges
Monthly, the following actions occur for the future payment plan:
- The next scheduled monthly charge is automatically posted to the patient’s ledger on the specified date.
- The credit card on file is automatically charged through Dentrix Ascend Pay on the specified date.
- Charges and payments remain in sync with no manual processing.
Submitting a Claim for Ortho Treatment
Make sure that you flag the procedure as ortho treatment for the insurance claim.
To submit a claim for ortho treatment
1. On the patient’s Ledger page, click the ortho procedure code (such as D8080).

The Edit Procedure dialog box appears.
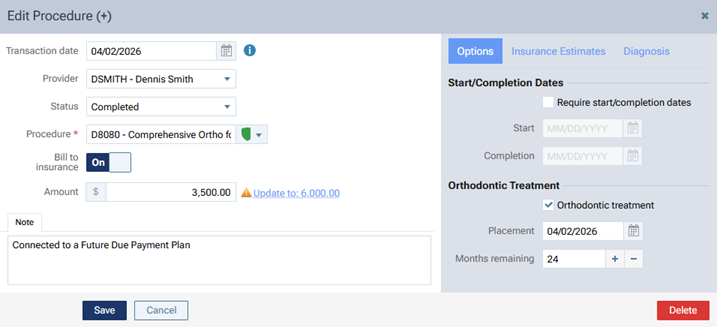
2. On the Options tab (on the right), under Orthodontic Treatment, select the Orthodontic treatment checkbox, and then set up the following options:
- Placement – Click in the box to display a calendar, and then select the date that the orthodontic device was placed.
- Months remaining – In the box, enter the number of months that remain until the treatment is complete.
3. Click Save.
4. Click Patient Walk Out.
The Patient Walkout dialog box appears.
5. On the Create Claims tab, select the ortho procedure, and then click Create Claim.
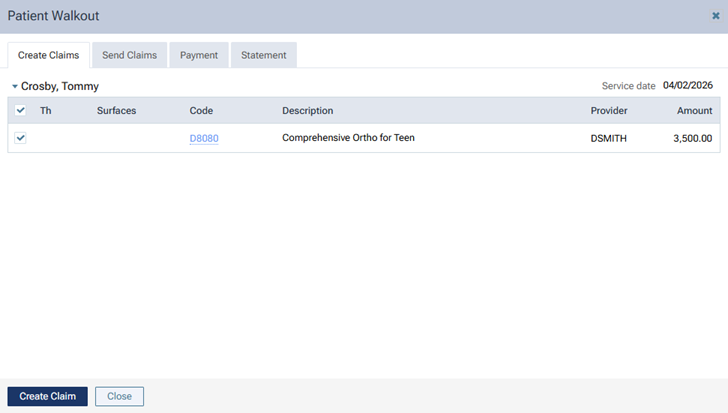
Note: If you did not complete steps 1-3, before you click Create Claim in the Patient Walkout dialog box, you can click the ortho procedure’s code, which is a link and then make the necessary changes explained in steps 1-3.
6. On the Send Claims tab, select the claim you created in the previous step, and then click Send Selected Claims.
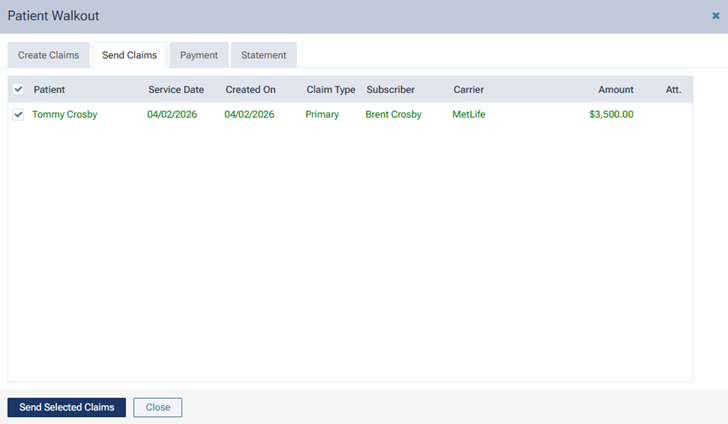
The claim is posted to the ledger.

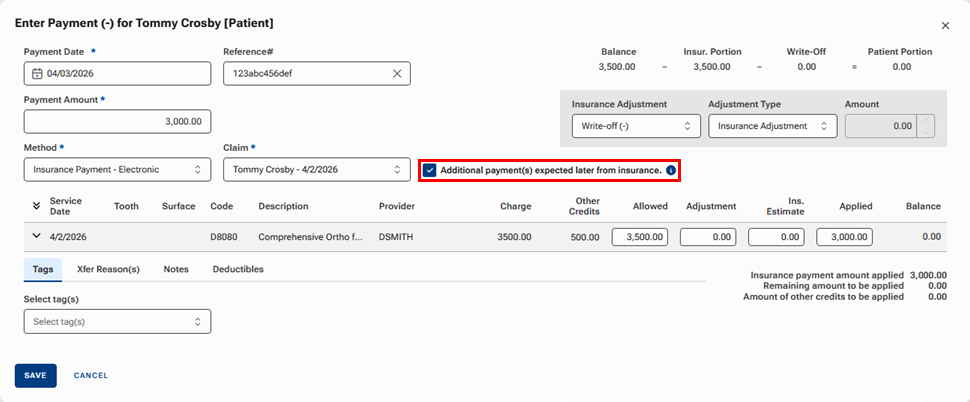
Note: When you enter the insurance payment for a claim with an ortho procedure, the Additional payment(s) expected later from insurance checkbox is selected automatically.
Viewing and Managing Future Payment Plans
Accessing an account’s plans
From a guarantor’s ledger, you can access the guarantor’s future payment plans and the future payment plans of the family members who have this guarantor in common.

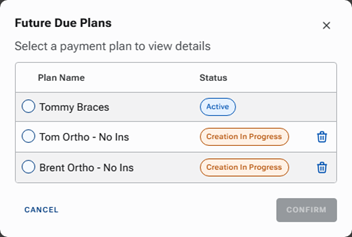
Note: If the account has only one plan, the above dialog box does not appear; you are taken directly to the only plan’s details.
Accessing a patient’s plans
From a patient’s ledger, you can access only the patient’s future payment plans.


Note: If the patient has only one plan, the above dialog box does not appear; you are taken directly to the only plan’s details.
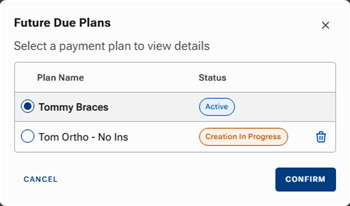
Plan statuses
The status of a plan can vary:
- Active – A plan has an “Active” only if the Finalize and Pay step was completed (the Process Card And Finalize Plan button was clicked).
- Creation In Progress – A plan has a “Creation In Progress” status only if the plan details in the Review Plan step were saved (the Save Plan Details button was clicked) but the Finalize and Pay step was not completed.
Viewing or editing a future payment plan
1. On the Ledger page, click Future Payment Plan.
2. If the patient has multiple future payment plans (or if the account has multiple, and you are viewing the guarantor’s ledger), select one, and then click Confirm.
The Future Plan – [Plan Name] page opens.
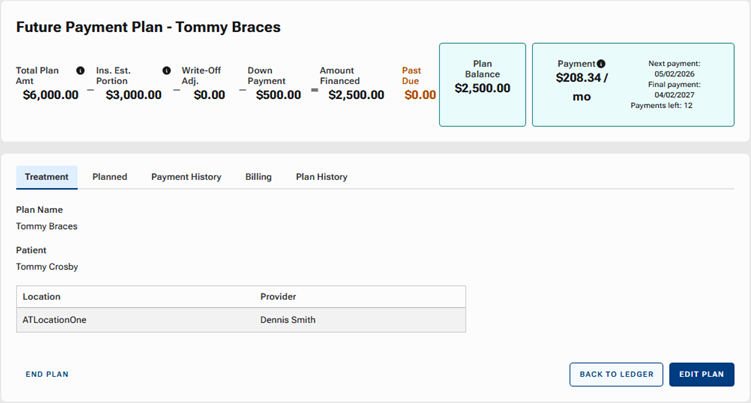
3. View information on each tab. If you need to make changes, click Edit Plan, make the necessary changes on the applicable tabs, and then click Save.
The following tabs are provided:
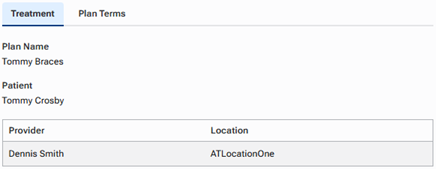
Treatment
The Treatment tab displays the plan name, patient name, location, and provider.
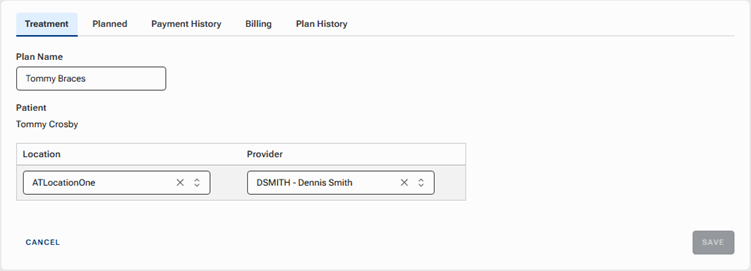
On the Treatment tab, you can make changes to the following options only:
- Plan Name.
- Location.
- Provider.
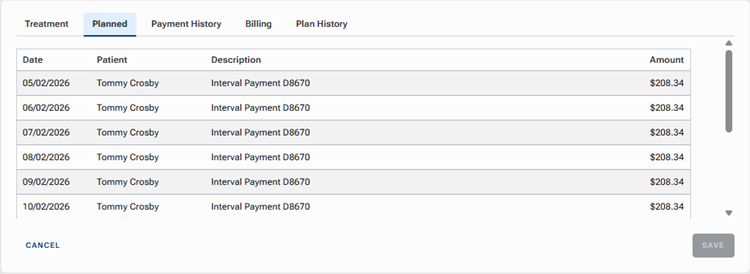
Planned
The Planned tab displays all scheduled upcoming payments.
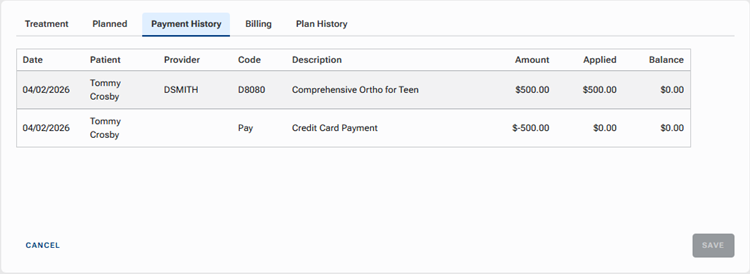
Payment History
The Payment History tab displays past charges and credit card payments (processed using the card on file) that were posted to the ledger.
Billing
The Billing tab displays the date of the next payment, card on file for the plan, procedure billing codes, charge amounts, and remaining number of payments.
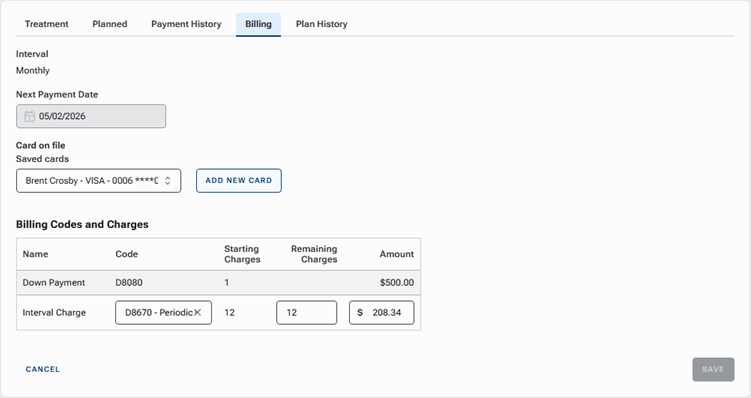
On the Billing tab, you can make changes to the following options only:
- Card on file – You can select a different card or add a new card.
- Interval Charge – You can change the Remaining Charges and Amount.
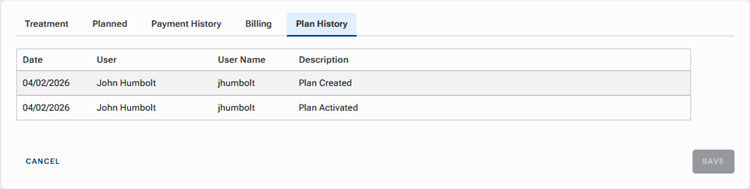
Plan History
The Plan History tab displays an audit log of events related the plan, such as creation and activation.
Ending a future payment plan
There are scenarios, such as the following, that require you to end a future payment plan and decide what to do with the remaining balance:
- Treatment has been completed ahead of schedule, and the patient must pay the remaining balance or a portion thereof.
- Treatment has been completed ahead of schedule, but you ended up not needing to do all the planned work, and none of the remaining balance needs to be paid by the patient.
- Treatment is not complete, but the patient would like to prepay the remaining balance in full.
- Treatment is not complete, but you offer a discount for paying off the balance early, so the patient would like to pay the portion of the remaining balance that was agreed upon.
- Treatment is not complete but will be completed elsewhere, so the patient must pay off any balance for the treatment completed thus far.
- Treatment is not complete but will be completed elsewhere, the patient has already paid for the treatment completed thus far, so no additional amount is to be collected from the patient.
To end a future payment plan
1. On the Ledger page, click Future Payment Plan.
2. If the patient has multiple future payment plans (or if the account has multiple, and you are viewing the guarantor’s ledger), select the plan with an “Active” status, and then click Confirm.

The Future Payment Plan – [Plan Name] page opens.

3. Click End Plan.
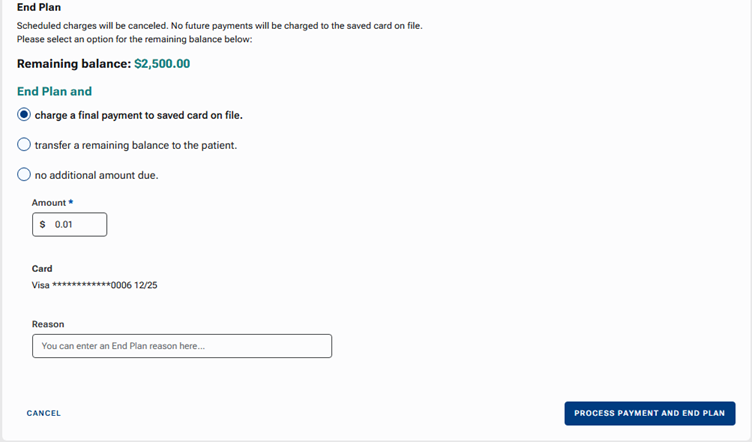
The remaining balance and options for ending the plan appear.
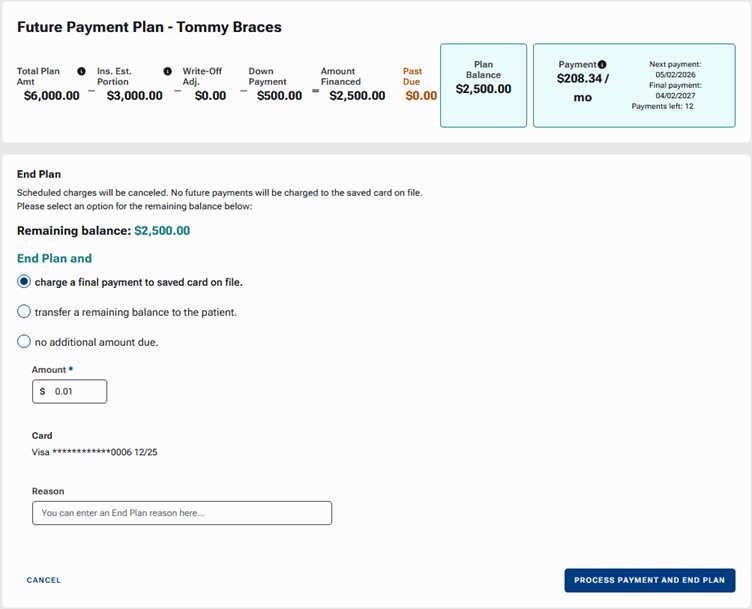
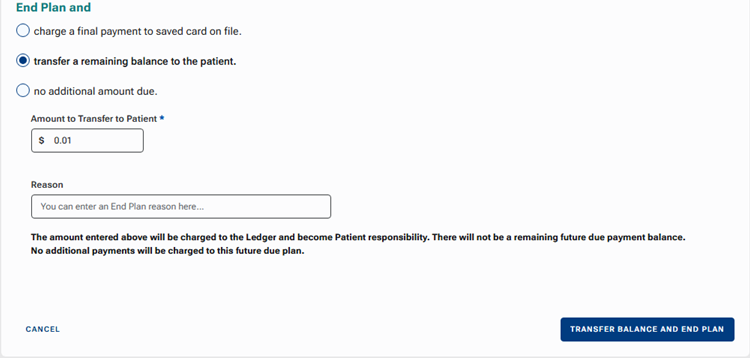
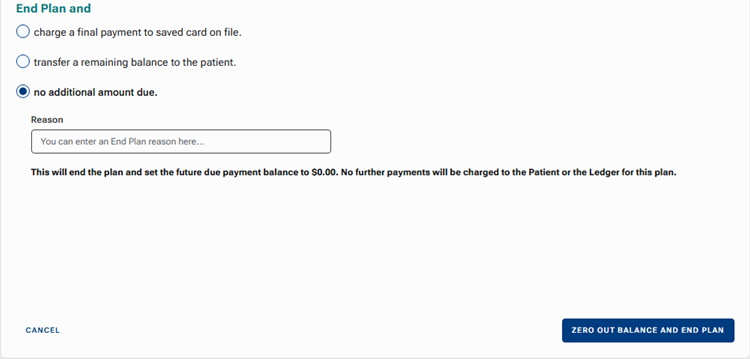
4. Use one of the following End Plan and options to handle the remaining balance:
charge a final payment to saved card on file. – Charge a specific amount to the card on file for the plan. You could use this option if, for example, treatment has been completed early, the patient owes the remaining balance or a portion thereof, and the patient wants to use the card on file to pay that amount.
With this option selected, enter an Amount to charge the card on file for the plan (the remaining balance or a portion thereof to charge the card on file for the plan), enter a Reason for ending the plan (optional), and then click Process Payment And End Plan.
transfer a remaining balance to the patient. – Transfer a specific amount to the patient’s ledger instead of charging the card on file for the plan. The patient can pay using a different method of payment (such as cash or a credit card not on file). You could use this option if, for example, the patient wants to prepay the balance before treatment is complete (such as wanting to use a tax refund to pay off some debt), but the patient does not want to use the card on file to pay that balance (such using a check to pay with money directly from their checking account).
With this option selected, enter the Amount to Transfer to Patient (the remaining balance or a portion thereof to become the patient’s responsibility; the card on file for the plan will not be charged), enter a Reason for ending the plan (optional), and then click Transfer Balance And End Plan.
no additional amount due. – The patient does not owe any more money for treatment under this plan. Do not transfer any of the remaining balance to the patient, and do not charge any of the remaining balance to the card on file for the plan. You could use this option if, for example, the patient is up to date on payments for treatment performed thus far, is moving, and will continue treatment elsewhere.
With this option selected, enter a Reason for ending the plan (optional), and then click Zero Out Balance And End Plan.
To delete a future payment plan that is in progress (not active)
Note: This is possible only if the patient has multiple future payment plans (or if the account has multiple, and you are viewing the guarantor’s ledger).
1. On the Ledger page, click Future Payment Plan.
If the patient has multiple future payment plans (or if the account has multiple, and you are viewing the guarantor’s ledger), the Future Plans dialog box appears.
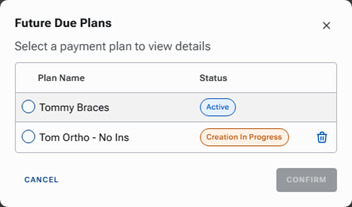
2. Click the trash can icon of a plan with a “Creation In Progress” status.
A confirmation message appears.
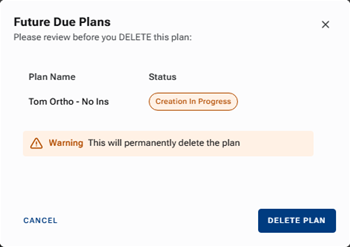
3. Click Delete Plan.
To finish a future payment plan that is in progress
1. On the Ledger page, click Future Payment Plan.
2. If the patient has multiple future payment plans (or if the account has multiple, and you are viewing the guarantor’s ledger), select a plan with a “Creation In Progress” status, and then click Confirm.

3. Review each step, making changes as needed, or go directly to the Finalize and Pay step.
Import Treatment Case
Treatment Information
Plan Terms

Review Plan
Finalize and Pay

Once you click Process Card And Activate Plan, the procedure and payment are posted, and the plan becomes active.
Future Payment Plans Dashboard
The Future Payment Plans dashboard provides visibility into both payment activity and overall plan health, helping your office monitor collections, identify issues early, and manage long‑term payment plans with confidence.
The Future Payment Plans dashboard helps your team accomplish the following:
- Reduce manual tracking of long‑term payment plans.
- Quickly identify and resolve payment issues.
- Maintain predictable revenue over the course of treatment.
- Keep billing aligned with treatment timelines.
To access the Future Payment Plans dashboard
On the Home menu, under Reports, select Future Plans.
The Future Payment Plans page opens.
The dashboard includes two views: Transactions and Plans.
Transactions
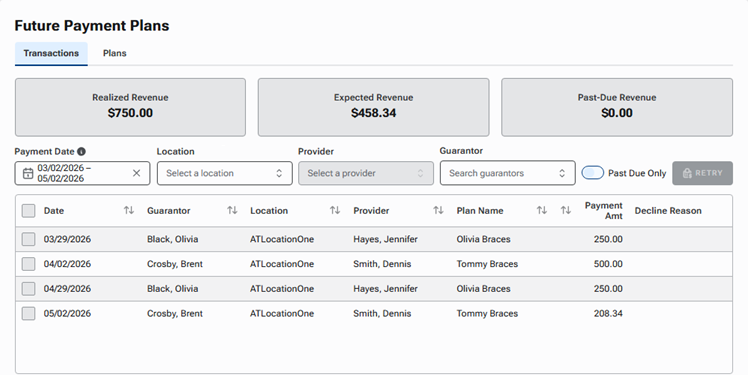
The Transactions view displays individual scheduled and completed payments for future payment plans. This view is best for daily or monthly reconciliation.
Use this view to do the following:
- Track recent and upcoming payments.
- Monitor realized versus expected revenue.
- Identify declined or past‑due transactions.
By default, transactions are displayed from one month in the past through one month in the future. The date range can be adjusted but is limited to a maximum total range of two months. Use filters to focus on specific locations, providers, or guarantors; or use filters to quickly identify past‑due payments.
Plans

The Plans view displays a high‑level view of all active future payment plans and their current statuses.
Use this view to do the following:
- Monitor overall payment plan health.
- Identify patients with remaining balances.
- Support patient conversations about payment progress.
- Prioritize outreach for plans that need attention.
Each row represents a single plan, showing overall amounts, balances, and the scheduled monthly payment. Plans with past due payments are visually highlighted to make follow‑up easy. Use filters to narrow the results by location, provider, guarantor, or past due status.