Tracking your patients’ insurance information can be time consuming. You must verify that your patients’ insurance plans are active and ensure that payment estimates are accurate. This may require your office staff to visit multiple insurance websites daily.
Verifying a patient’s insurance eligibility and understanding a patient’s insurance plan benefits are key to ensuring that you are compensated appropriately for the care you provide your patients and that your patients enjoy the full insurance benefits to which they are entitled. Dentrix Ascend Eligibility Pro helps ensure that you have access to the most accurate insurance eligibility information available.
In addition to all the standard eligibility verification features of Dentrix Ascend Eligibility Essentials, Eligibility Pro provides you with the following:
- Advanced searches – It scours payers’ online portals, pulling in more data than are usually received, such as patient history, frequency limitations, and procedure code level coverage percentages.
- Broader coverage – It works with more payers and provides greater access to additional data.
- Flexible payment options – You can pay either per request or monthly:
- Per request – Pay a fee per request with no commitment.
- Subscription based – Choose a monthly package for a lower cost per request. To learn more, please call 1-866-955-5694.
- Per request – Pay a fee per request with no commitment.
Notes:
- To use Eligibility Essentials or Pro, each location must have an eTrans User ID (to verify, go to Settings > Location Information).
- Ensure that your firewall allows access to the dentalapp.cc website by adding the following exception to your firewall rules: *.dentalapp.cc (consult your office’s IT Support person for assistance).
Setting Up the Payer Connection Portal
To use Eligibility Pro requests to get enhanced insurance eligibility data, you must create payer connections.
To add payer connections
1. On the Settings menu, click the new option called Payer Connection Portal (under Production).
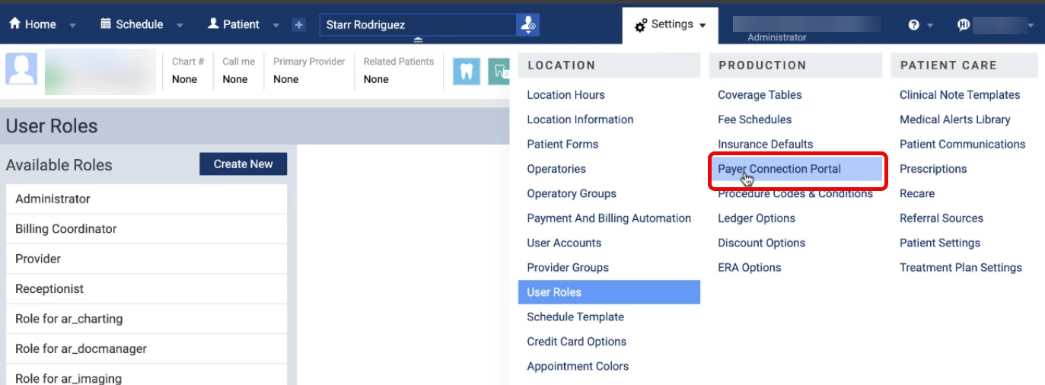
New Security Right: There is a new security right called “Payer Connection Portal” (under the “Insurance” category) that controls the availability of the Payer Connection Portal option on the Settings menu. By default, no users are granted this right.
The Payer Connection Portal page opens on a new browser tab. Initially, there are no payer connections.

2. Click New Payer Connection.
The New Payer Connection dialog box appears.
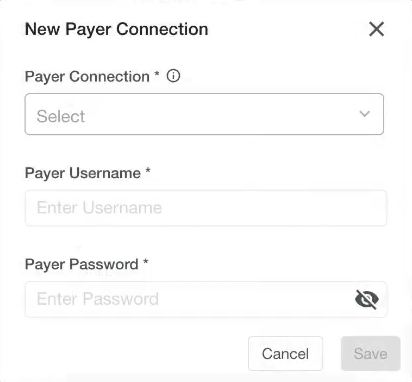
3. Select a Payer Connection.
Note: With a payer connection selected, a message appears, explaining that several payers are included under the umbrella of the selected payer connection.
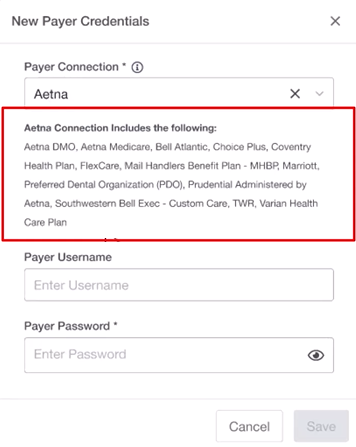
4. In the Payer Username and Payer Password boxes, enter the credentials to access that payer’s online portal.
5. Click Save.
6. If the payer connection requires two-factor authentication, do the following:
a. In the Status column, click the corresponding Two-Factor Auth Required link.

b. Enter the code that the insurance company sends to you by email or text message, and then click Verify.
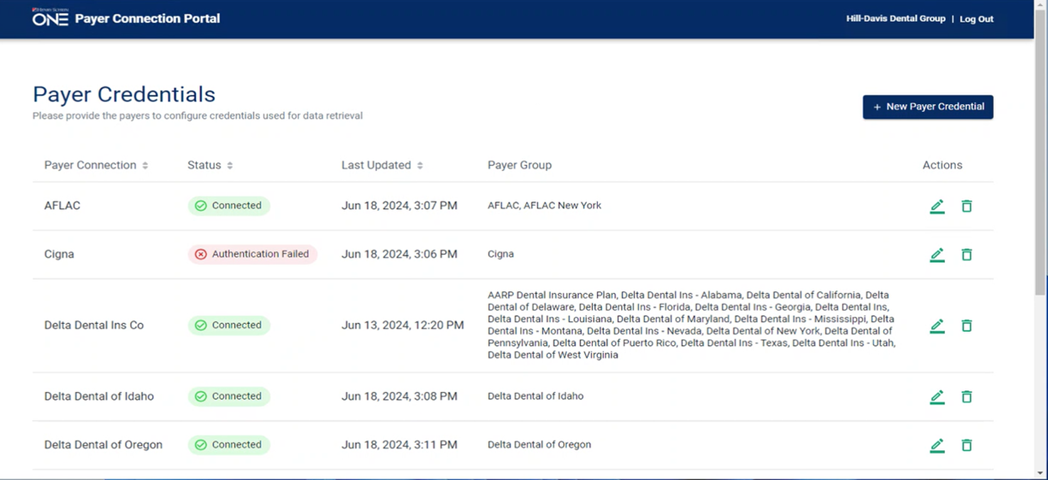
Note: If the payer connection has been successfully authenticated, its Status is “Connected.”

7. Repeat steps 2-6 as needed to add other payer connections.
Notes:
- If an authentication fails, click the corresponding Edit icon
 in the Actions column to open the Edit Payer Credentials dialog box and verify that the credentials you entered are correct.
 - With a payer connection established, Dentrix Ascend attempts to get enhanced data from a payer. However, if the payer supports standard and enhanced data, to provide the most complete response possible, Dentrix Ascend attempts to merge the data from both sources according to the following criteria:
- If the enhanced and standard data are available, Dentrix Ascend returns the enhanced and standard data.
- If only the enhanced data are available, Dentrix Ascend returns only that data.
- If the enhanced data are not available, Dentrix Ascend attempts to return the standard data.
- If the enhanced and standard data are available, Dentrix Ascend returns the enhanced and standard data.
- You are charged for an Eligibility Pro request only if it returns enhanced data.
- For payers (such as BCBSTX, Delta SD, and Delta OR) that support only Eligibility Pro requests, if an eligibility verification request fails, Dentrix Ascend returns a “Payer Not Participating” error.
Automatic Batch Insurance Eligibility Verifications
Existing functionality of Dentrix Ascend Eligibility Essentials allows you to enable or disable batch insurance eligibility verifications for a location and allows you to specify the number of lead days (business days with appointments; based on the location’s hours) for eligibility verifications. The lead days are used for batch Eligibility Essentials and Pro verifications.
With Eligibility Essentials and Pro, Dentrix Ascend verifies eligibility every three hours for patients with appointments that are scheduled for the next specified number of lead days, skipping patients whose eligibility has already been verified automatically in the current calendar month.
Note: Prior to the release of Eligibility Pro, batch verifications occurred nightly.
Dentrix Ascend also verifies eligibility immediately after an appointment is scheduled today or for the next specified number of lead days unless a verification has already received within the past 30 days. This is existing functionality; however, an Eligibility Pro request is now possible.
On-demand Insurance Eligibility Verifications
Existing functionality of Dentrix Ascend Eligibility Essentials allows you to use the Insurance Eligibility List to verify eligibility for insurance coverage for patients with upcoming appointments; however, there is a minor change to the interface to allow for Eligibility Pro (enhanced) requests.
To verify eligibility statuses
1. On the Schedule menu, select Insurance Eligibility.
The Insurance Eligibility page opens.
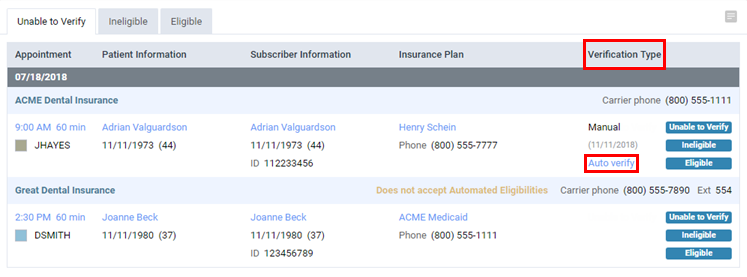
Previously, there was an Auto verify link in the Verification Type column.
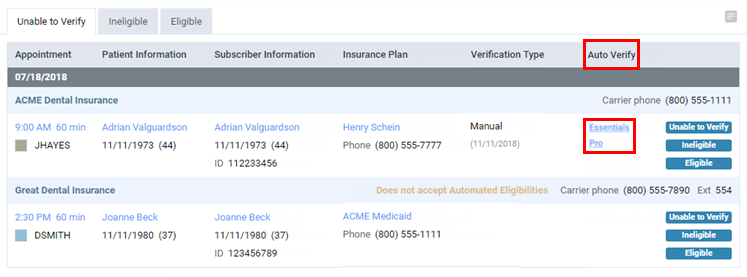
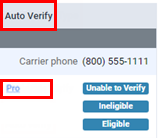
Now, there is an Auto Verify column. In that column there is either a Pro link (for Eligibility Pro) or an Essentials link and a Pro link (for Eligibility Essentials).
2. For an appointment on the Unable to Verify, Ineligible, or Eligible tab, do one of the following:
- For Eligibility Essentials, click one of the following links:
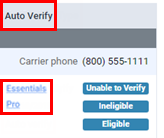
- Essentials – To request standard data.
- Pro – To request standard data and enhanced data (if available).
Note: A Pro request is subject to a per transaction cost. If you do not want Pro requests to be available for anyone at your office, contact a Henry Schein One representative at 1-800-336-8749 to have the option turned off.
If you click the Pro link, the Eligibility Pro Request Confirmation dialog box appears. Read the statement about pricing. If you have not set up payer connections, you must do so before you proceed (click the connect your payers link or Cancel). To not show this confirmation message for 30 days, select the Do not show this warning for 30 days checkbox. Then, click Continue.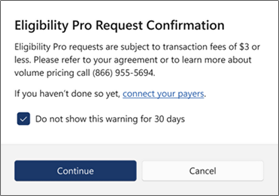
- Essentials – To request standard data.
- For Eligibility Pro, click the Pro link to request standard data and enhanced data (if available).
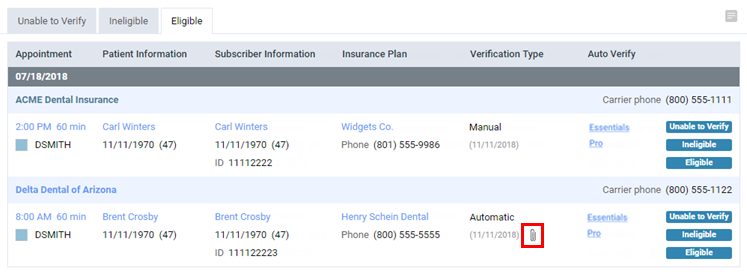
3. After a response is received, you can click the paper clip icon in the Verification Type column to view the eligibility information contained in the response.
E Icon Colors
The color of an appointment’s “E” icon varies according to the eligibility status:
![]() (Orange) – Unable to verify (this is existing functionality).
(Orange) – Unable to verify (this is existing functionality).
![]() (Red) – Ineligible (this is existing functionality).
(Red) – Ineligible (this is existing functionality).
 (Green) – Eligible (this is new functionality).
 (White/Green; with red dot) – Eligible; deductibles and benefits are available for importing (this is new functionality).
Viewing Insurance Eligibility Information for Appointments
Existing functionality of Dentrix Ascend Eligibility Essentials allows you to view a standard response for an eligibility request; however, an Eligibility Pro (enhanced) response is now possible.
To view insurance eligibility information
Click an appointment’s red or green “E” icon.

If a document that contains the patient’s eligibility information exists, the document appears.
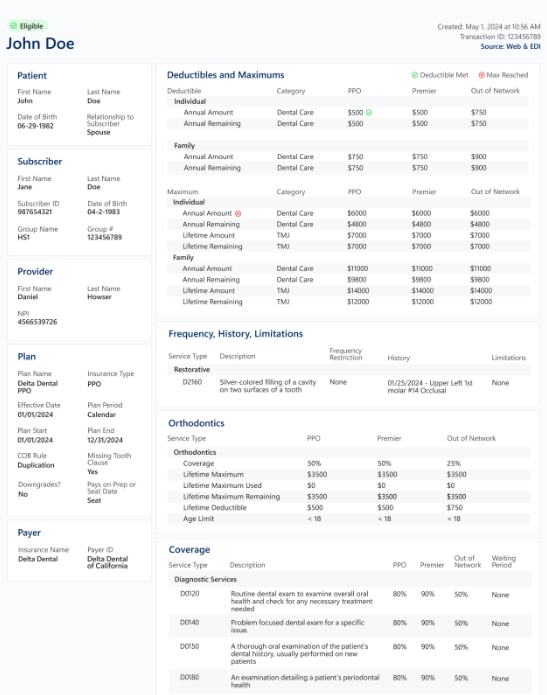
Note: Documents with eligibility information are stored in the corresponding patients’ Document Managers. This is existing functionality; however, enhanced data are now possible in those documents.
Importing Deductibles and Benefits
With Dentrix Ascend Eligibility Essentials and Pro, you can import deductible and benefit details for a patient’s insurance plan.
To import deductibles and benefits
1. If deductibles and benefits are available for importing, the “E” icon on an appointment tile is a green E with red dot on a white background. Click the “E” icon.
New Security Right: There is a new security right called “Import Insurance Benefit Details” (under the “Insurance” category) that controls the availability of this representation of the “E” icon. By default, all users are granted this right.

The Import Insurance Benefit Details page opens.
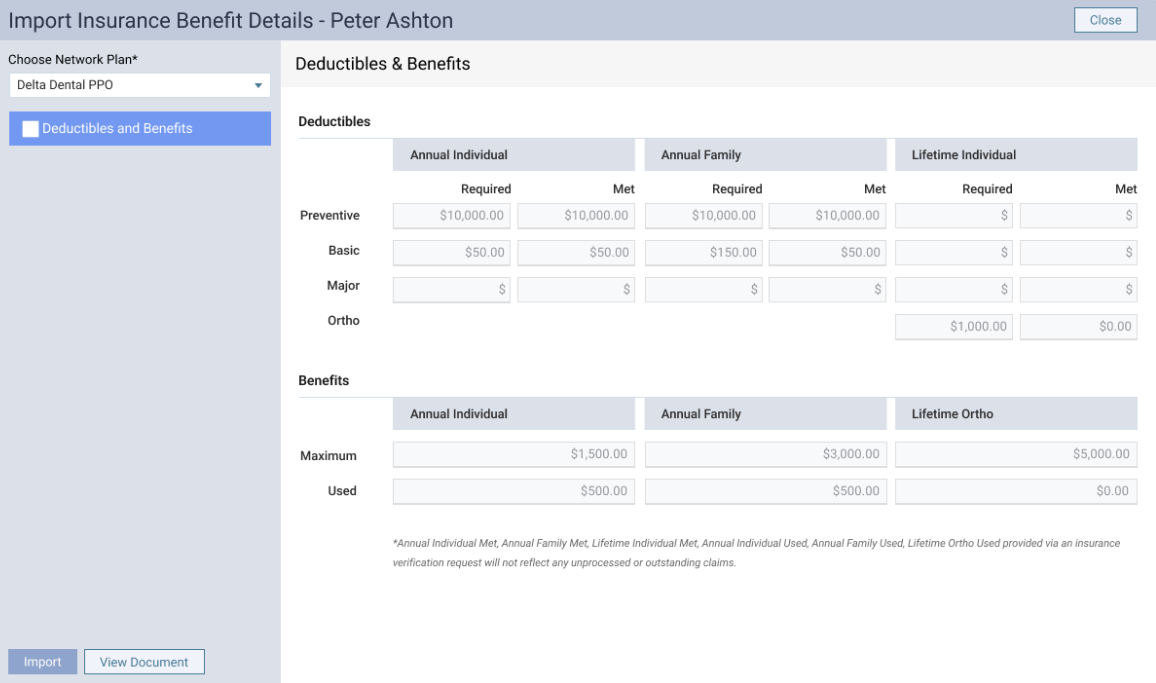
2. From the Choose Network Plan list, select the type of plan that corresponds to the correct network status (such as in-network or out-of-network).
Note: When eligibility results are received, the payer may include coverage information for more than one type of plan under its umbrella. Make sure you select the correct type of plan so the correct coverage details are imported.

3. Review the required and met deductibles and the maximum and used benefits.
4. Select the checkbox next to Deductibles and Benefits on the left.
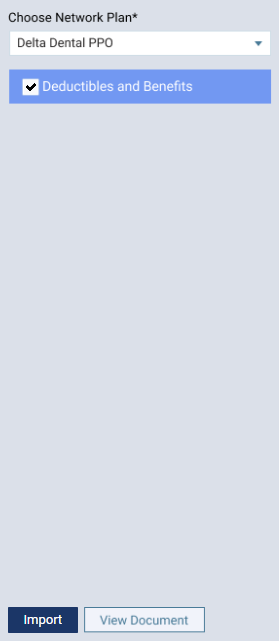
5. Click Import.
A confirmation message appears.
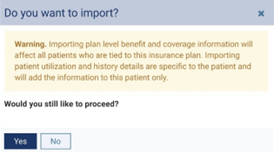
Notes:
- The plan-level deductible amounts (required amounts) and benefit amounts (maximum amounts) for the plan will be overwritten. This affects not only the current patient but all patients in any family who are covered by the plan.
- The patient- and family-level deductible amounts (met amounts) and benefit amounts (used amounts) for the plan will be overwritten. This affects the current patient and any of his or her family members who are covered by the plan.
6. Click Yes.
When the import is successful, a green success message appears briefly, and a green checkmark icon appears next to Deductibles and Benefits on the left.
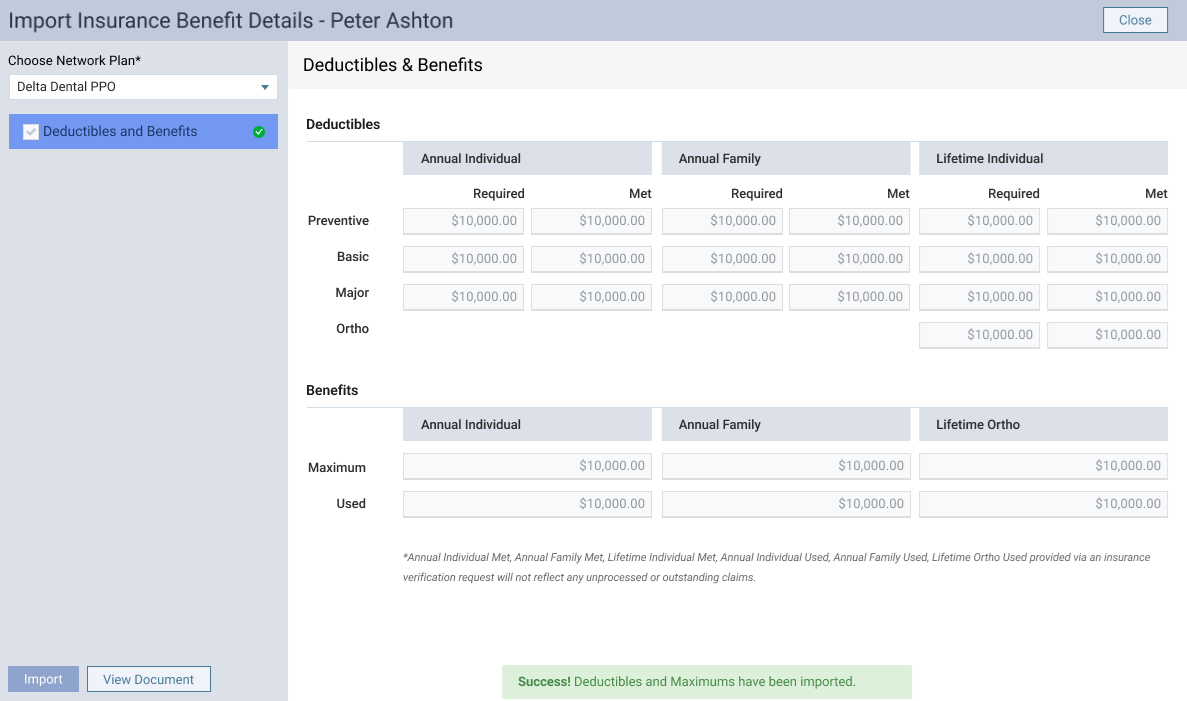
7. Click Close to return to the Calendar page.
Note: If you click Close prior to performing an import, a confirmation message appears so you can choose how to proceed. Click one of the following buttons:
- Mark as Done – You are returned to the Calendar page, and the “E” icon becomes a white E on a green background.
- Exit without Importing – You are returned to the Calendar page, and the “E” icon stays a green E with a red dot on a white background.
- Cancel – You are returned to the Import Insurance Benefit Details page.

