Released 11/19/25 (for organizations with locations in multiple time zones)
Released 3/21/24 (for organizations with all locations in one time zone)
You can now change the coordination order of insurance plans that are attached to a patient’s record as needed.
Important: Changing the coordination order will create two responsibilities for each payer: the original insurance responsibility (such as primary) for the coverage period up to, but not including, a specified as-of date; and the new insurance responsibility (such as secondary) for the coverage period starting at the specified as-of date. The payer will be responsible for the insurance plan under both the original coordination order and the new order.
1. Do one of the following:
Swap two existing plans’ positions, and start new insurance responsibilities
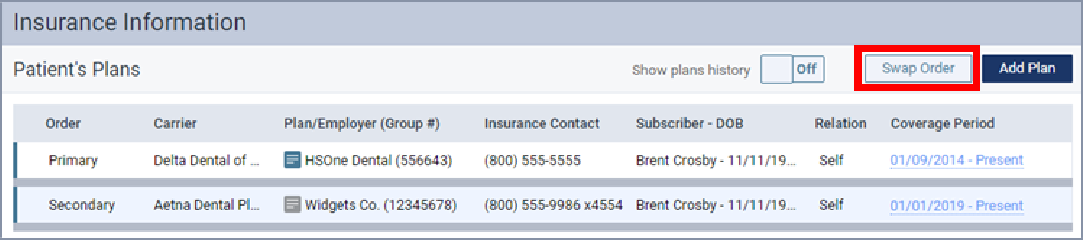
You can swap the positions of two active insurance plans in the coordination order.
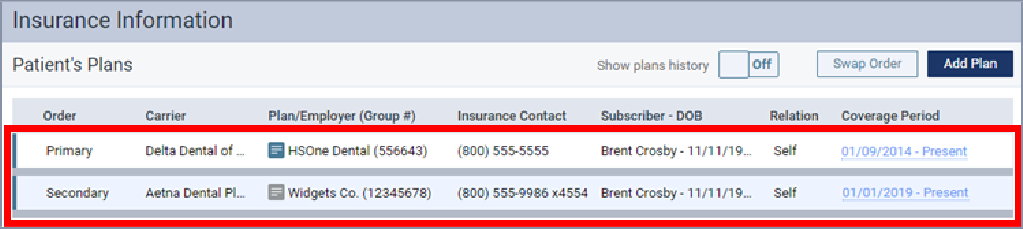
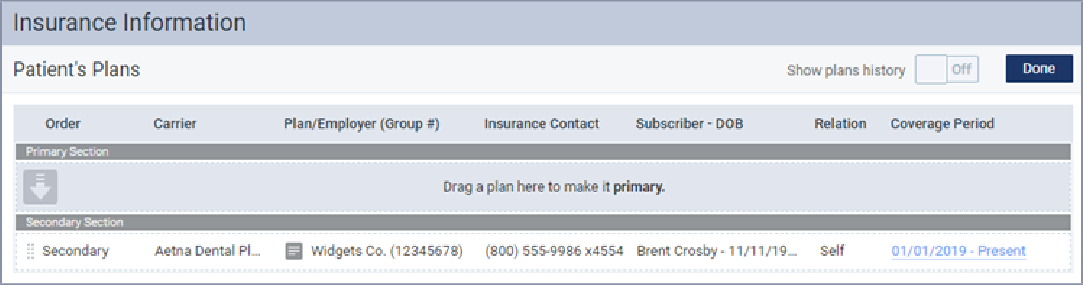
On a patient’s Insurance Information page (on the Patient menu, select Insurance Information), use either of the following methods.
Method A: Dragging a plan
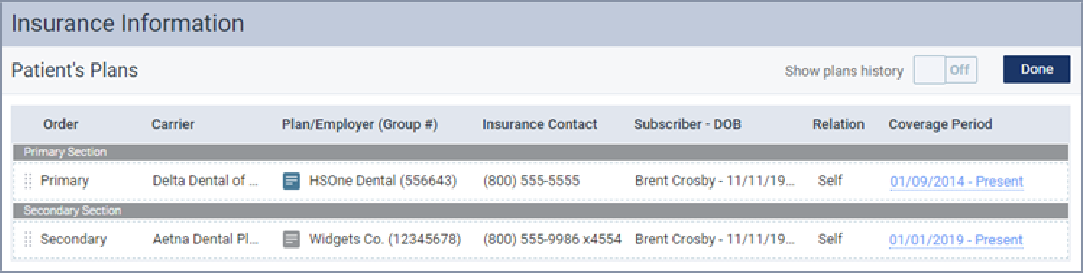
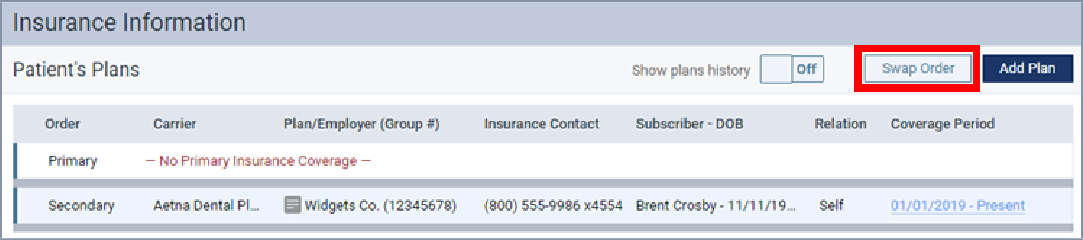
Click Swap Order.
The insurance plans are divided into sections by insurance responsibility. Any plan can be dragged to any section.
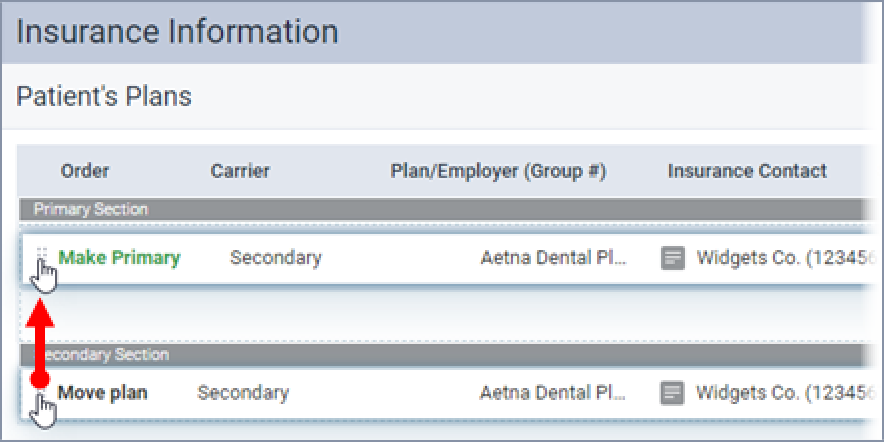
Drag a plan by the handle ![]() to another section.
to another section.
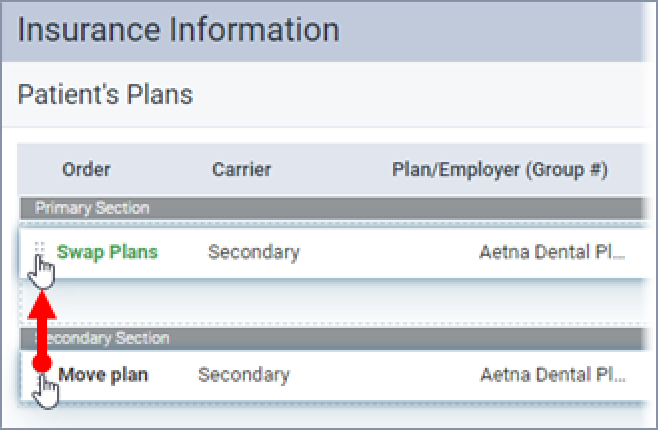
The Change Insurance Coordination Order/Coverage Range dialog box appears.
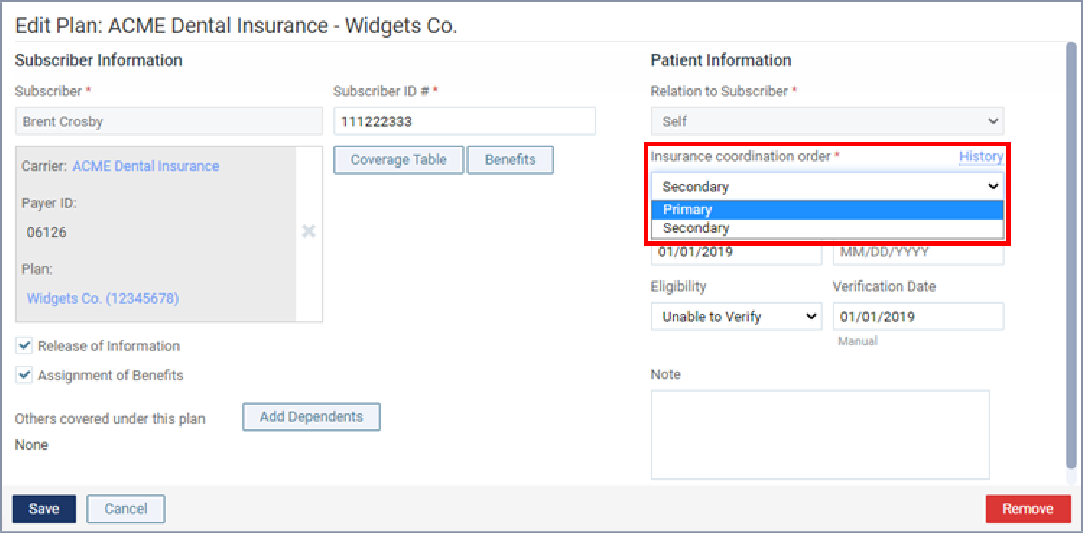
Method B: Editing a plan
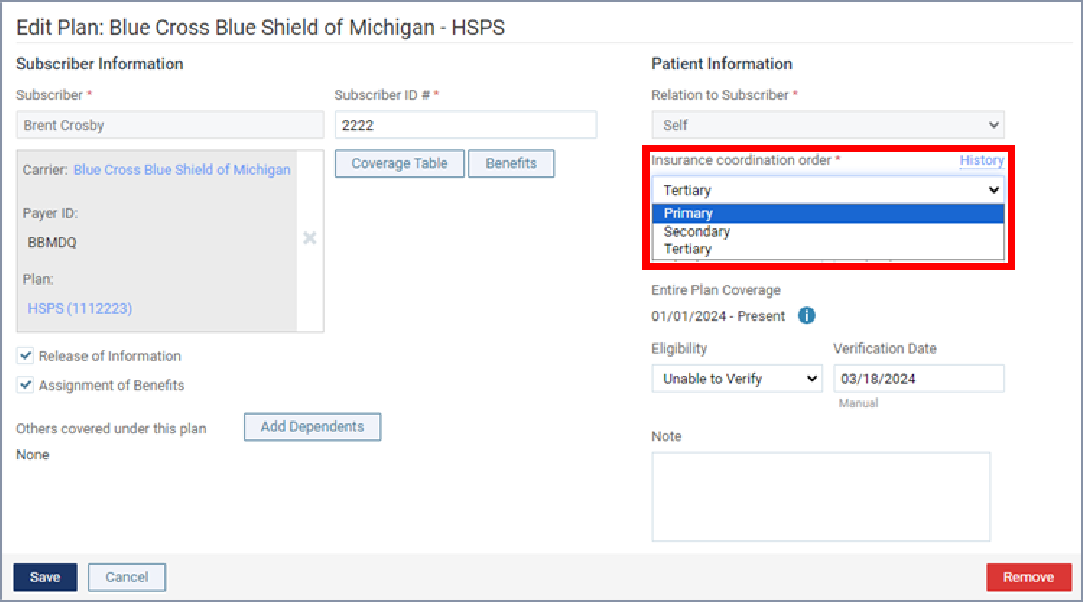
Select an insurance plan.
The options for editing insurance information become available.
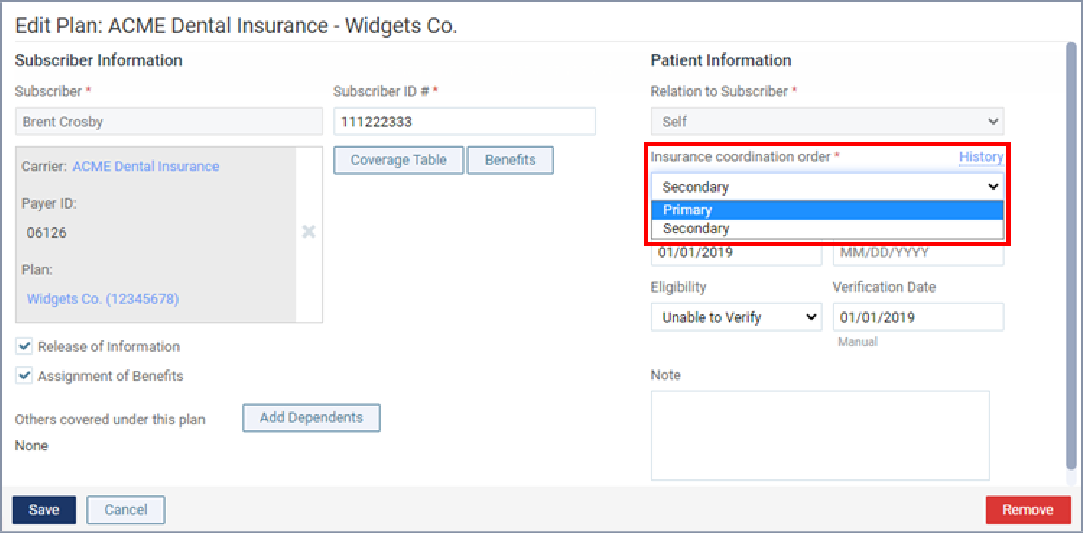
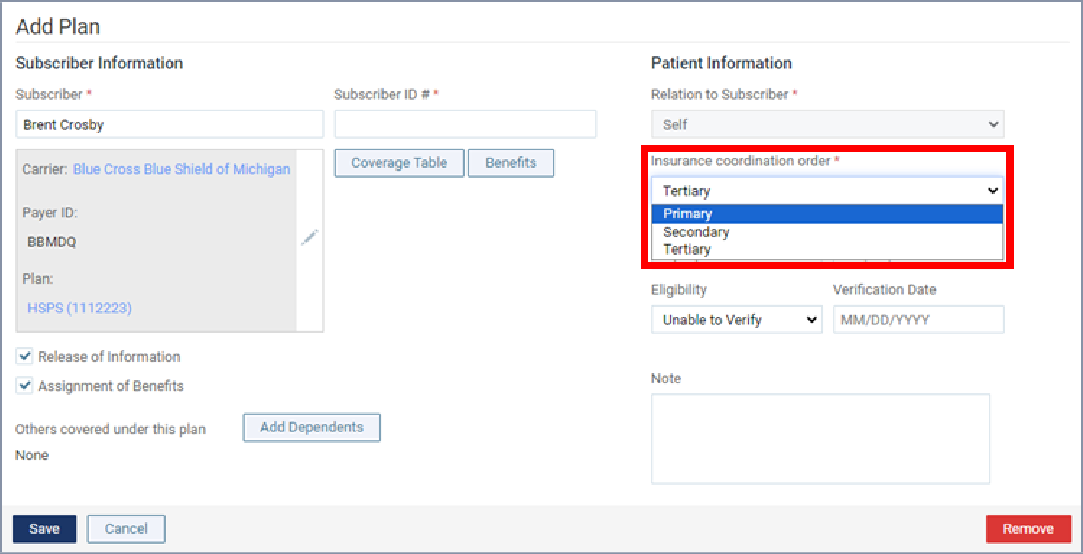
From the Insurance coordination order list, select an insurance responsibility in the coordination order that has an insurance plan.
Note: The insurance responsibilities that are available on the Insurance coordination order list are the ones that have active insurance plans and missing insurance plans in the coordination order.
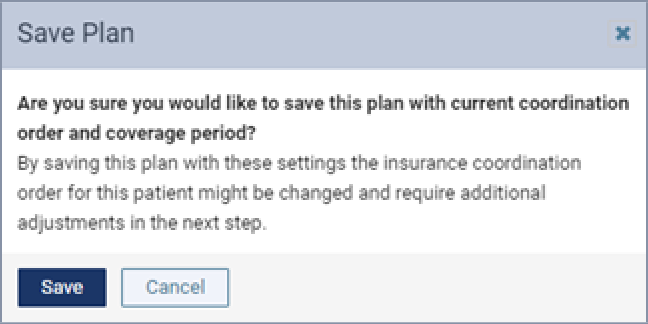
Click (or tap) Save (the change will not be saved yet). The Save Plan message box appears.

Click (or tap) Save (the change will not be saved yet).
The Change Insurance Coordination Order/Coverage Range dialog box appears.
Proceed to the next step.
Add an existing plan to an empty position, and start new insurance responsibilities
If an insurance plan is missing at a given position in the coordination order (because the plan either expired or was removed), you can fill the empty position with any one of the patient’s active insurance plans.
On a patient’s Insurance Information page (on the Patient menu, select Insurance Information), use either of the following methods.
Method A: Dragging a plan
Click Swap Order.
The insurance plans are divided into sections by insurance responsibility. Any plan can be dragged to any section.
Drag a plan by the handle ![]()
![]() to another section.
to another section.
The Change Insurance Coordination Order/Coverage Range dialog box appears.
Method B: Editing a plan
Select an insurance plan.
The options for editing insurance information become available.
From the Insurance coordination order list, select an insurance responsibility in the coordination order that does not have an insurance plan.
Note: The insurance responsibilities that are available on the Insurance coordination order list are the ones that have active insurance plans and missing insurance plans in the coordination order.
Click (or tap) Save (the change will not be saved yet). The Save Plan message box appears.
Click (or tap) Save (the change will not be saved yet).
The Change Insurance Coordination Order/Coverage Range dialog box appears.
Proceed to the next step.
Add a new plan to an empty position, and start new insurance responsibilities
If an insurance plan is missing at a given position in the coordination order (because the plan either expired or was removed), you can fill the empty position with a new insurance plan. The positions of the existing plans in the coordination order are not affected.
Do the following:
On a patient’s Insurance Information page (on the Patient menu, select Insurance Information), do the following.
Click (or tap) Add Plan.
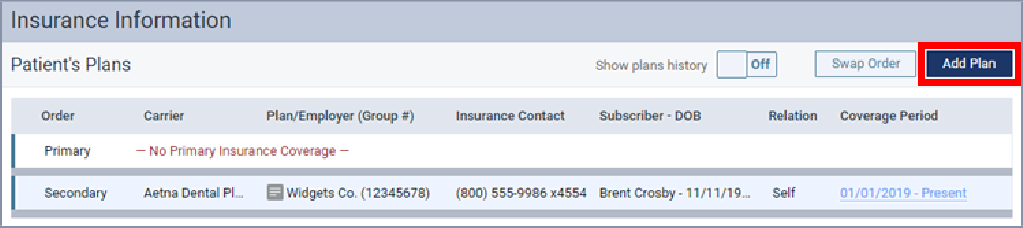
The options for entering insurance information become available.
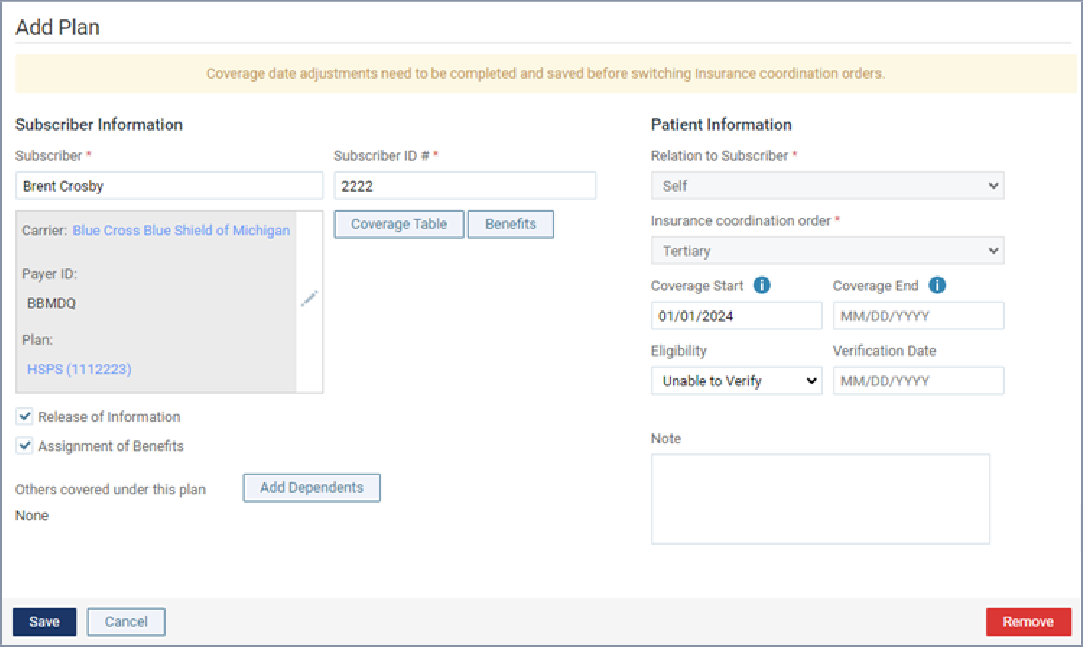
Set up the options for the plan as needed, making sure that the selected Insurance coordination order is an insurance responsibility in the coordination order that does not have an insurance plan.
Note: The insurance responsibilities that are available on the Insurance coordination order list are the ones that have active insurance plans and missing insurance plans in the coordination order.
Click (or tap) Save.
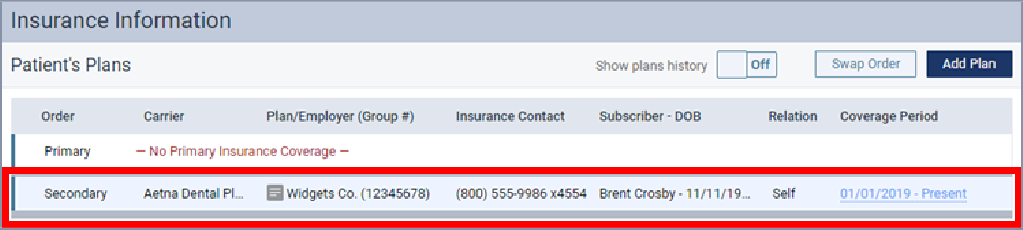
The empty insurance responsibility in the coordination order is now filled.
Ignore the following steps.
Add a new plan to an existing plan’s position, and start new insurance responsibilities
While attaching a new insurance plan to the patient’s record, you can assign that plan to a position in the coordination order that already has an active insurance plan. Be aware that doing this causes the existing plan to be assigned to the first available position in the coordination order (a position that is missing a plan; or if there is not a gap, the last position).
Do the following:
Click (or tap) Add Plan.

The options for entering insurance information become available.
Set up the options for the plan as needed, and then click (or tap) Save. You are returned to the list of insurance plans.
Click (or tap) the insurance plan that you just added.
The options for editing insurance information become available.
From the Insurance coordination order list, select an insurance responsibility in the coordination order that already has an active insurance plan.
Note: The insurance responsibilities that are available on the Insurance coordination order list are the ones that have active insurance plans and missing insurance plans in the coordination order.
Click (or tap) Save (the change will not be saved yet). The Save Plan message box appears.

Click (or tap) Save (the change will not be saved yet).
The Change Insurance Coordination Order/Coverage Range dialog box appears.
Proceed to the next step.
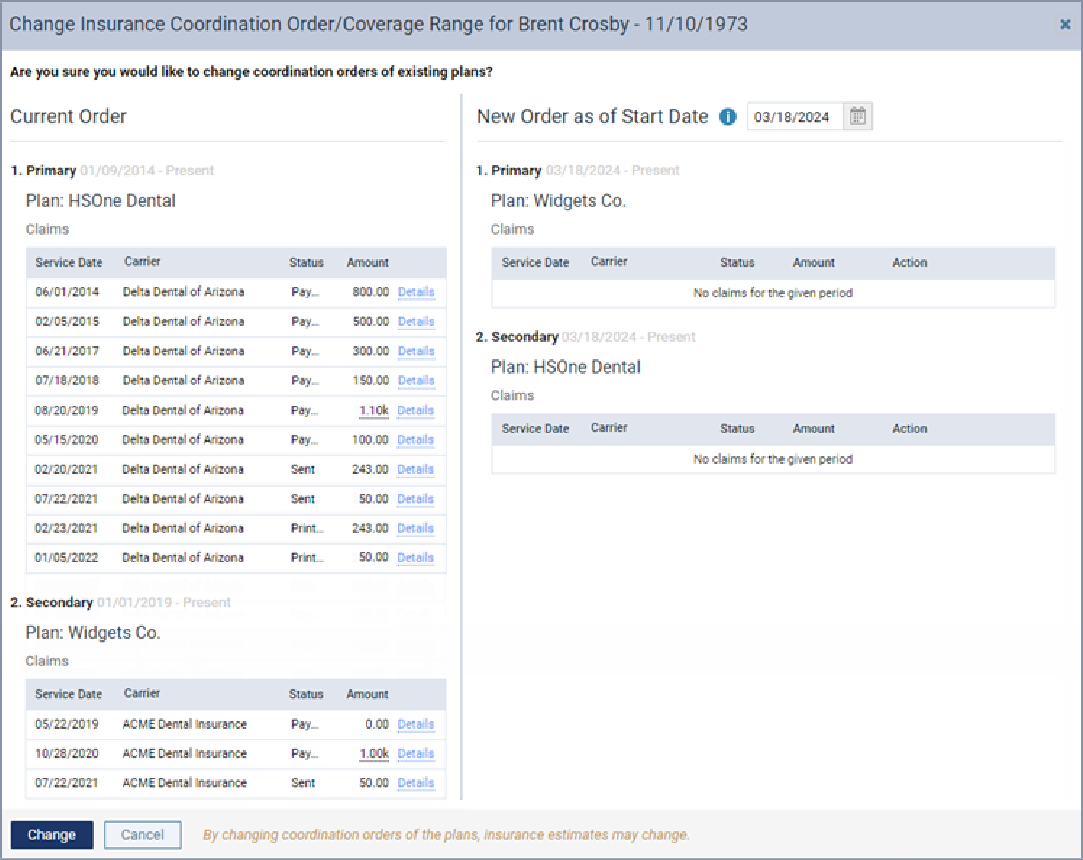
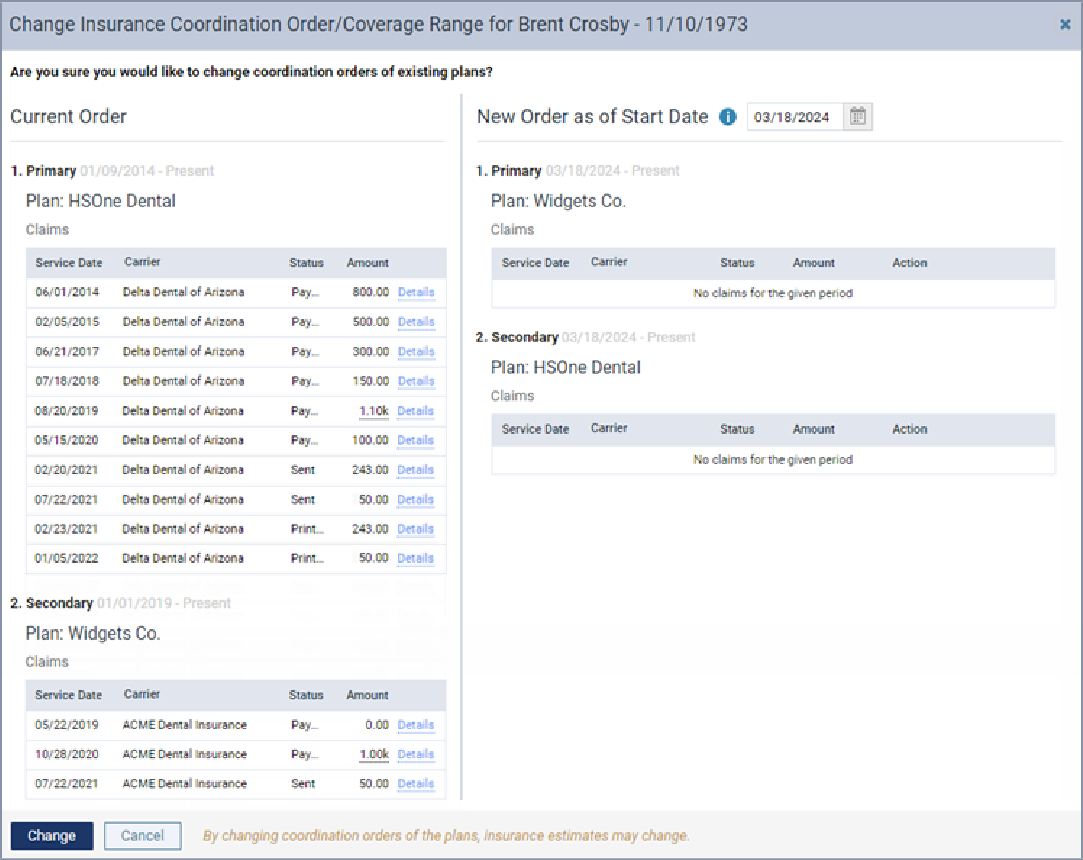
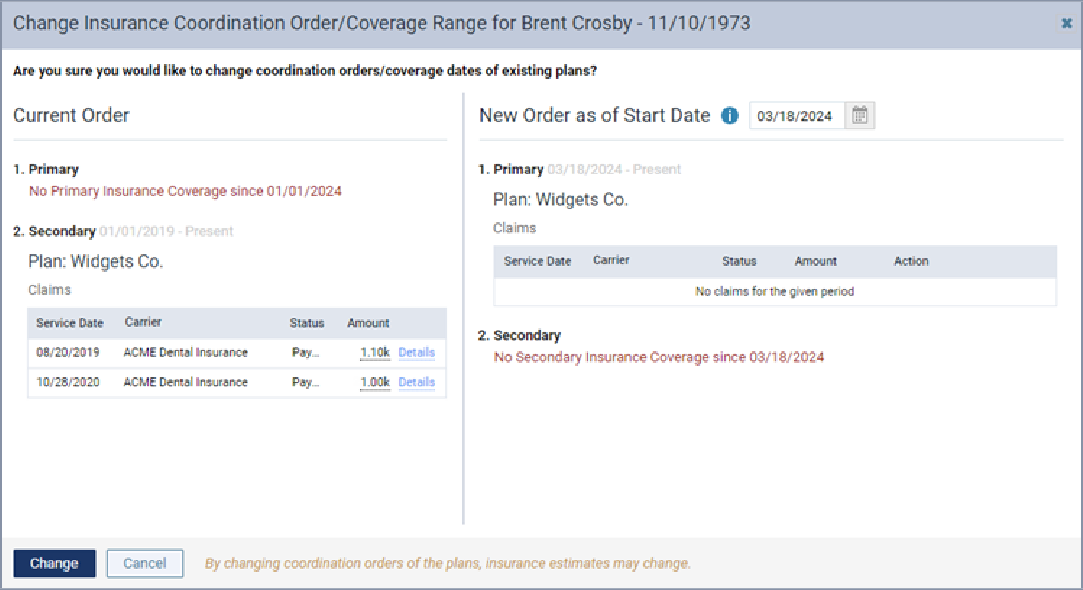
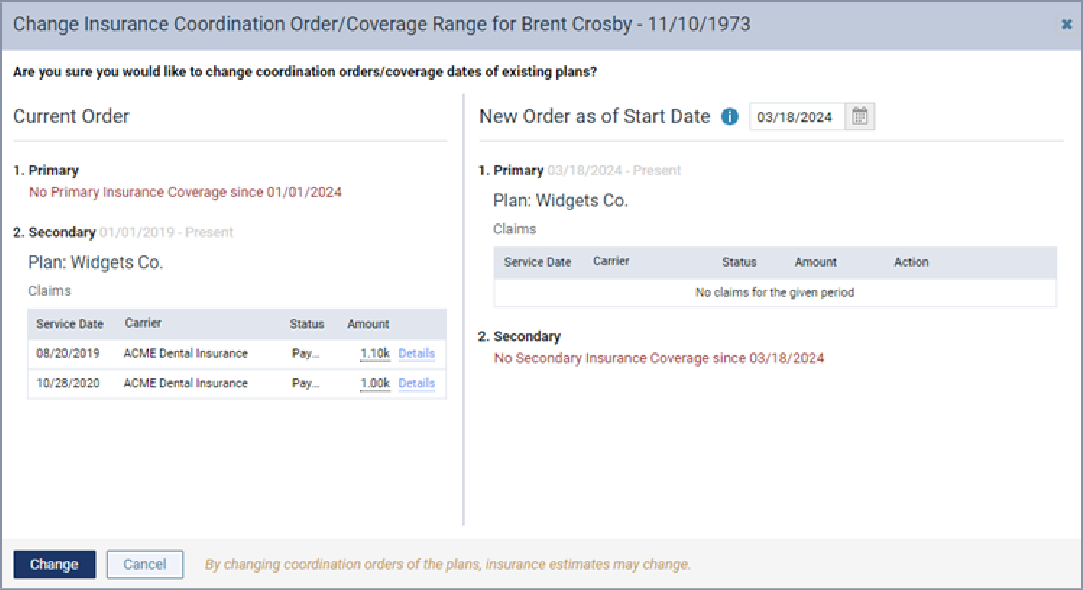
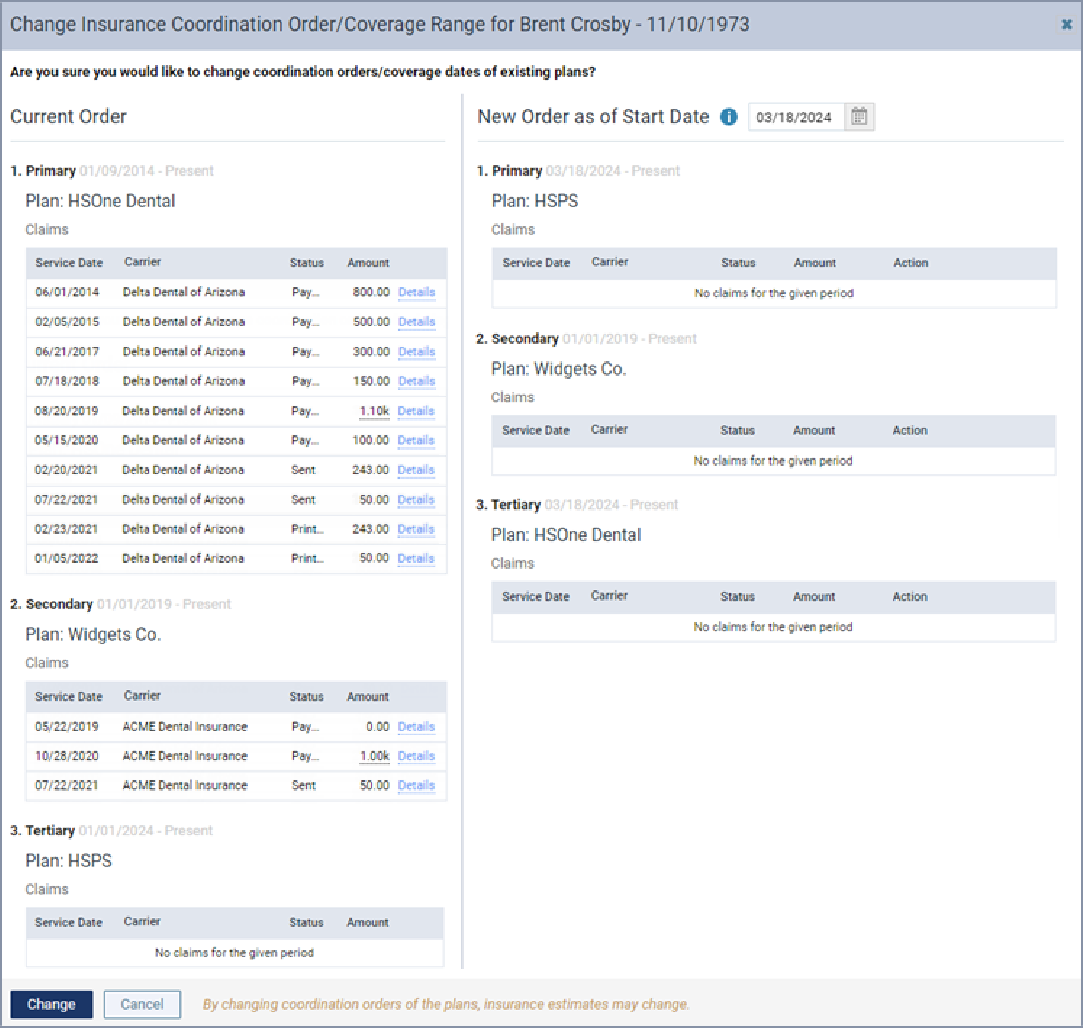
2. Review the Current Order and the New Order to make sure you understand how the coordination order will change and how claims will be affected.
Notes:
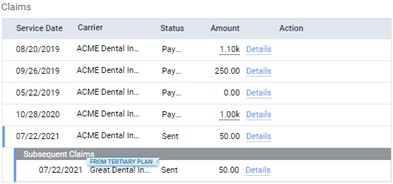
- For each position in the current and new coordination orders, the following information appears where applicable: the coverage period, the plan name, and a list of corresponding claims within the coverage period.
- For each claim, the service date, carrier name, status, and amount appear. To view more details regarding a claim, click (or tap) its Details link.
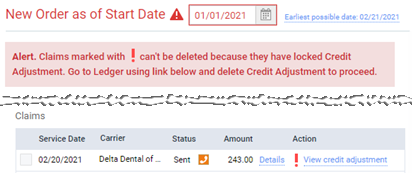
3. The as of Start Date box displays today’s date as the effective date of the change in the coordination order. You can change this date only if you are swapping the positions of two active insurance plans in the coordination order.
To change the date, do the following: Click (or tap) in the box, and then select a different date on the calendar that appears. Only today’s date and prior dates that are within the coverage period of the current plans are available. Click (or tap) Update Preview.

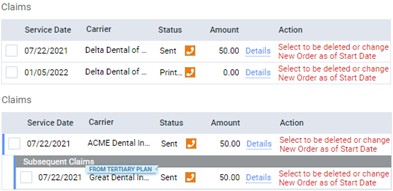
4. Under New Order, do the following as needed:
- Any claims with a service date before the start of the new coverage period for a given plan are not affected. No action is required for those claims.
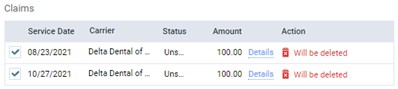
- If there are any unsent (or unprinted) claims with a service date on or after the start of the new coverage period for a given plan, by default, the checkboxes next to those claims are selected to flag them for deletion.
- Do one of the following:
- Leave the checkboxes selected next to the claims that must be deleted.
- Click (or tap) in the as of Start Date box, select a later date from the calendar that appears, and then click (or tap) Update Preview.
- Do one of the following:
- Select the checkboxes next to the claims that must be deleted, including any Subsequent Claims, and then click (or tap) Update Preview.
- Click (or tap) in the as of Start Date box, select a later date from the calendar that appears, and then click (or tap) Update Preview.
- Do one of the following:
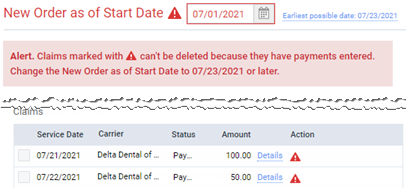
- To quickly change the date to the earliest possible date, click (or tap) the Earliest possible date link, and then click (or tap) Update Preview.
- Click (or tap) in the as of Start Date box, select a later date from the calendar that appears, and then click (or tap) Update Preview.
- Do one of the following:
- To quickly change the date to the earliest possible date, click (or tap) the Earliest possible date link, and then click (or tap) Update Preview.
- Click (or tap) in the as of Start Date box, select a later date from the calendar that appears, and then click (or tap) Update Preview.
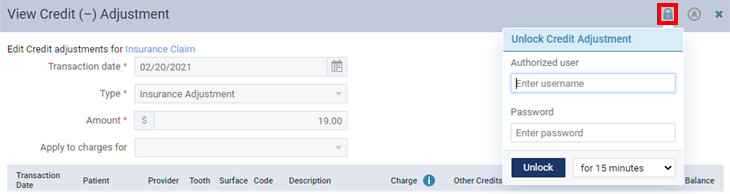
- For each adjustment that needs to be unlocked so it can be deleted along with the associated claim, click (or tap) the corresponding View credit adjustment link to open the View Credit Adjustment dialog box, click (or tap) the Unlock icon, enter credentials, and then click (or tap) Unlock. If the View Credit Adjustment dialog box does not close automatically, close it. In the Change Insurance Coordination Order dialog box, if the claim’s checkbox is not selected automatically, select it.
5. For each sent or printed claim that must be deleted, you should notify the corresponding payer regarding the change:
- For contacting the payer now, click (or tap) the phone icon
 next to the claim’s status to view the carrier’s phone number. Contact the payer. During your communication with the payer, you can click (or tap) the claim’s Details link to reference additional details regarding the claim.
 - For contacting the payer later, click (or tap) the phone icon
 next to the claim’s status to view and make a note of the carrier’s phone number. You can click (or tap) the claim’s Details link to view and make a note of additional details regarding the claim that you may need to provide the payer with.
6. Click (or tap) Change.
Note: This button is available only if there are not any alerts and if all the claims that must be deleted are flagged for deletion.
7. If the Delete Claims message box appears, click (or tap) Delete to confirm that you want to delete the claims that are flagged for deletion.