
EARLY ACCESS ONLY
The Appointment Readiness section of the eligibility manager gives you a centralized, real-time work list to verify insurance ahead of scheduled patient visits. This view replaces the Insurance Eligibility page and is designed for insurance coordinators, front desk staff, and practice managers at both single-practices and multiple-location organizations.
Accessing the view
To access the Appointment Readiness section of the eligibility manager, go to Schedule > Eligibility Appointment Readiness.
Notes:
- On the Schedule menu, Insurance Eligibility has been replaced with Eligibility Appointment Readiness.
- Alternatively, to access the Appointment Readiness section of the eligibility manager, do one of the following:
- If you are not already viewing the eligibility manager – Go to Home > Eligibility Manager to open the eligibility manager with the Overview section displayed, and then select Appointment Readiness on the navigation panel (on the left).
- If you are already viewing the Overview section of the eligibility manager, do one of the following:
- Select any segment of the Appointment Readiness chart. The Appointment Readiness section is displayed with the applicable date (today or tomorrow only), location, and status filters applied.
- Select Appointment Readiness on the navigation panel (on the left). The Appointment Readiness section for today is displayed with the applicable location filter applied.
- Select any segment of the Appointment Readiness chart. The Appointment Readiness section is displayed with the applicable date (today or tomorrow only), location, and status filters applied.
- If you are not already viewing the eligibility manager – Go to Home > Eligibility Manager to open the eligibility manager with the Overview section displayed, and then select Appointment Readiness on the navigation panel (on the left).
Understanding the layout
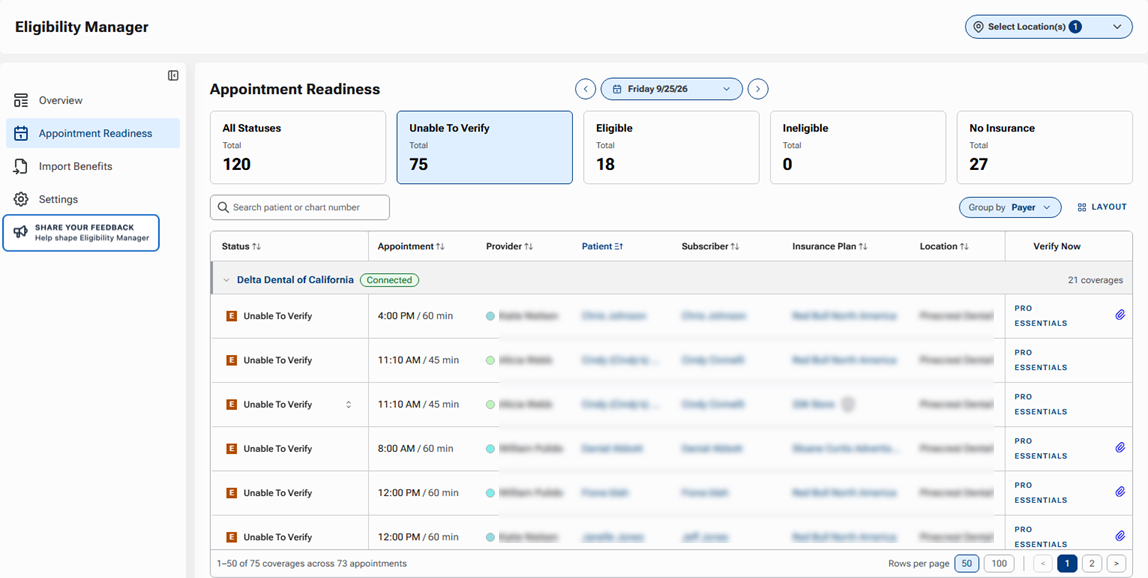
- Metrics – Boxes for the following verification statuses appear at the top: All Statuses, Unable to Verify, Eligible, and Ineligible. Also, a box for No Insurance appears. The totals in the boxes are pulled from the appointments that are currently being displayed in the list.
- Appointments – by default, the list displays today’s appointments that have an “Unable to Verify” verification status. For each appointment, the following details can appear: verification status, appointment time and length, provider, patient, subscriber, insurance plan, connection status, and location.
- Primary and secondary insurance – If a patient has both primary and secondary insurance, the patient’s appointment is listed twice (once under each applicable payer), allowing you to view the verification statuses separately and verify coverage separately. A “2” indicator appears next the name of the secondary insurance plan (in the Insurance Plan column). Entries for tertiary and higher coverages do not appear.
- Payer groupings – Unless you have changed the Group by filter, the appointments are grouped by insurance carrier, allowing you to streamline phone calls and provider portal lookups.
Sorting the list
You can click a column header to sort the list by that criteria.
Note: A change in the sort order is saved even after you log out of Dentrix Ascend.
Filtering by location
Use the Select Location(s) list to filter the list by location. If you have not changed the location filter since you logged in to Dentrix Ascend, the location that you are currently logged in to is selected.
Note: A change in the location filter is saved until you log out of Dentrix Ascend.
Filtering by status
To filter the list of appointments by verification status or no insurance, click the applicable metric box at the top:
- All Statuses – Appointments with any verification status or no insurance.
- Eligible – Appointments with this verification status (eligible for benefits).
- Ineligible – Appointments with this verification status (inactive or terminated coverage, or ineligible for benefits).
- Unable to Verify – Appointments with this verification status (automatic verification could not be completed, returned an error, or requires manual follow-up).
- No Insurance – Appointments with no active primary or secondary insurance on file.
Note: A change in the status filter persists until you navigate to another section of the eligibility manager or to another area of Dentrix Ascend.
Filtering by date
Use the date selector to filter the list by date. You can navigate back or forward one day at a time or choose a date on the calendar.
Note: A change in the date filter persists until you navigate to another section of the eligibility manager or to another area of Dentrix Ascend.
Searching for a patient
Type in the Search patient or chart number box to quickly find an individual patient’s appointment in the list (according to the location, date, and status filters that are currently applied). You can search by name or chart number.
Notes:
- You must enter at least three characters for the system to start filtering the list. Continue typing as needed to narrow down the list or matches.
- The totals for the status metrics at the top are updated automatically to reflect the list of matches.
- The metric box (at the top) that was selected remains selected. If you cannot find the desired patient, you may need to change the location, date, or status filters.
Getting payer connection statuses
If you have an Eligibility Pro subscription, payer connection statuses appear:
- If the list is grouped by payer, an indicator appears next to each insurance carrier’s name (for payers that support connections). If a connection is missing, you can click the Set up connection link to open the Payer Connection Portal on a new browser tab and then add the payer connection.
- If the Connection Status column is visible, indicators appear in that column (for payers that support connections).
Viewing context and detail at a glance
Position your pointer over a patient’s, subscriber’s, or payer’s name to quickly view contact information and identifiers:
- Patient – Phone numbers, email, and demographics.
- Subscriber – Subscriber relationship, ID, date of birth, and employer.
- Payer – Carrier address, phone numbers, and clearinghouse connection info.
Changing the grouping
From the Group by list, select one of the following options to specify how you want to group appointments in the list: None, Payer, Location, Provider, Subscriber, Patient, or Plan Name.
Notes:
- When you change the Group by option (except for the “None” option), the corresponding column is hidden by default.
- A change in the sort order is saved even after you log out of Dentrix Ascend.
Customizing the layout
To choose which columns of the list to show or hide, and/or to reorder columns, do the following:
1. Click LAYOUT.
2. Do any of the following as needed:
- Select or clear an item’s checkbox to show or hide that column.
- Drag an item or click its up or down chevron to change the order of the columns.
- Click RESET LAYOUT to apply the default column order and visibility.
3. To save any changes, click APPLY.
Note: A change in the layout is saved even after you log out of Dentrix Ascend.
Running eligibility verifications
You can run electronic eligibility checks (using Eligibility Pro or Essentials) for any appointment in the list. Click the PRO or ESSENTIALS link in the Verify Now column.
Notes:
- If the system prompts you for Pro verification, confirm the check.
- An in-progress indicator appears while the verification request is being processed.
- When the clearinghouse/payer responds, the status is updated automatically (to Eligible, Ineligible, or Unable to Verify).
Viewing eligibility documents
If there is a document that contains the patient’s eligibility and coverage details in response to a verification of coverage, to view that response document, click (or tap) the Eligibility Document icon
 in the Verify Now column.
Importing insurance information
If data are available for importing, an “E” icon (a green E with red dot on a white background) and “Import Benefits” (instead of “Eligible”) appear in the Status column. To import insurance information, click (or tap) the “E” icon.
Manually changing statuses
You can change an appointment’s verification status from “Eligible,” “Unable to Verify,” or “Ineligible” to another status. Click the status (or the icon) in the Status column, and then select a different status from the list.
Navigating pages
In the lower-right corner, specify the maximum number of appointments that can be viewed at once: 50 or 100. If not all the appointments are being displayed, to navigate between pages, click a page number button, the back button (if available), or the forward button (if available).