EARLY ACCESS ONLY
With campaigns, you can now reach specific patient segments to promote unscheduled treatment, send benefit expiration reminders, or fill last-minute appointment gaps to help you achieve overall practice growth. You can now send targeted messages (by text or email) to patient segments. You can instantly execute a campaign or schedule one in advance for a future date and time and send a message to patients across locations.
Note: This feature will be available only with a Dentrix Ascend Pro or Accelerate subscription. It will not be available with an Essentials subscription.
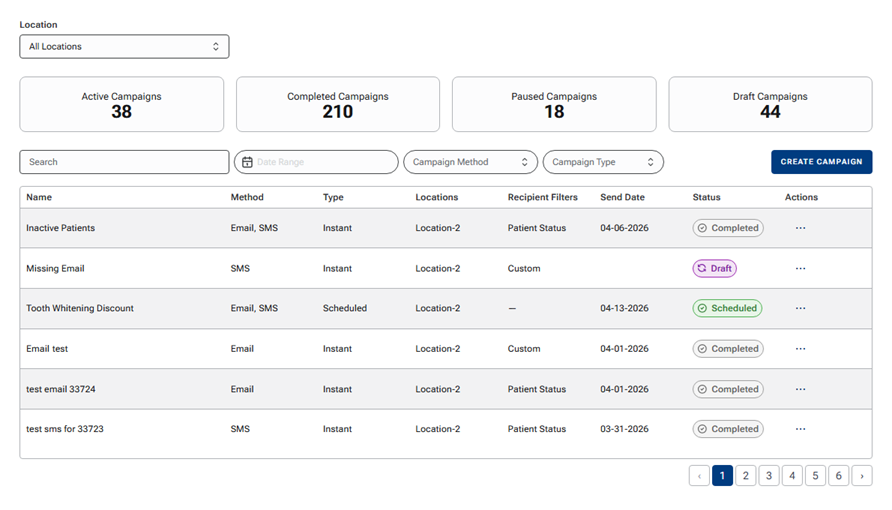
Viewing the Campaign Dashboard
The dashboard for campaigns provides a view of all campaigns. You can filter by locations, type, and/or method. The metrics displayed provide an overview of campaign statuses.
To view the campaign dashboard
1. On the Settings menu, under Patient Care, click (or tap) Patient Communications.
The Patient Communications page opens.
Note: As in previous versions, accessing this page requires the “Review Communications setup” security right (in the “Settings” category).
2. Select the Campaigns tab.
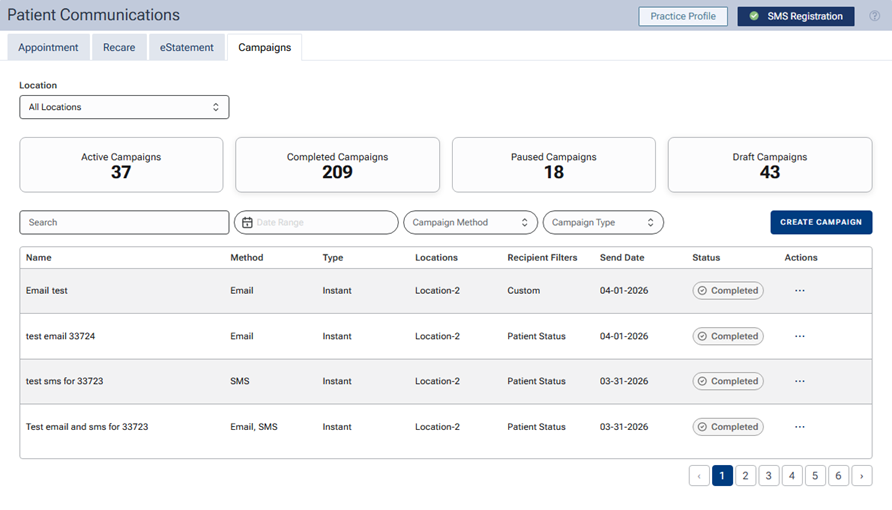
Do any of the following to filter the list of campaigns:
- By default, campaigns for all locations appear. To display campaigns for a specific location only, select that location from the Location list.
Note: Only the locations to which your user account has access are available for selection.
- To search for a campaign by name, begin typing in the Search box. As you type, only the campaigns whose name contains what you type in the Search box appear.
- To display campaigns for a specific date, click in the Date Range box, and then select a date on the calendar that appears. Only the campaigns whose “Send Date” is on the selected date appear.
Note: To remove the date filter, click in the Date Range box, and the click the select date to deselect it.
- To display campaigns for a specific date range, click in the Date Range box, select the first date of the range on the calendar that appears, and then select the last date of the range on the calendar. Only the campaigns whose “Send Date” is on any of the dates of the selected date range appear.
Note: To remove the date filter, click in the Date Range box, click the first date of the range to deselect the last date of the range, and then click the same date again to deselect it.
- To display campaigns with a specific delivery method only, select that method (SMS or Email) from the Campaign Method list.
- To display campaigns of a specific type only, select that type (Instant or Scheduled) from the Campaign Type list.
As you apply filters, the metrics above the list are updated automatically to reflect how many Active Campaigns, Completed Campaigns, Paused Campaigns, and Draft Campaigns are currently being displayed in the list.
Note: If all campaigns are not being displayed, you can click the Previous button (left arrow icon), Next button (right arrow icon), or a page number button to navigate between the pages of the list.
Creating Campaigns
You can create a targeted campaign to send to patients immediately or on a future date.
Note: Creating campaigns requires the “Manage Communications setup” security right (in the “Settings” category).
To create a campaign
1. On the Campaigns tab of the Patient Communications page, click Create Campaign.
The Start Your Campaign options appear.
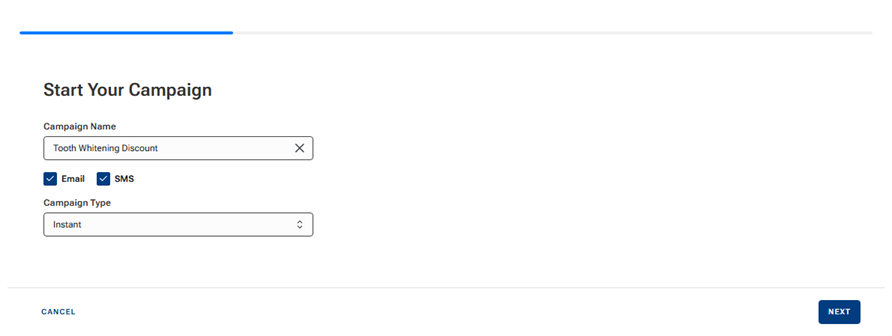
2. Set up the following options:
- Campaign Name – Enter a name to identify the campaign in the list.
- Email – If you want the message to be delivered by email, select this checkbox; otherwise, leave the checkbox clear.
Note: If Email is not selected, SMS must be selected.
- SMS – If you want the message to be delivered by text, select this checkbox; otherwise, leave the checkbox clear.
Note: If SMS is not selected, Email must be selected.
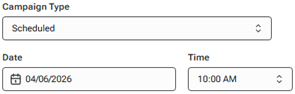
- Campaign Type – Select one of the following options:
- Instant – To have messages delivered immediately after you complete the creation of the campaign.
- Scheduled – To have messages delivered on a specific date and time.
- Instant – To have messages delivered immediately after you complete the creation of the campaign.
Note: If both Email and SMS are selected, a patient will receive only one type of message. Dentrix Ascend will attempt to send the type of message that corresponds to the communication preference in that patient’s record.
3. If the Campaign Type is Scheduled, specify the Date and Time you want messages to be delivered.
4. Click Next.
The Compose SMS Campaign options appear if the SMS checkbox was selected in step 2; otherwise, skip to step 7.
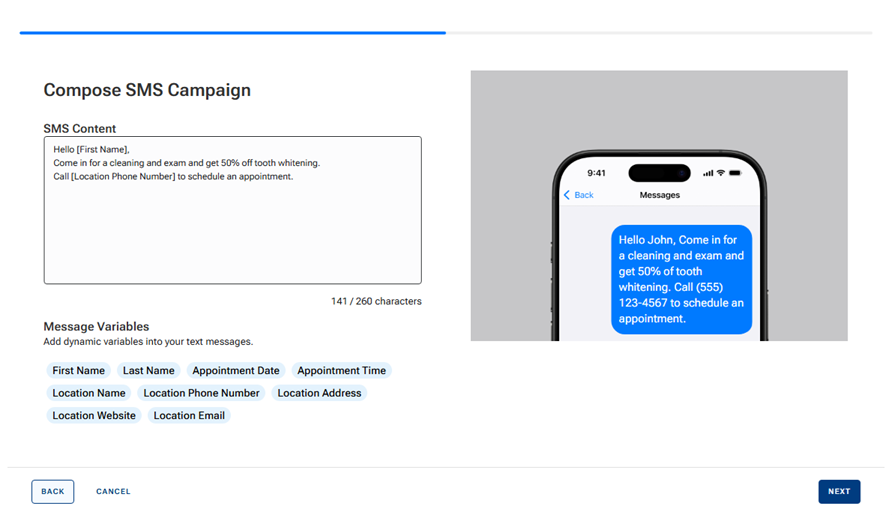
5. Type the content of the text message, inserting variables as needed. To insert a variable, position the text cursor where you want to insert the variable, and then click the variable.
Notes:
- In the generated text message, each inserted variable is replaced with the applicable patient or office information.
- The text message can be up to 260 characters long.
A preview of the resulting text message appears on the right.
6. Click Next.
The Compose Email Campaign options appear if the Email checkbox was selected in step 2; otherwise, skip to step 10.
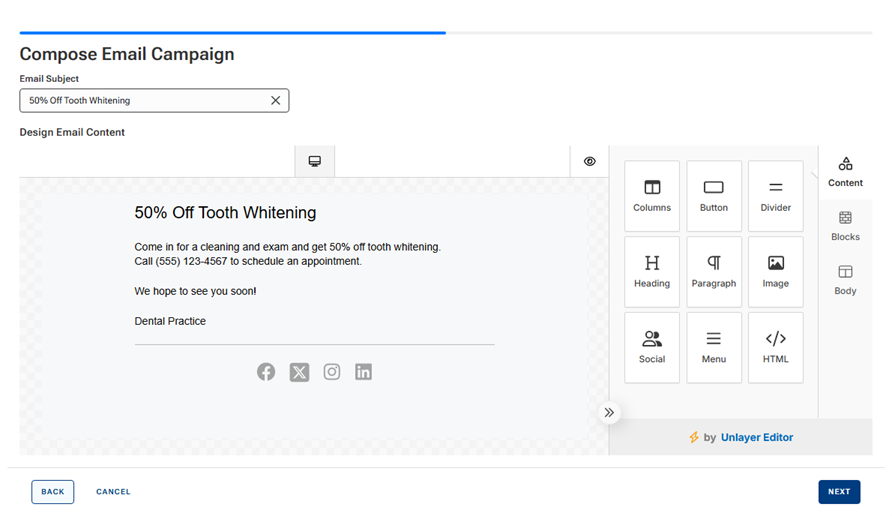
7. Enter an Email Subject.
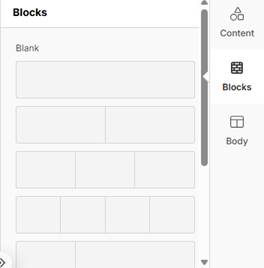
8. Drag components (such as Heading and Paragraph) to the authoring area, and type content for the email message.
You can use the Blocks to layout content in columns of various widths.
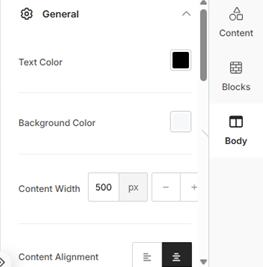
You can use the Body options to further customize the look of the message, such as the text color and alignment.
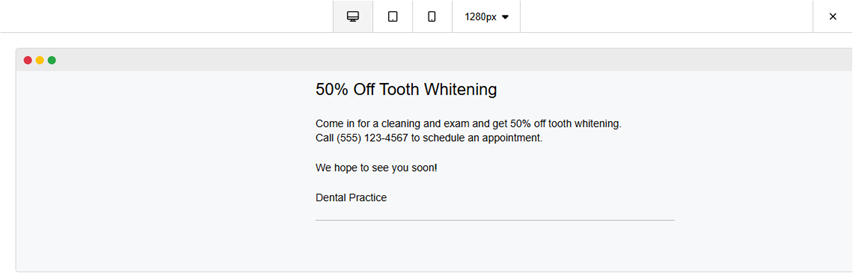
You can click the eye icon
![]() to preview how the email message will look on various types of devices (desktop monitors, tablets, and mobile phones). You can also preview the message for specific screen widths by expanding the [Width]px menu and then selecting a specific device or entering a width. When you are finished with the preview, click the X to close it.
to preview how the email message will look on various types of devices (desktop monitors, tablets, and mobile phones). You can also preview the message for specific screen widths by expanding the [Width]px menu and then selecting a specific device or entering a width. When you are finished with the preview, click the X to close it.
9. Click Next.
The Select Locations and Recipients options appear.
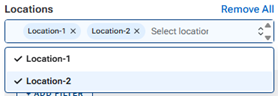
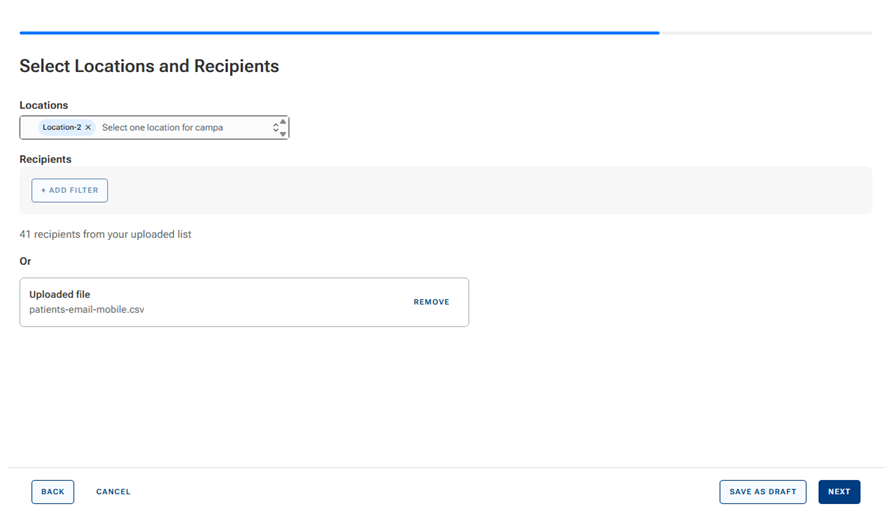
10. To select the locations that the campaign pertains to, expand the Locations menu, and then select each applicable location.
Notes:
- Only locations for which SMS registration has been completed are available for selection.
- To remove a location that you have added, click its X.
- If one or only some of the available locations are selected, to quickly select all available locations, click the Select All link.

- If all available locations are selected, to quickly remove all locations, click the Remove All link
11. Either add filters to send messages only to patients who meet specific criteria, or upload a custom list to send messages only to the patients on that list.
To add filters:
Click Add Filter, select the type of filter, and then specify the parameters for that filter. Repeat as needed to add other filters.
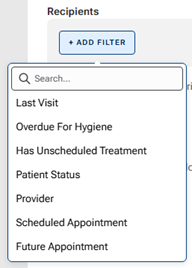
The following filters are available:
- Last Visit – Patients whose last visit was on a specific date, before a specific date, after a specific date, or within a specific date range.
- Overdue For Hygiene – Patients with a hygiene recare type that is due on, before, or after a specific number of days.
- Has Unscheduled Treatment – Patients who have a planned procedure for which an appointment has not been scheduled.
- Patient Status – Patients who are either active or inactive.
- Provider – Patients with a matching primary provider (by name). You enter all or part of a name and specify the condition that a provider’s name must meet (equal, starts with, ends with, contains, not contains, unknown, or has value).
- Scheduled Appointment – Patients who either have or do not have a scheduled appointment in the future.
- Future Appointment – Patients whose future visit is on a specific date, before a specific date, after a specific date, or within a specific date range.
The number of recipients who match the specified criteria appears for your reference.

With locations and filters applied, you can proceed. Or, you can save the campaign as a draft.
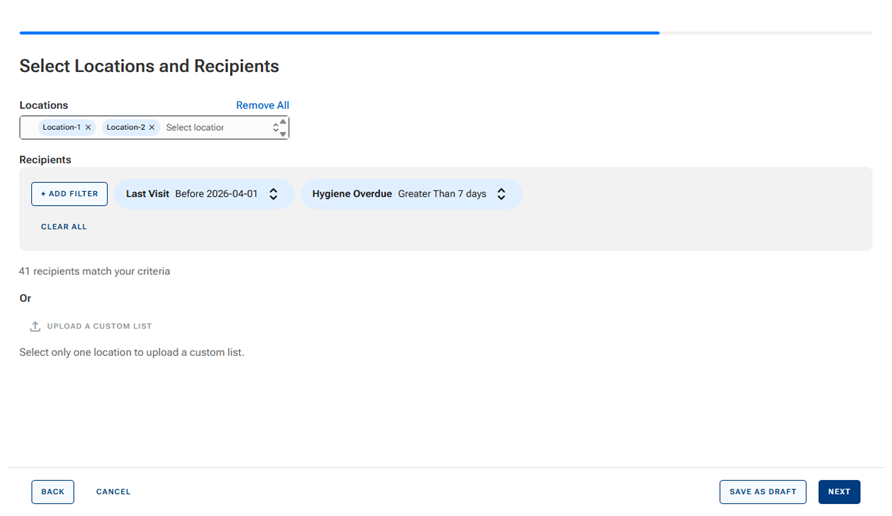
To upload a custom list:
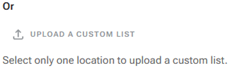
a. Click the Upload a Custom List link.
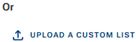
Note: You can upload a custom patient list only if only one location is selected for the campaign.
The Upload Custom Recipient List dialog box appears.
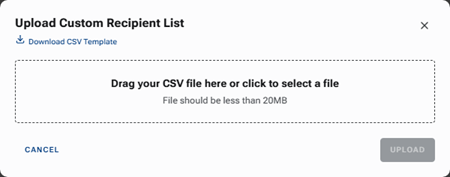
Note: If you need to create a list, click the Download CSV Template link, open the .csv file, enter the first and last name, email address, and mobile phone number for each patient, and then save the changes.

b. Either drag the .csv file from an open window to the Drag your CSV file here or click to select a file box, or click the Drag your CSV file here or click to select a file box to select the .csv file.
The Uploaded file appears.
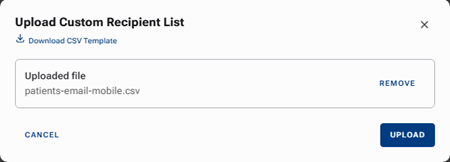
c. Click Upload.
The number of recipients from the uploaded list appears for your reference.
With a location selected and a list uploaded, you can proceed. Or, you can save the campaign as a draft.
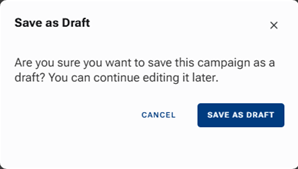
To save the campaign as a draft so you can edit it later, click Save As Draft. On the confirmation message that appears, click Save As Draft.
Note: Only you can edit a campaign that you saved as a draft.
12. Click Next.
The Review Campaign Summary appears.
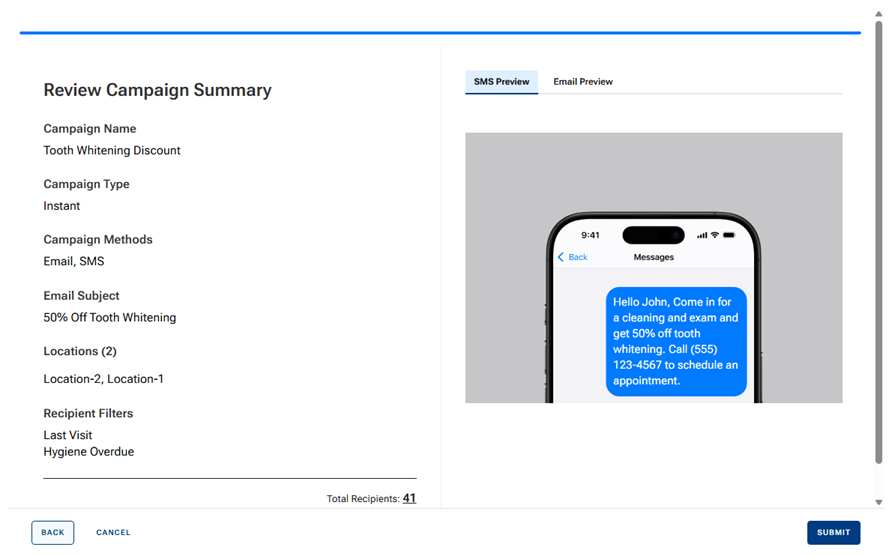
13. Review the details of the campaign: name, type, delivery methods, email subject (if applicable), locations, and recipient filters (if applicable).
Note: Text message and/or email message previews appear on the right.
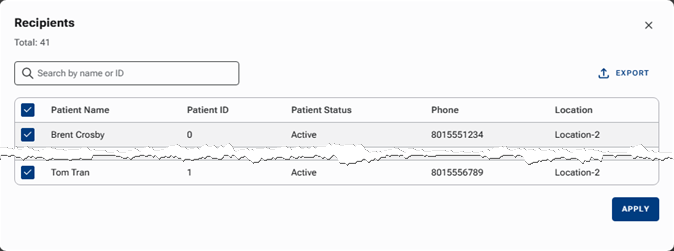
14. If you want to see the list of recipients, click the number link next to Total Recipients.
The Recipients dialog box appears.
Notes:
- To search for a recipient, begin typing a name or ID in the Search by name or ID box. As you type, the matching recipients appear.
- If you want to exclude any patients from receiving messages, clear the checkbox next to each of those patients, and then click Apply.
15. Click Submit.
The campaign is either sent as soon as possible or is scheduled to be sent.
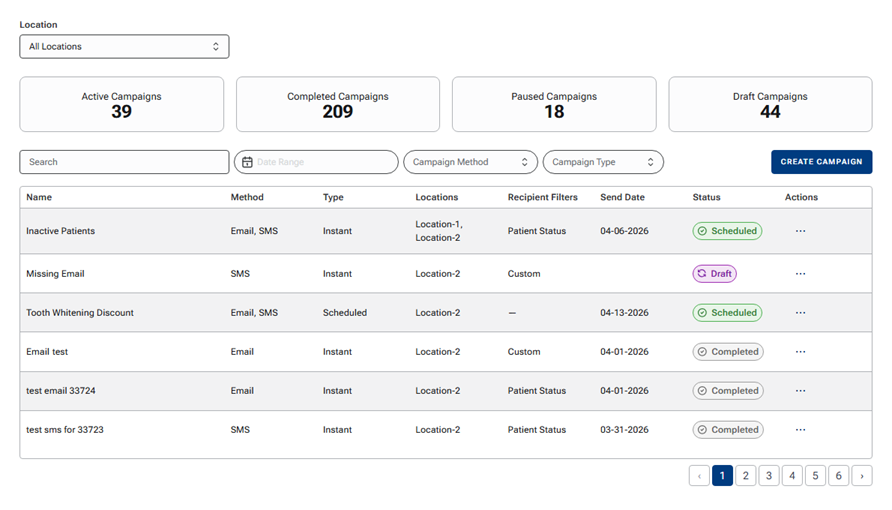
Note: A campaign can have one of the following statuses:
- Scheduled – For an “Instant” or “Scheduled” campaign, this is the status until the messages are sent.
- Draft – The campaign was saved as a draft.
- Paused – The campaign was paused. This will be the status until the campaign is resumed.
- Completed – The messages were sent for the campaign.
Managing Campaigns
On the Campaigns tab of the Patient Communications page, you can edit, delete, duplicate, pause, and resume campaigns; and you can view the results of campaigns.
To perform a maintenance function on a campaign, select an option on its Action menu.
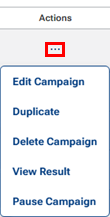
- Edit Campaign – To edit the campaign if it is Paused, Scheduled, or a Draft. You can also edit a campaign that is Completed if you want to change options and then resend messages.
Note: For a campaign that is a Draft, only the user who saved the campaign as a draft can edit it.
- Duplicate – To create a copy of the campaign (including all parameters and message contents) so you can easily repurpose it and update only certain options without having to re-create everything from scratch. This could be valuable for email templates that you have created because it allows you to easily swap out components, such as logos for a specific location.
- Delete Campaign – To delete the campaign. On the confirmation message that appears, click Delete.
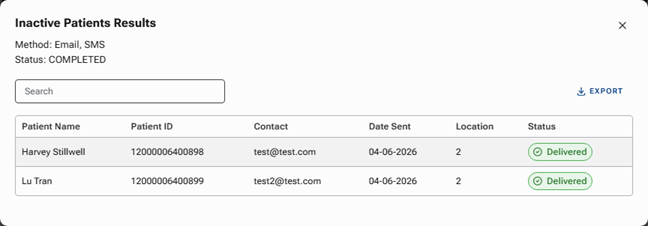
- View Result – To view the delivery status of email and/or text messages at the patient level.
- Pause Campaign – To pause the campaign if it has a Scheduled status, preventing messages for the campaign from being sent at the scheduled date and time (this option is available only if the status is Scheduled). On confirmation message, click Pause. The campaign will remain paused until it is resumed.
- Resume – To resume the campaign if it has a Paused status (this option is available only if the status is Paused). On the confirmation message that appears, click Resume.
Note: Editing, duplicating, deleting, pausing, and resuming campaigns requires the “Manage Communications setup” security right (in the “Settings” category).