The product update released May 04, 2021 includes a popular feature request, the Dentrix Ascend Time Clock. An enhancement to the ePrescribe feature allows non-provider proxy users to enter prescriptions for the provider to approve later. You will now be automatically warned when an insurance claim is missing required attachments and have a greater ability to fine tune insurance rights. There are multiple Power Reporting enhancements.
Time Clock
This update introduces a basic time clock function to Dentrix Ascend. The time clock enables office team members to punch in and out for their shifts and provides reports containing summary information on hours worked. It is not intended to be a full payroll solution; it is just the time clock portion.
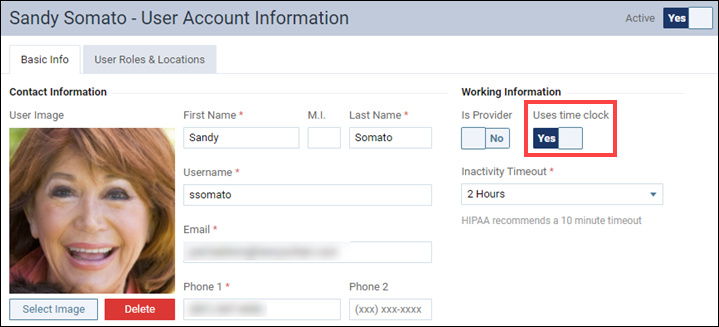
To enable the time clock for a team member, an admin with Edit User rights must go into the user account, Basic Info tab, and toggle the new Uses time clock switcher to Yes. If that user is currently logged in, they must log out and back in again to see the change take effect.
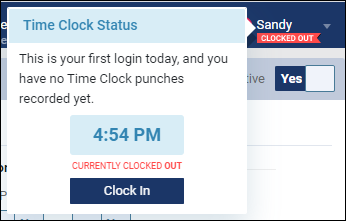
The first time you log in after getting your time clock enabled, you will see a pop-up note informing you that the time clock is now available, with an invitation to clock or “punch” in by clicking the Clock In button.
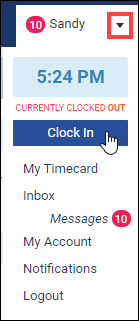
You can see your time clock status at any time, by looking at a message just below your username. There are two status messages: “Clocked In” in blue, or “Clocked Out” in red.

To clock in, click the menu dropdown next to your username and click Clock In. To clock out, do the same except this time the button name will be Clock Out.
Note that closing the browser page or logging out will not clock you out. Meaning, you can close Ascend or switch to a different location and remain clocked in.
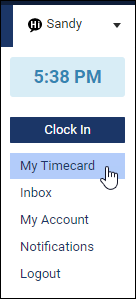
To check your hours for a given time period (default is last 7 days), open the username menu and click My Timecard to open the My Timecard report.

Dentrix Ascend tracks hours on a per-location basis, which is especially useful for team members who work in multiple locations. A user who is clocked in at one location and uses the location dropdown menu to switch locations remains clocked in and Ascend handles clocking out of the first location and into the next automatically. Ascend also automatically adjusts for time zone differences if they apply.
Note that all your punches appear in all locations so you can see the entire picture while looking at any one location. When a punch was done in a location other than the one you are looking at, the gray location (map) icon appears next the punch. Click the icon to see in which location the punch was made.
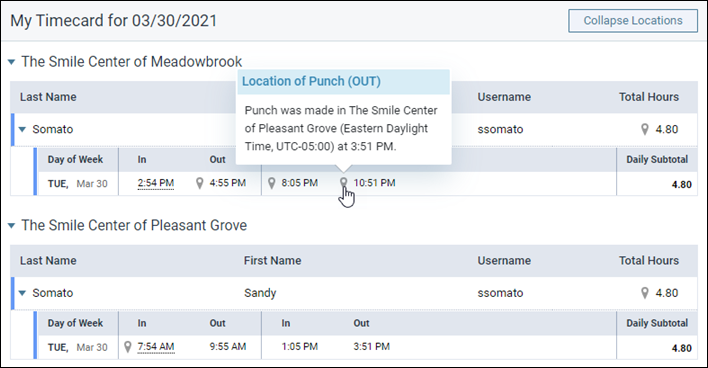
The example above shows that Ascend automatically adjusts for the time zone of each location. Note that if your location keeps extended hours or runs 24/7, the Time Clock is very literal-minded and cannot pair punches that cross over the midnight line—the punch gets recorded for the new day.
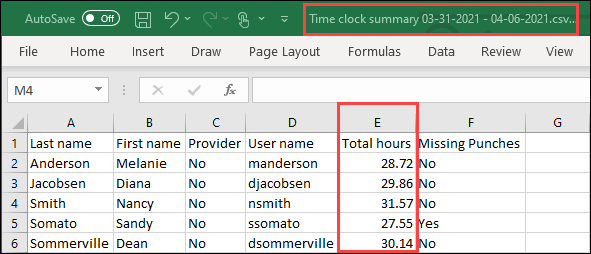
Dentrix Ascend tracks your punches for an extended period (>30 days, enough for most payroll systems), but if you want to save a time report for yourself, the time clock includes an export feature. In the My Timecard page click Export to save a .CSV file with your time in the date range selected in the report. Note that the file includes only the totals for the date range, and not the individual punches or days or locations.

As a time clock user, you cannot edit your punches or add in missed punches. You must contact your payroll administrator to get those taken care of. To work as a payroll administrator in Dentrix Ascend, you must have the Time Clock Summary right (Reports category) to access the new Time Clock Summary report.

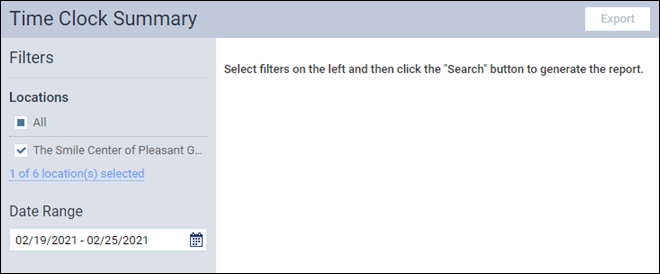
As with most reports of this type, you must select one or more locations and a date range and then click Search to generate a report.

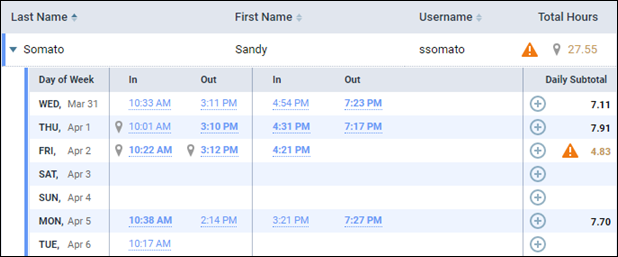
Time clock punches are grouped by location and then by user. When you expand a username, you will see an entry list that includes the entire date range of the search filter; for example, if your search is Last 7 Days, there will be seven rows beneath the username. If you search Last Month, there will be a row for each day of the month.
A warning icon next to the Total Hours means that the user is missing clock entries. To make time clock corrections, including adding, editing, or deleting punches, your user role must additionally have the Manage time clock punches right (Other category).
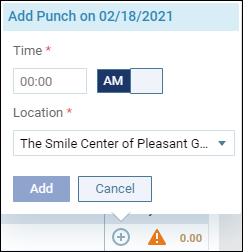
To add a punch, click the plus (+) icon on the row with the missing punch. Enter the missed time in the Add Punch pop-up and use the switcher to toggle between AM and PM. Select a different location if needed and click Add to save the new punch.
To edit or delete a punch, click the hyperlink text of the punch. Set the correct time in the Edit Punch pop-up and click Save or click the delete icon (trash can) to delete the punch. After an adjustment, the Daily Subtotal and Total Hours update automatically.

Added or edited punches are highlighted by bold text in the summary report. The Audit Log tracks time clock punch changes.
The Time Clock Summary report includes a file export functionality like that of the individual user, the difference being this report includes all the users captured in the report search filter. The file includes only the total hours for each user.
Note: Hourly rate definitions and earnings tracking are not part of the time clock feature.
Clinical
Electronic Prescription Creation by Non-Providers
With this update, a new “proxy” user feature has been added which allows non-providers (i.e. dental assistants or hygienists) to enter ePrescribe electronic prescriptions for providers, while continuing to require a provide to review, approve, and then submit the electronic prescription.
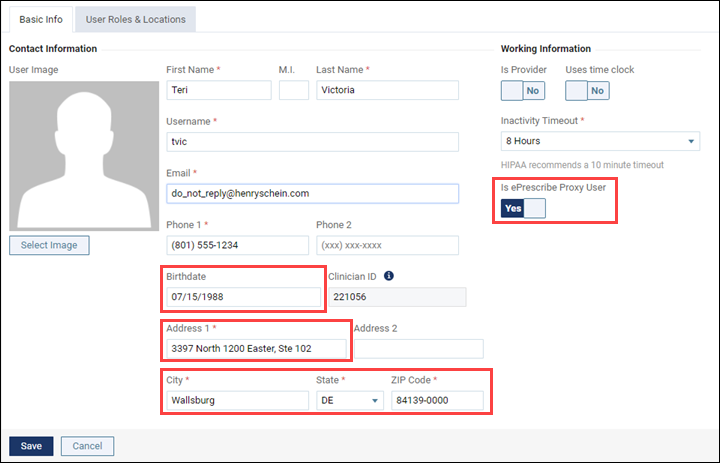
To make a non-provider a proxy user, an administrator toggles the new Is ePrescribe Proxy User switcher to Yes in the user’s User Account Information page. Enabling a proxy user also requires you to enter the user’s birth date and other personal information such as address, city, state, and ZIP code. No other action is required for the proxy user to start entering prescriptions.
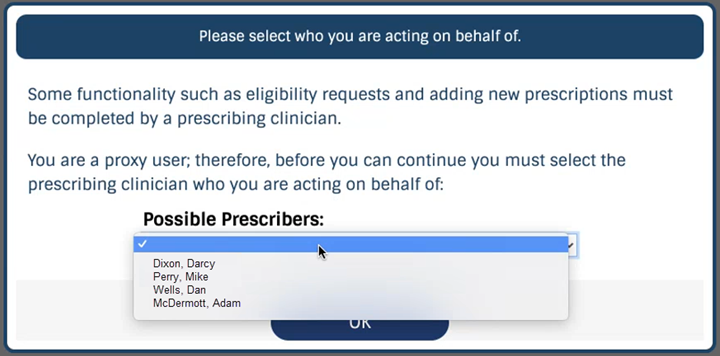
To enter an electronic prescription, the proxy user clicks New Electronic Prescription in the patient’s Patient Prescriptions page.

The proxy user then indicates for which provider they are entering the prescription.
The proxy user enters the electronic prescription for the provider following the workflow demonstrated in the Dentrix Ascend ePrescribe feature video.
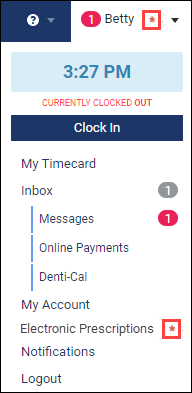
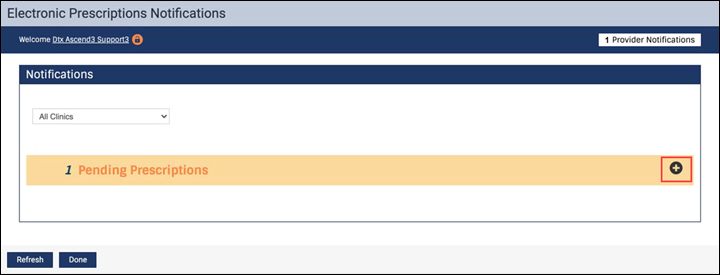
After the proxy user or dental assistant enters a prescription for a provider, a red asterisk appears next to the provider’s username and next to Electronic Prescriptions Notifications on the username menu to alert them that they have pending prescription(s) that must be reviewed, approved, and sent.
When the provider clicks Electronic Prescriptions, it opens the Electronic Prescriptions Notifications page, which shows their pending prescriptions. From there, they click the plus icon to open the pending prescriptions list.
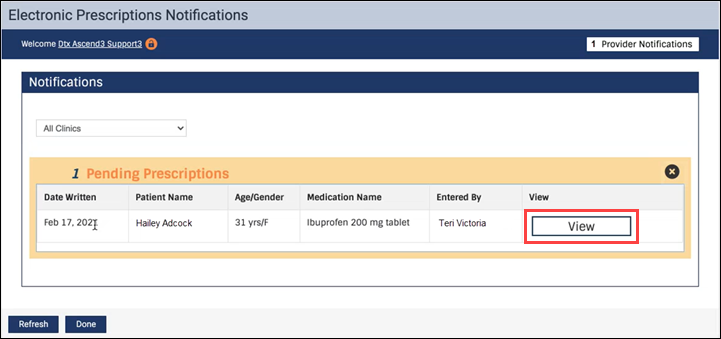
Next, the Provider clicks View to open a pending prescription.
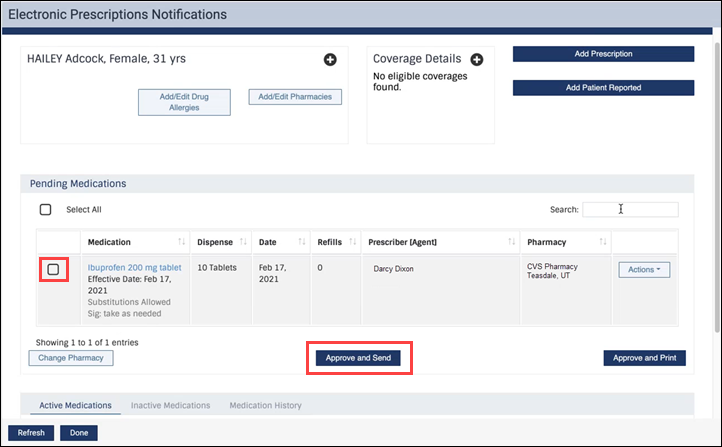
The provider selects and reviews the electronic prescription, editing if needed using the Actions dropdown, and clicks Approve and Send.
Electronic Prescription Visibility in the Progress Notes
Now when you enter a prescription electronically, the patient Progress Notes update to show the electronic prescription.

Display Clinician ID under User Accounts
When a provider is enrolled with ePrescribe, they are assigned a Clinician ID number by the ePrescribe partner, DoseSpot. When you toggle the Enable Electronic Prescriptions switcher, the provider’s new Clinician ID automatically appears on their User Account Information page. The field is not editable.

Insurance
Automated Claim Attachment Reminders
If you want to be paid by insurance companies, you need to know when to include the appropriate attachments with your dental claim submissions. With this update, Dentrix Ascend now alerts you when, according to NEA guidelines, supporting documentation is recommended for the procedures in a claim. The intent is to reduce the delays or non-payments from insurance carriers known to accept electronic attachments.
Automated recommendations appear on the following pages and/or dialog boxes:
- Claim Detail
- Pre-authorization Detail
- Patient Walkout
- Unsent Claims Report (from the Home menu)
- Unsent Claims (from the Overview page)
An orange warning icon appears to alert you when claim attachments are recommended. You will also see recommendations for the attachment types. The exact appearance of the messaging varies depending on which page or dialog box you are in.
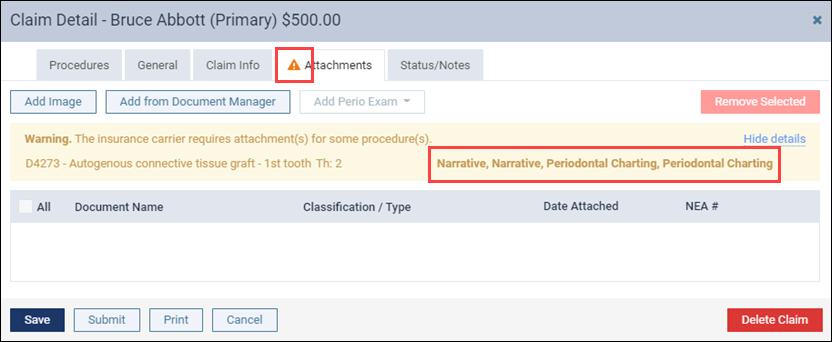
When the warning appears in a report, click the orange warning icon to see the attachment recommendation. In the pop-up click the Add Attachment(s) button to open the claim.

If you need a refresher on how to add attachments, watch Adding Attachments to Claims in the Dentrix Ascend Resource Center. When all attachment requirements have been satisfied, the warning message clears.
In cases where a secondary insurance claim needs an attachment, the warning message includes a recommendation to attach the EOB(s) from prior claims before submitting the claim.
You can ignore the warnings and submit a claim without the recommended attachments, but we don’t encourage you to do that unless you know for certain that this specific carrier doesn’t require supporting documentation.
There is no option to turn off this warning notification feature.
Refined User Rights for Insurance Management
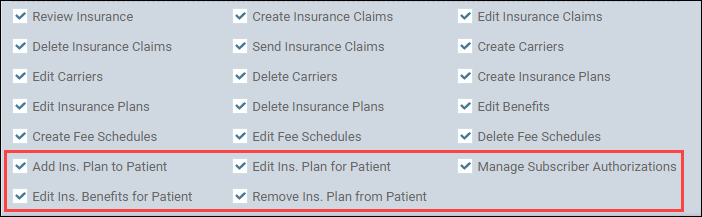
This update introduces changes to user rights to help office managers be more specific about user role activities when it comes to patient insurance management. To describe it broadly, users with the old access rights will continue to have access to pages at a global level while the new access rights work at the patient level. For example, changes to maximum benefits and coverage table values will be done to the plan under the insurance carrier rather than accessing through any patient record. This is especially useful for centrally-managed practices which don’t wish to allow local users to make organization-wide changes. These are the new rights:
- Add Ins. Plan to Patient – Attach a patient to insurance but make no edits after saving
- Edit Ins. Plan for Patient – Edit the Subscriber ID and Patient Information fields on a patient’s Insurance Information page
- Edit Ins. Benefits for Patient – Edit the deductibles met or benefits used in a patient’s Deductibles and Benefits window
- Manage Subscriber Authorizations – Check or uncheck the Release of Information and Assignment of Benefits fields
- Remove Ins. Plan from Patient – Remove (delete) an insurance plan from a patient
Because these new rights require the basic Review Insurance right, a user with any sort of insurance rights can view all configurations related to insurance. They will not however be able to make edits except where specified. Any activity associated with these rights is recorded in the Audit Log.
Calendar
Provider and Appointment Production Data Synchronization
In the last iteration, a blue refresh icon was added to indicate changes to production in the Calendar by appointment, provider, and location. When it appeared, you had to manually click the blue refresh icon to see the new production number.
With this update, when you click the blue refresh icon for a provider, the refresh cascades downward to update the production totals for all appointments associated with that provider in the Calendar for that day.

Patient Information
Text Message Inbox Enhancements
With this update, you can mark messages as Read and Unread in the Inbox, so you know which message needs to be processed. New envelope icons have been added to indicate whether a message is read or unread. The closed envelope icon indicates that a message is unread, and the opened envelope icon indicates that the message has been read.
Click the closed or opened envelope icon to change the status of the message. When you click the opened envelope icon:
- You change the message status to Unread and the opened envelope icon changes to a closed envelope icon.
- A red notification dot appears on the patient message to show the number of unread messages.
- The red notification dot number increases on the Inbox Messages tab and the Username menu to show the new number of unread messages.
Note that when a patient changes their preferences and no longer wants to receive text messages, the envelope icon becomes disabled in the Inbox.
Usability
Date Labels Renamed
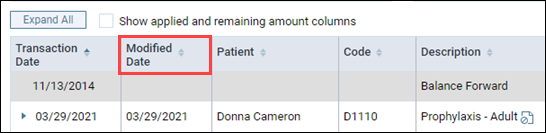
As part of a continuing effort to unify and align the labels of dates within Dentrix Ascend, some column name changes have taken place in the Ledger and its associated financial reports. In the Ledger, the Created On date is now the Modified Date.
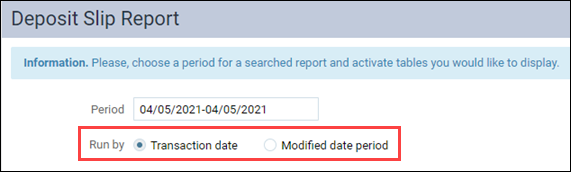
The Deposit Slip Report reflects the Ledger names for Transaction Date and Modified Date.

In the Payment Analysis report, the Run by Service date radio button now says Run by Transaction Date.

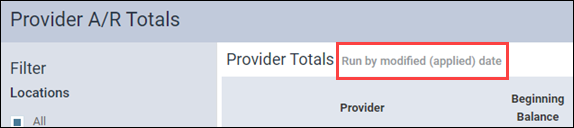
In the Provider A/R Totals report, the Date Range field has no title, but for clarification the note “Run by modified date” appears in the title.
Day Sheet Display
The Created Date in the Day Sheet is now named Modified Date.
When revision history visibility was added to the Ledger in an earlier release, that same information also became available to the Day Sheet. Based on your feedback, this release simplifies the Day Sheet display. For example, transaction cancellations are no longer included in the location details section. Deletions are still included. When a transaction has revisions in the Ledger, an asterisk now appears in the Modified Date column.

Power Reporting
Several of the power reports related to provider production have been modified to make use of the new transaction dates (modified date) and revision history in the Ledger.
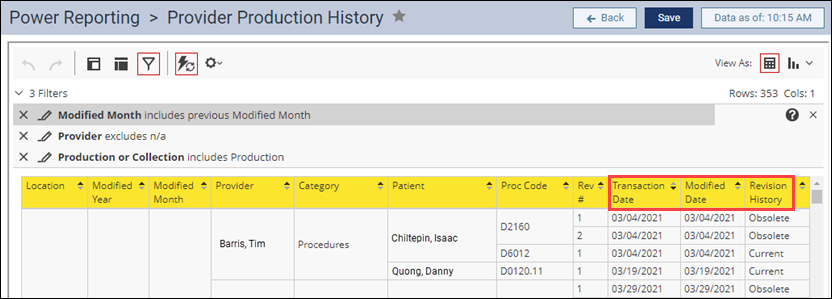
Provider Production History
This is a new power report which by default represents all the changes and the current state of provider production for the previous month. Its purpose is to help investigate and explain provider production numbers, especially if there is confusion or misunderstanding when paying on production. To do this, it makes use of the new fields related to revision history.
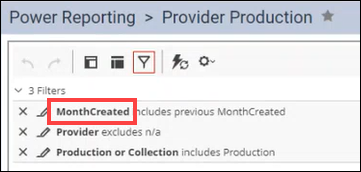
Production Reports Now Use the Modified Date
To help production reports maintain their integrity from one month to the next, the following power reports have been converted to make use of the Ledger Modified Date in their construction:
- Patients & Production by Referral Type – Chart
- Production by Provider Type – Pie Chart
- Production by Referral Source
- Production by Referring Patient
- Provider Production
- Referred Patients & Production
The purpose of these changes is to maintain the integrity of historical reports within date range. Any changes made after the date range will not show up in the selected view of the report.
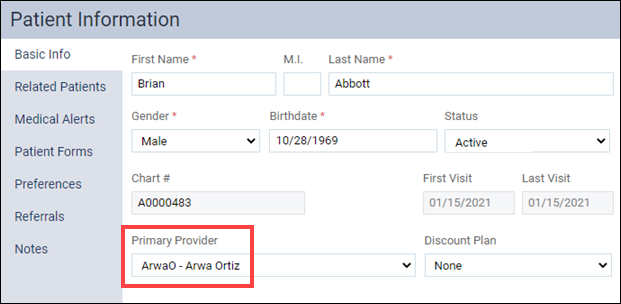
Primary Provider Information Added
This update brings the ability to add the patient’s primary provider information to reports related to procedure detail. This is not the provider of the procedure; it is the patient’s primary provider as configured in the Basic Info tab of the Patient Information page.

An easy way to make use of this field is through the Analysis Procedure Tracking Report Builder.
“Pre-authorization” Now “Predetermination”
The Analysis Treatment Plan Report Builder and Interactive Treatment Plan Report Builder have fields you can use to construct a report for pre-authorizations. There is no prebuilt report currently. With this update, the term “pre-authorization” is replaced with “predetermination” to more correctly describe the activity: gathering a pre-estimate of benefits. The predetermination fields use PreD as a prefix to keep the field names shorter.

Adjusted Production Report Retired
With this update, the Adjusted Production Report will no longer be available. There are now other, better ways to capture the information for which it was originally created.
User Rights
The following changes to user rights are included in this release:
- A new Time Clock Summary right (Reports category) grants access to the Time Clock Summary report.
- A new Manage time clock punches right (Other category), for which the Time Clock Summary right is required, allows the user to edit, add, and delete time clock punches.
- A new Add Ins. Plan to Patient right (Insurance category) allows the user to attach a patient to insurance but make no edits after saving.
- A new Edit Ins. Plan for Patient right (Insurance category) allows the user to edit the Subscriber ID and Patient Information fields in a patient’s Insurance Information page.
- A new Edit Ins. Benefits for Patient right (Insurance category) allows the user to edit the deductibles met or benefits used in a patient’s Deductibles and Benefits window.
- A new Manage Subscriber Authorizations right (Insurance category) allows the user to check or uncheck the Release of Information and Assignment of Benefits fields in a patient’s Insurance Information page.
- A new Remove Ins. Plan from Patient right (Insurance category) allows the user to remove (delete) an insurance plan from a patient.
Imaging
New Device Integration
New with this update is direct integration for e2v sensors on macOS.
New Learning Content
Are you keeping up with the latest feature releases, or perhaps hoping for more information? The Dentrix Ascend Resource Center includes feature overview videos. Click a title below to get more information on these exciting new capabilities.
Dentrix Ascend Pay
Dentrix Ascend Pay offers your practice an integrated payment solution to efficiently and accurately process all credit card payment methods and post transactions automatically to the Ascend Ledger.
Dentrix Ascend ePrescribe
Providers can save their patients time and make filling any prescription easier by sending prescriptions directly to the patient’s preferred pharmacy.
Dentrix Ascend Voice Perio
Dentrix Ascend Voice Perio is a hands-free and highly accurate voice recognition system that enters periodontal measurements and conditions into the patient’s perio chart as the hygienist calls them out.
Are you an administrator tasked with managing user accounts and struggling to make sense of how rights and roles work in Dentrix Ascend? Watch the informative new Roles and Rights Overview video to help make sure your team members acquire the rights they need to perform their tasks when you assign them to a role.
