The product update released August 24, 2021 brings many new tools and enhancements to the Dentrix Ascend feature set. A new statement submission report will help you track billing statements sent. There are updates to the Day Sheet and the Deposit Slip Report. You will find exciting changes to the clinical chart, the patient ledger, and more!
Revenue Cycle Management
Statement Submission Report
This update introduces a new standard report which provides insight into your billing activity. The Statement Submission Report summarizes or details the patient statements you sent electronically or printed during a given time frame. To open the report, select Home > Statement Submission Report.
The report selects a month-to-date date range by default. Click the Date Range field to make other selections. Select the locations to include in the report and click Search to run the report.
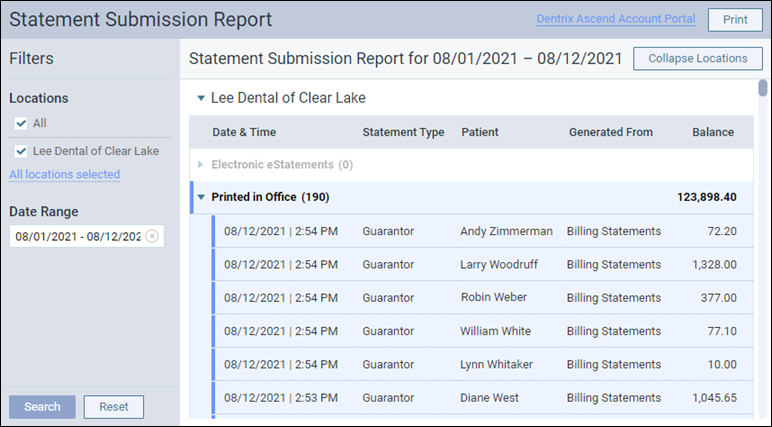
The report begins with a summary for each of three statement types: Electronic Statements, Printed in Office, and Printed and Mailed for Me. Note that this release does not include the Print and Mail for Me feature, which we will announce in a future update.
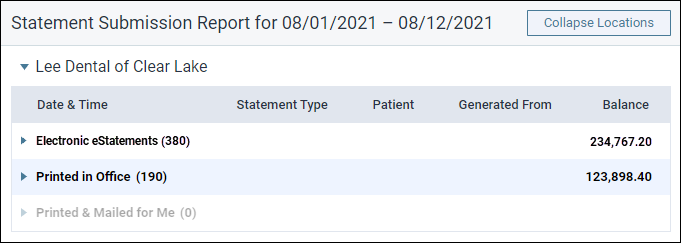
The count shown in parentheses after the statement type name is how many billing statements you generated or printed during the selected time frame. The Balance column shows the sum of the “Please Pay This Amount” values in all the included billing statements.
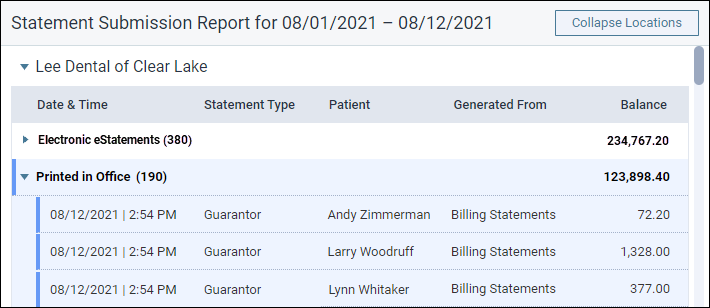
To see a list of the individual billing statements for any of the types, click the expansion arrow next to the type name.
If there are more than 100 statements in a section, a Show More link at the bottom loads more statements.
The Generated From column tells you where you generated the statement, whether it was from the billing statements generator, the patient walkout, or a patient’s individual statement.
You can print this report. Statement rows print either collapsed or expanded depending on their state at the moment you click Print.
The Statement Submission Report includes a link to the Dentrix Ascend Account Portal. Although the link is active now, its value will come in a future release when the purpose of visiting the portal will be to pay for Printed & Mailed for Me statements. The portal has instructions for account creation. After you create an account, you will be able to view the statements printed for you and pay for that service.
Billing Statement Enhancements
This update makes it easier to print or send electronic statements. This is in preparation for the upcoming Print and Mail for Me option. All your options flow through the new Actions menu button.

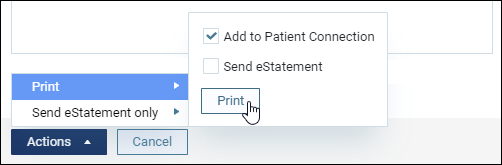
This update brings a simplified workflow for sending electronic statements. Previously we recommended you immediately print statements for patients who could not receive electronic statements. When you use Send eStatement only, a new Billing Statements to Print box automatically pops up with a list of patients for whom you cannot send an electronic statement. This saves you from having to re-run the billing statement generator.
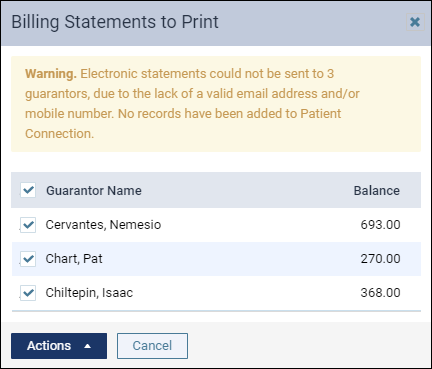
The list automatically selects all the patients who couldn’t receive an eStatement, ready to go to the print action. You can deselect individual patients for whom you do not wish to print.
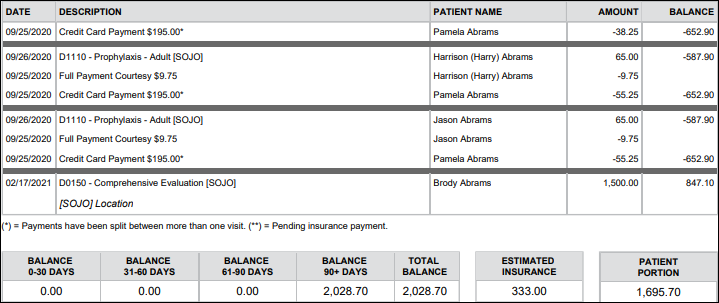
This update includes a small improvement to the presentation of the electronic statement itself. The statement is now grouped into visits to make it easier to read.
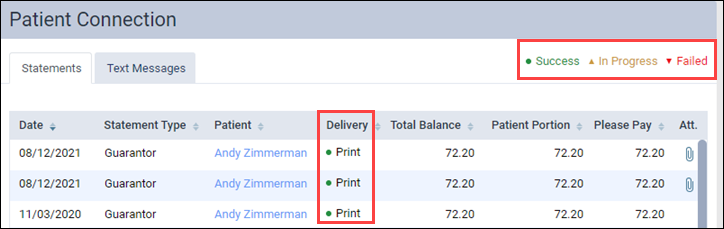
The Patient Connection page now includes colored status icons in the Delivery column. This will be particularly useful to show you which electronic statements are In Progress or Failed to be delivered.
Clinical
Charting Symbol Priority Update
In the past, certain charting symbols for newer conditions and procedures were hidden behind charting symbols for older conditions and procedures. This update features a new priority order for charting symbols to ensure that the most recent conditions and procedures are visible in the Patient Chart. The following sections give examples of where you will see changes to the layering of charting symbols.
Completed Procedures and Existing Procedures
With this update, most completed procedures overlay existing procedures. Some exceptions are pins, posts, sealants, and apicoectomies.
Example: There is an existing occlusal amalgam restoration on tooth 1. The doctor removes the existing amalgam restoration and replaces it with a MOD composite restoration. In the Chart, the completed procedure will overlay the existing procedure.

Procedures and Conditions
Here are some rules for the layering of charting symbols when procedures and conditions are charted on the same tooth.
- Treatment planned procedures overlay conditions despite the posted dates.
- Conditions always overlay existing procedures.
- Conditions overlay completed procedures when the conditions have a more recent date.
- If a condition and a procedure have the same date, the procedure will overlay the condition.
Appointment Handling When Moving Procedures Between Cases
If you are working with a patient that requires multiple visits for treatment-planned procedures, you may need to move those procedures between visits or even treatment cases. When this happens, it may cause you to move all the scheduled procedures out of an appointment you have scheduled for the patient.
In the past, when you moved all scheduled procedures out of an appointment, that appointment was deleted from the Calendar. This led to some frustration when patients showed up for their previously scheduled appointments and there was no record of those appointments in the schedule.
With this release, when you move all scheduled procedures out of an appointment, Dentrix Ascend keeps the empty appointment on the Schedule with a note that the procedures initially scheduled for that appointment were moved to another appointment.
Scheduling Treatment Planned Procedures
When you create a new appointment, you can click Add Tx Planner to add procedures from the treatment plan.
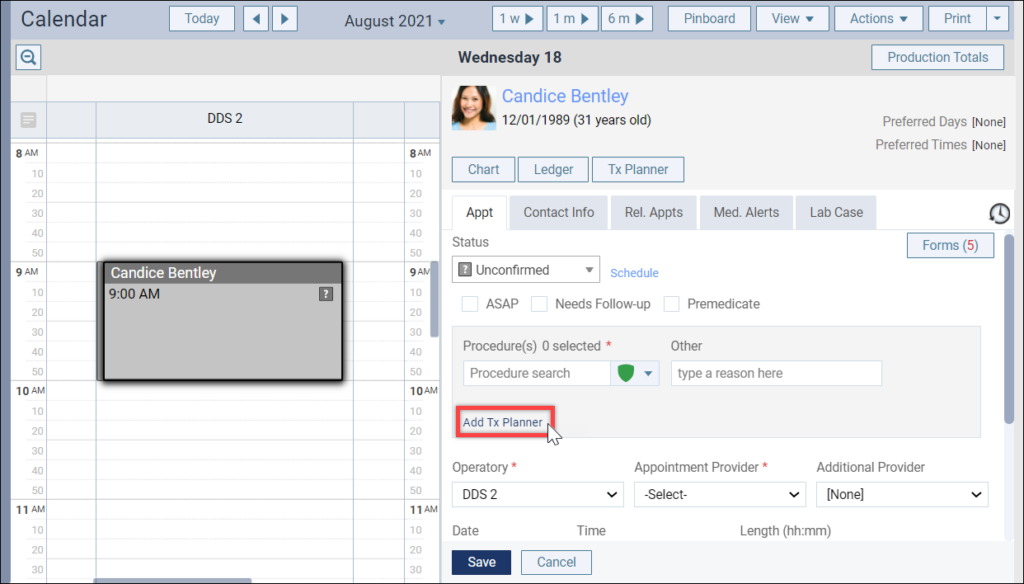
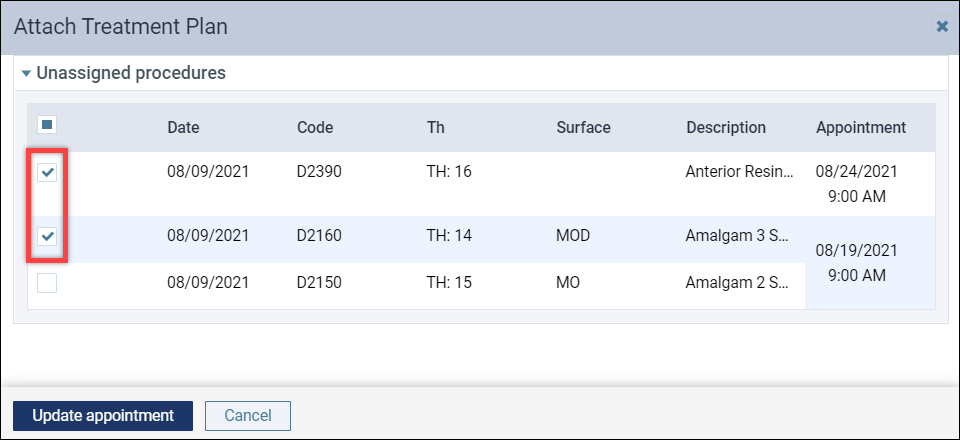
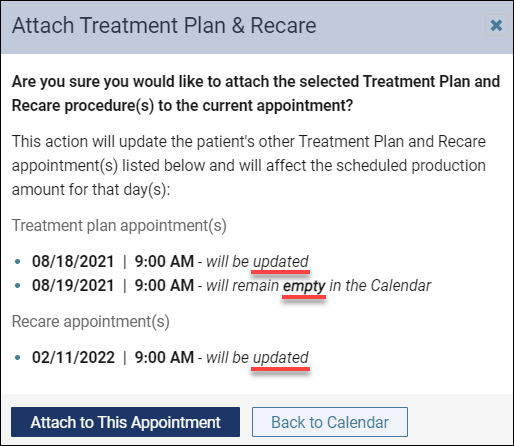
If you add procedures to the new appointment that have previously been scheduled for a different appointment, Dentrix Ascend will prompt you to confirm the change. You will see which appointments will be left empty (be left with no scheduled procedures) and which appointments will be updated (include procedures other than those you moved).

By default, Dentrix Ascend will save the empty appointment and add this note to the Other field: “The procedure(s) scheduled initially were moved to another appointment dated [MM/DD/YYYY]”.
Empty appointments will not be deleted from the schedule unless you click Delete.
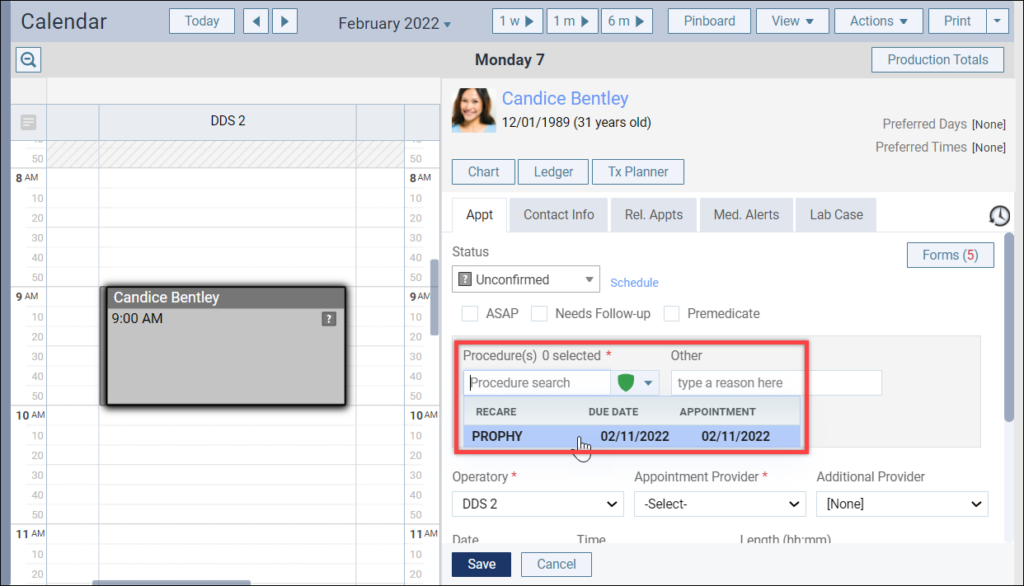
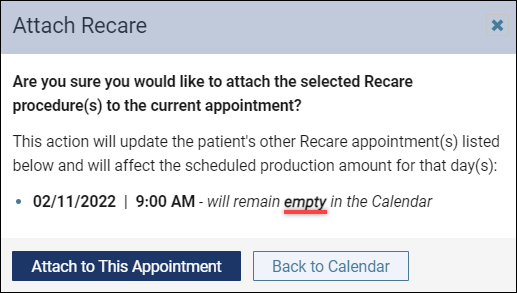
Scheduling Recare
You will also see a confirmation message when you are scheduling recare procedures that had previously been attached to another appointment.
Scheduling Treatment Planned Procedures and Recare
If you are adding previously scheduled recare and treatment planned procedures to a new appointment, the confirmation message will note the changes for all affected appointments.
Treatment Planner and Progress Notes Section
You will also see a confirmation message in the Treatment Planner and the Progress Notes sections to notify you when deleting a procedure will leave an appointment empty.


Scheduling
Provider ID Added to Routing Panel
This update adds a new Provider field to the Chair and Checkout statuses in the routing panel.
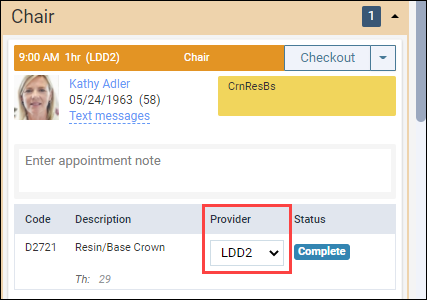
The purpose of this field is to allow you to easily assign the correct provider to any procedure in the appointment. By default, this field lists the provider associated with the appointment, but you can update the field to show who actually performed the procedure in real time.
If you need to make a change to a treatment-planned procedure, simply click the dropdown and select from the provider list. For appointment procedures, when you select a different provider from the list a Change & Save Provider pop-up asks you to confirm the change and complete that procedure.

Things to Know about Changing Providers
- The Provider field also appears in the Post Procedures Complete box if you make use of the Complete All feature, and in the procedure completion confirmation pop-up.
- You cannot change the provider for completed procedures using the routing panel.
- If the appointment includes multiple procedures, you can only change one procedure at a time (no group changes).
- For treatment-planned procedures, if you change the provider in the patient Progress Notes, that change automatically updates the routing panel. The opposite is also true: updating the provider in the routing panel automatically updates the Progress Notes.
- Your user role must have the Edit Patient Procedure right to use this feature.
Patient Information
Discount Plan Expiration Field
This update continues our progress towards a new discount plan type. In this phase, we added a new switch to the Ledger Rules tab of the Ledger Options page.
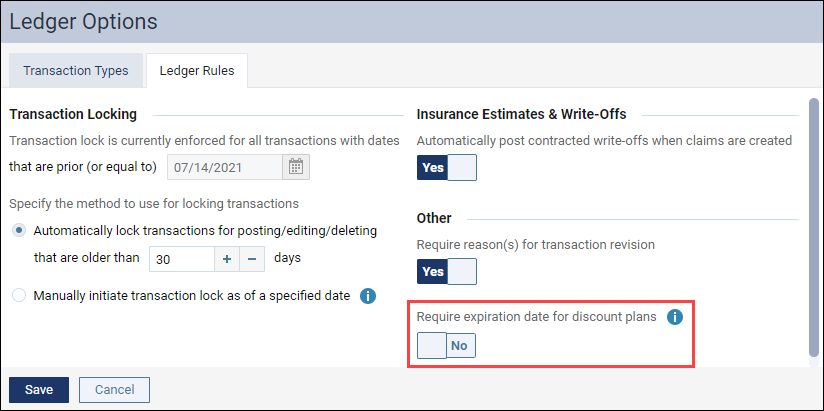
Toggle the Require expiration date for discount plans switch to Yes to require a team member to set an expiration when they assign a patient to the basic uninsured discount plan and fee schedule combination. The default setting on this switcher is No. The expiration date still has no actual effect upon the discount plan; this is merely a preparatory addition.
Reporting
Day Sheet Enhancements
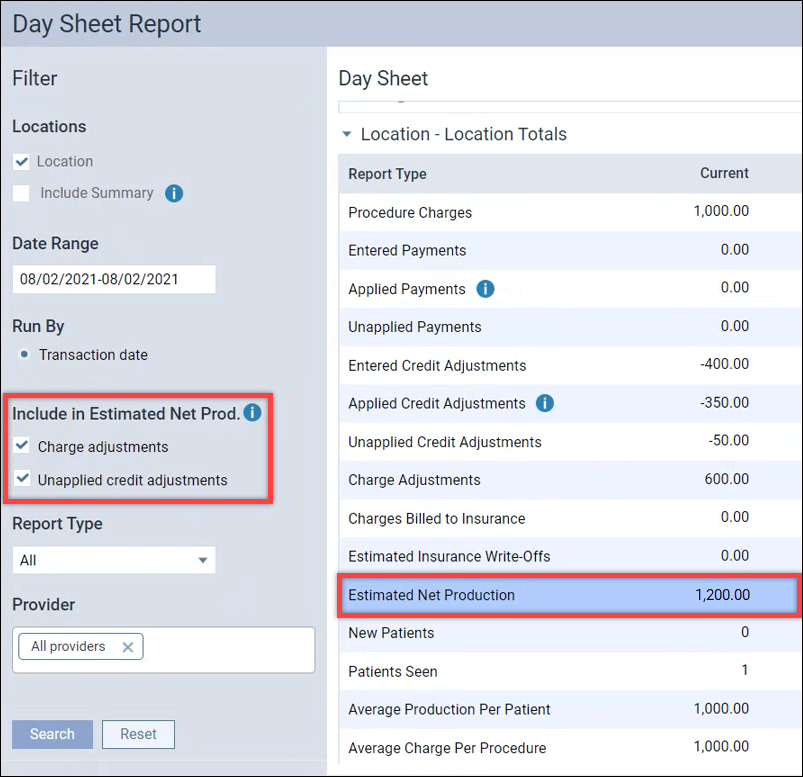
Updated Estimated Net Production Calculation
You now have the option to include charge adjustments and unapplied credit adjustments in the calculation of Estimated Net Production in the Day Sheet.
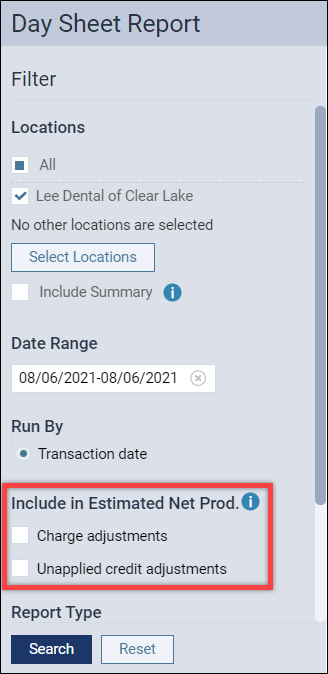
For example, in this patient’s Ledger, there is a charge adjustment, a credit adjustment, and some unapplied credit.

If you run the report without including these adjustments, it looks like this:

When the adjustments are included, the report looks like this:
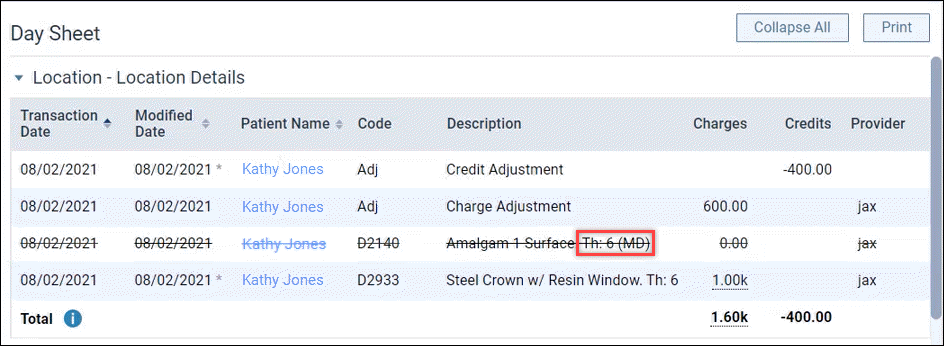
Tooth and Surface Information for Deleted Procedures
If you delete a procedure, the tooth and surface information will now be included in the deleted record in the Day Sheet.
Display Patient Names in the Deposit Slip Report
This update enhances the Deposit Slip Report by adding patient names to the report. The main benefit of this change is that now you can see the patients included in a bulk insurance payment. Dentrix Ascend assumes that payments sharing the same check number, carrier, and transaction date are part of the same bulk insurance payment.
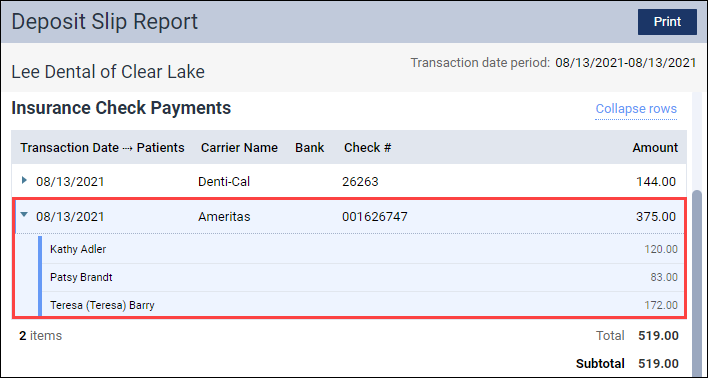
If an insurance carrier pays for multiple claims with one check, the payments applied to each claim show as individual line items in the expanded view of the report.
Payment rows print either collapsed or expanded depending on their state when you click Print.
Denti-Cal Reporting Enhancements
The following enhancements only affect practices in California working with Denti-Cal.
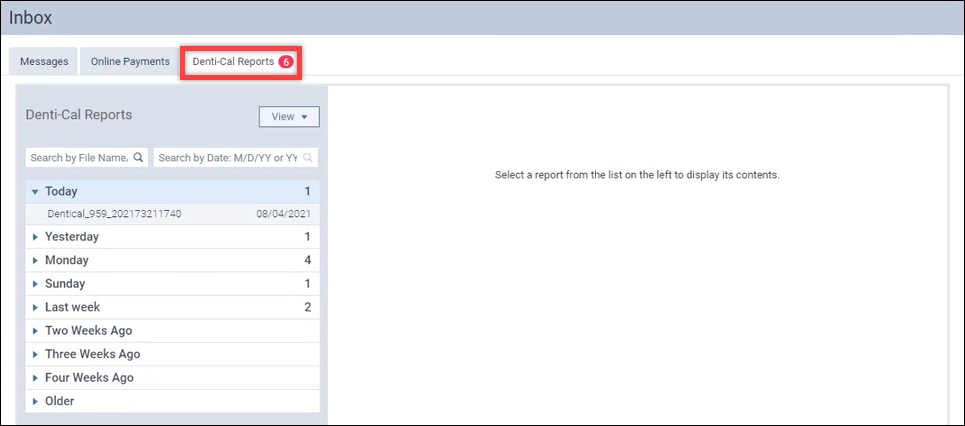
This release features additional enhancements to Denti-Cal Reports in the Inbox.
To view Denti-Cal Reports, you must have the Review Denti-Cal Reports right. To manage the reports, you must have the Manage Denti-Cal Reports right.
Filter the Report List
Dentrix Ascend initially only displays Denti-Cal reports within the past four weeks. This is to help decrease loading times. Still, the list of reports may be quite long. This release introduces several ways to filter and search the list to find the report you are looking for.
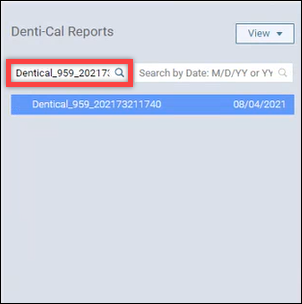
Search by File Name, Patient Name, or Other Piece of Information
Use the Search by File Name field to search for a specific file name, patient name, report type, or other piece of information. Dentrix Ascend will show you a list of all the reports within the past four weeks that contain the piece of information you searched for.
Search by Date or Time Range
Use the Search by Date field to filter the report list by a specific date or time range. Dentrix Ascend will show you a list of all the reports that fall on the date or within the time range you search for. The limit for the time range is 30 days.
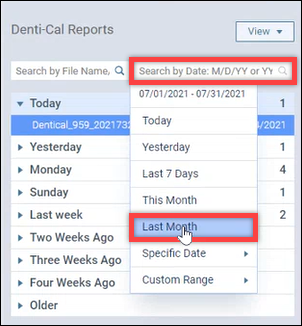
Search for Older Reports
As stated above, the report list initially shows reports within the last 4 weeks. To search for a report that falls outside of that window, you will need to use the Search by Date field. To reduce loading time, be specific with your search parameters. Use both of the Search fields to narrow your search further.


Search for Outstanding Claims
Once you have found the correct Denti-Cal report, you can associate that report with a patient insurance claim. Use the Search Patient/Claims field to search all outstanding Denti-Cal claims in your practice. Type a patient’s name. Then select a claim from the list.

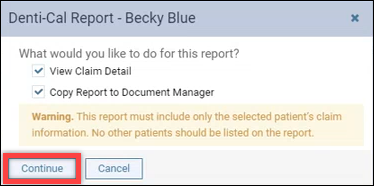
The Denti-Cal Report patient dialog appears. You have two options in this dialog.
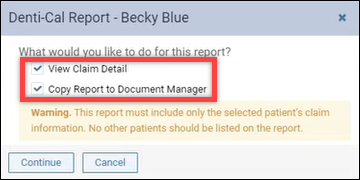
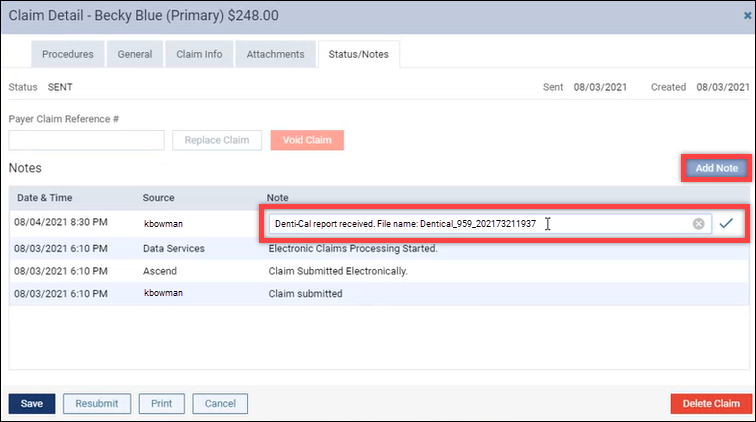
- Select View Claim Detail to view the Claim Detail so that you can add a status note to the claim.
- Select Copy Report to Document Manager to add the selected Denti-Cal report to the patient’s Document Manager. This action takes place in the background. You will see a green success message when this action is complete. Navigate to the Document Manager to view the file.
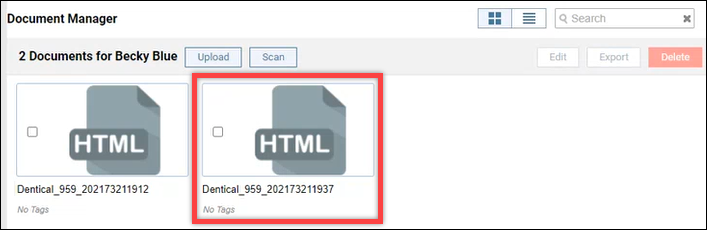
Warning: Sometimes Denti-Cal reports contain information on multiple patients. Make sure that the report you are attaching only contains information on the selected patient.
After you select one or both of the checkboxes, click Continue to open the Claim Detail window or to copy the report to the Document Manager.
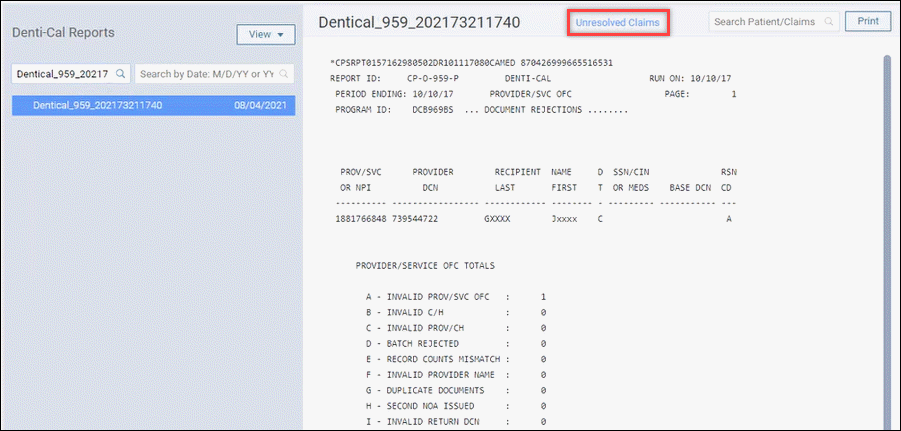
Link to Unresolved Claims
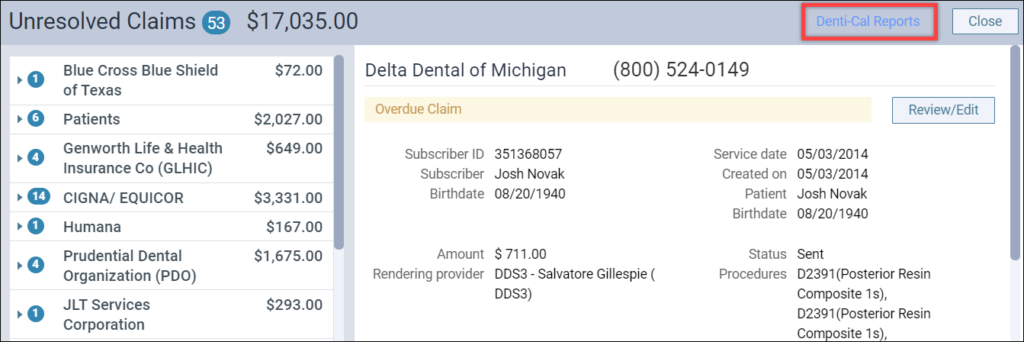
There is now a hyperlink on every Denti-Cal Report so that you can quickly navigate to the Unresolved Claims report.
The Unresolved Claims page includes a link back to the Denti-Cal Reports page for quick access.
Usability
Ledger Enhancements
Auto Scroll to Most Recent Transaction
When working in the Ledger for a patient with an extensive history, it can be time-consuming to find the most recent transaction. With this new release, you will be able to see the most recent transaction right after opening the Ledger.
In the Ledger, click the View menu, and set the transaction list to Sort by Statement. Then toggle the Auto-scroll to recent transactions switcher to Yes. Now, each time you open the Ledger, Dentrix Ascend will automatically scroll to the most recent transaction. This feature is enabled by default, but you may switch it off according to your preference. Auto scroll is not available in the Transaction date view.

Transaction Date Sorting Order
This release features another enhancement in the Ledger. Currently, you can change the sorting order of the Transaction Date column from oldest to newest or newest to oldest by clicking the column header.
With this release, Dentrix Ascend will now remember the sorting order that you select and automatically sort the Transaction Date column according to that order the next time you visit the Ledger.
Note that to be able to change the sorting order of the Transaction Date column, you must select Sort by Transaction date in the View menu.
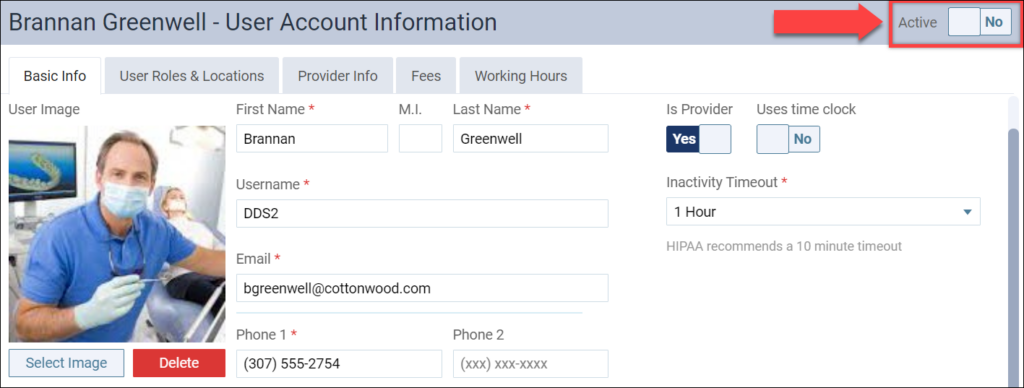
No Emails to Inactive Users
In the past, inactive users were receiving account update emails when their user account information changed or the rights associated with their role changed. As of this release, inactive users will no longer receive emails when changes are made to their account or their assigned roles.
User Rights
This release includes the following user right changes:
- The Edit Patient Procedure right now extends to include procedure provider selection in the routing panel appointment cards.
New Learning Content
Dentrix Ascend includes access to hundreds of articles that can answer a wide variety of questions, available at any hour of the day and every day of the week. Here are some popular topics. Click a title to open the topic.
Online Booking Overview
Why make a patient wait a minute longer than necessary when they’re ready to book an appointment? When you offer online booking, you give your patients the flexibility to book 24/7.
Scheduling Related Patients
By selecting any patient in Dentrix Ascend, you can quickly check to see whether related patients (i.e., a spouse, a dependent, etc.) have their next appointment scheduled.
Using the Chairside Dashboard
Using the Chairside dashboard streamlines processes and saves time so that you don’t have to keep switching tabs while working on a patient.
Adding a New Patient Record
Probably the most fundamental task you will do is add a patient record. Dentrix Ascend automatically searches existing patients to help prevent duplicate records in your database.