This release includes the ability to merge insurance carriers when you have duplicate insurance carriers, get billing warnings when billing information is missing, and communicate with your patients using standard SMS emojis. Additionally, a new clinical notes task report is available for office managers so you can monitor outstanding clinical notes.
Patient Communications
Text Messaging Emojis
This release introduces the ability to communicate with your patients using standard SMS emojis.
Dentrix Ascend is now able to display emojis in text messages sent to you by your patients. You can also insert standard SMS emojis when you are sending text messages. Text messaging is available in the following areas of Dentrix Ascend:
- Inbox
- Routing panel (blue text messages hyperlink)
- Calendar- patient appointment panel (blue text messages hyperlink)
- Patient Ribbon (Message icon)
- Patient Connection page (accessed from the Home menu)
To insert an emoji into a text message, click the emoji icon. The emoji library opens. Use the scroll bar to search for and select an emoji you want to send. Then, click Send.
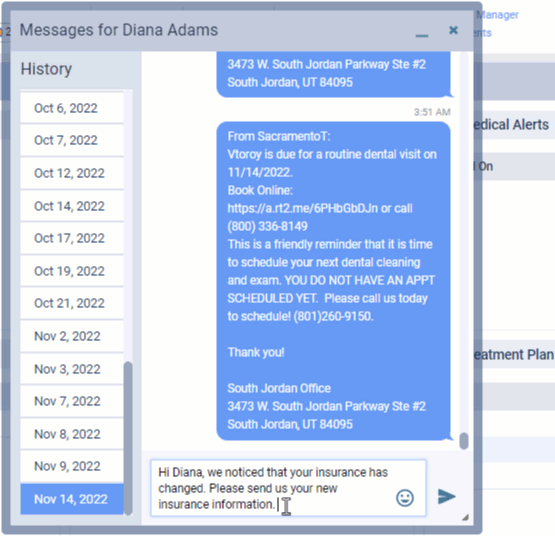
Emojis that you use the most will appear under Frequently used to help you quickly select an emoji when you are sending a text message.
A2P 10DLC (10-digit long code) Registration
A2P 10DLC refers to a system in the United States that allows businesses to send Application-to-Person (A2P) type messaging via standard 10-digit long code (10DLC) phone numbers. As a dental organization, your text messages, including automated reminders and electronic statements, are considered “business texting” and are sent using the A2P standard. Due to updated industry standards, to continue successfully sending business text messages you must complete a Trust Center business profile to verify your company’s information.
“Messages sent by unverified [businesses] will be subject to heavier filtering by mobile carriers such as Verizon, AT&T, and T-Mobile. This means they will not be guaranteed to be delivered. If they are delivered, they may be marked as “spam likely” in the recipient’s message inbox” (https://docs.smrtphone.io/en/articles/5104466-what-does-a2p-10dlc-stand-for-and-why-should-i-care, accessed November 22, 2022). The mobile carriers will not let you know if this is the case.
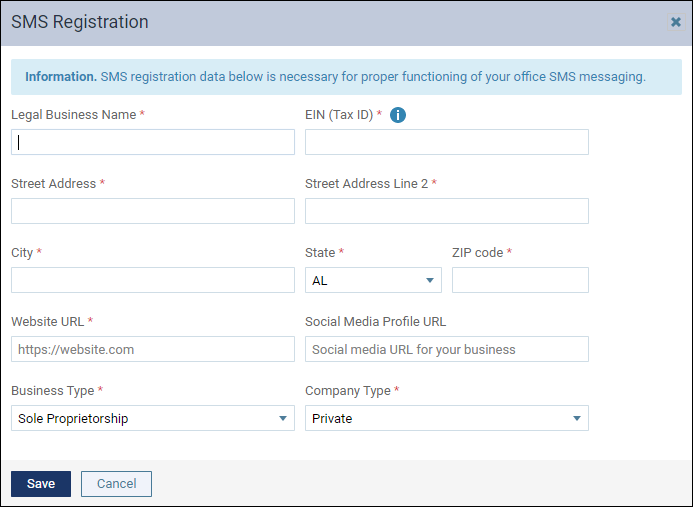
To help you complete a Trust Center business profile, Dentrix Ascend has added an SMS Registration window on the Patient Communication page (accessed from the Settings menu). To open the form, click SMS Registration.

Complete the form using your legal business registration information. A straightforward way to get that information is to find your company’s W2 form, or any local or federal tax filings that may be online. If you are unsure, contact your company’s accountant or financing office.
Important: You must complete this SMS Registration for each of your locations.
Once you save the completed form, you will see a notification that your registration status is In Progress and that it may take several days to complete the verification process, which is conducted by our messaging provider.
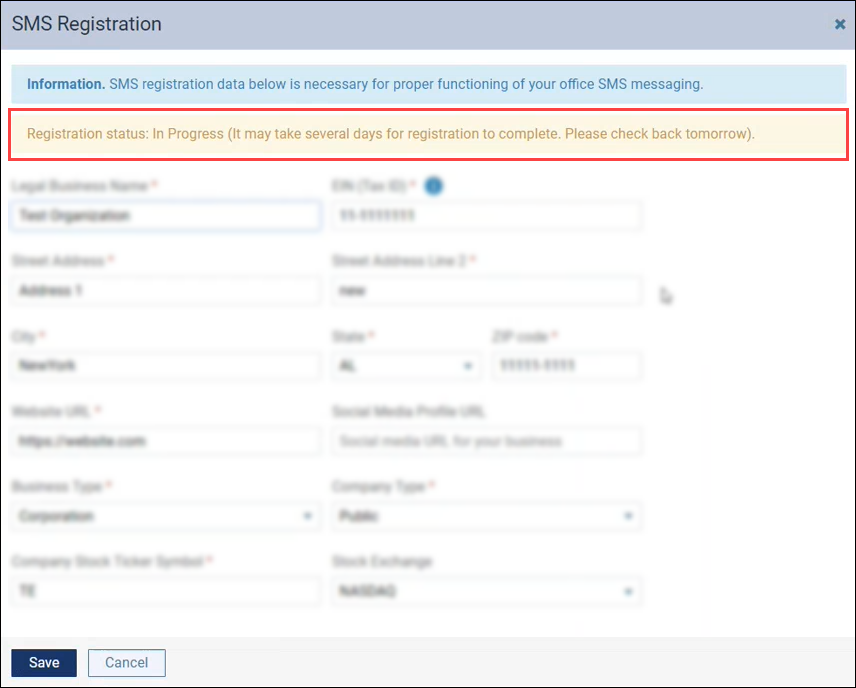
When registration is successful, the icon on the SMS Registration button will change from an orange warning sign to a green checkmark.

Clinical
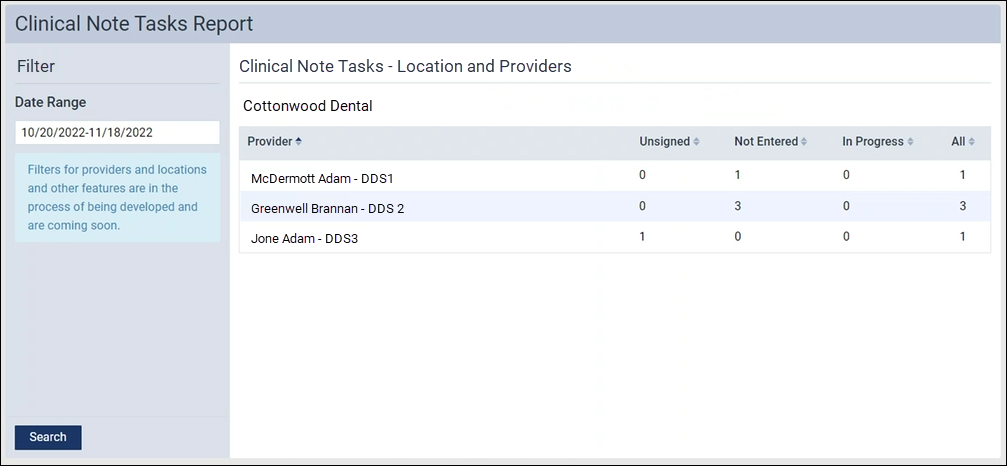
Clinical Note Tasks Report
This release introduces the first phase of a new Clinical Note Tasks Report. This report helps dental practice Administrators see outstanding clinical note tasks for all Providers in each location so they can ensure compliance with dental licensing regulations.
Assigned Access Rights
To view the Clinical Notes Task Report, your user role must be granted the Clinical Note Tasks Report right in the Reports security category. By default, this right is granted to the Administrator role. If your role was granted the Clinical Reports right prior to this update, you will automatically be granted the Clinical Note Tasks Report right.
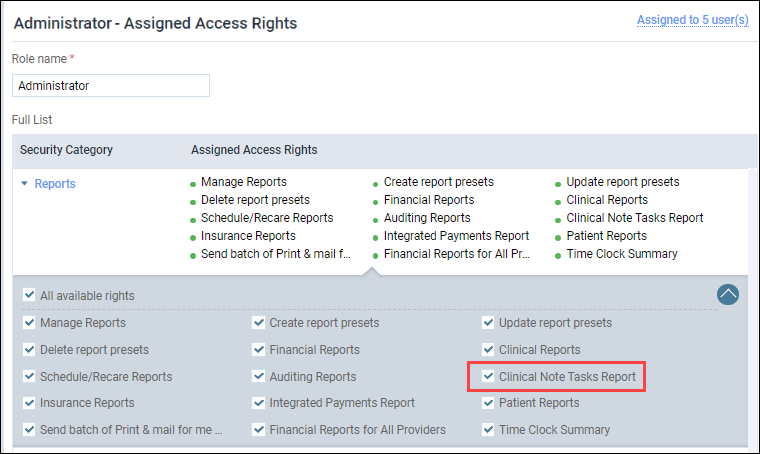
If your role has not been granted the Clinical Note Tasks Report right, when you attempt to open the Clinical Note Tasks Report, the usual Access Denied message appears.
Viewing the Clinical Note Tasks Report
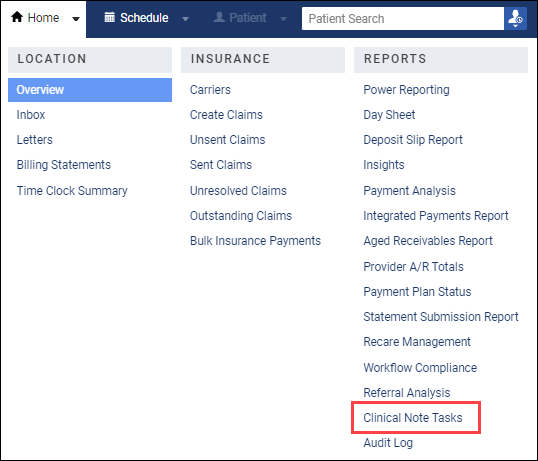
To view this report, click Clinical Note Tasks from the Home menu.
The Clinical Notes Tasks Report displays Providers that have any Unsigned, Not Entered, and In Progress clinical notes for each location. The report also includes an All column which gives you a total of all Unsigned, Not Entered, and In Progress clinical notes for each provider.
Note: A message appears (in blue) under the Date Range filter to inform you that filters for providers, locations, and other features for this report are being developed and are coming soon in future releases.
Sorting by Column Headers
You can sort the outstanding clinical notes by any of the columns. Click the column header to sort the outstanding clinical notes by that heading. Click the heading again to reverse the order.

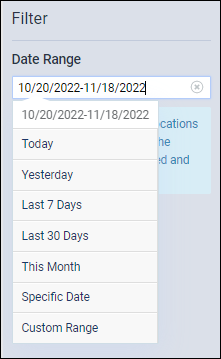
Filtering By Date Range
You can filter the outstanding clinical notes by Date Range. Click the Date Range filter to find outstanding clinical notes by several standard date ranges. The default date range is set for the Last 30 days.
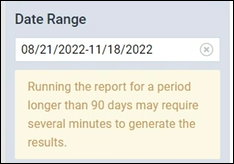
If you choose to a period longer than 90 days, a message appears under the Date Range to let you know that the report may require several minutes to generate the results.
Insurance
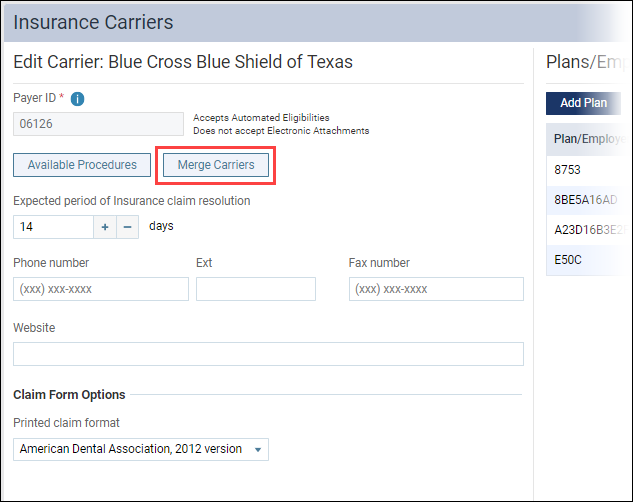
Merging Insurance Carriers
This release introduces the ability to merge duplicate insurance carriers or insurance carriers entered in error. For example, you entered an unsupported (Payer ID 06126) version of a supported carrier in error.
A new Merge Carriers button has been added to the Insurance Carrier page and a new Merge Insurance Carriers dialog box helps you to merge two insurance carriers. You must have the new Merge Carriers right in order to do this. Users who currently have the Create Carrier, Edit Carrier, and Delete Carrier rights (all three) will automatically be granted the new Merge Carriers right.
Note: When you merge two insurance carriers, the patients’ coverages and Start and End Dates stay the same.
To merge two carriers, from the Home menu, select Carriers. Search for and select the wrong insurance carrier you want to merge with the correct insurance carrier. On the Edit Carrier page, click Merge Carriers.
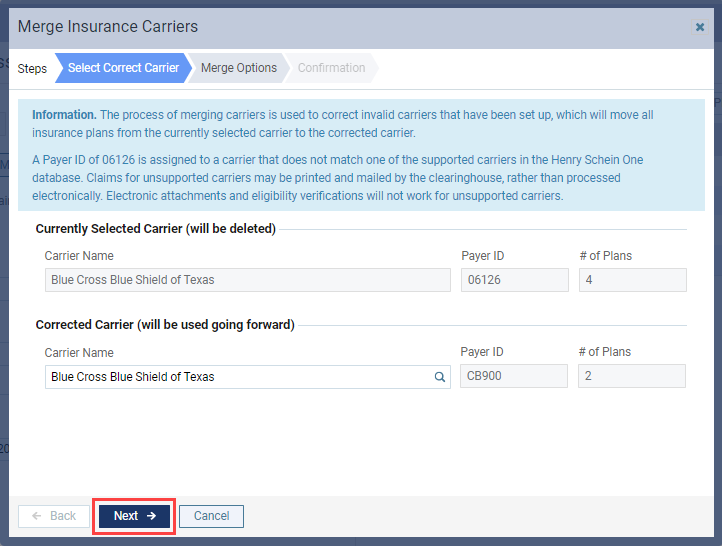
The Merge Insurance Carriers dialog box opens where you will select the correct carrier, choose your merge options, and confirm the merge.
Select the Correct Carrier
The Select Insurance Carrier tab allows you to select the correct insurance carrier that will be used going forward. The process of merging carriers moves all insurance plans from the currently (wrong) selected carrier to the correct carrier.
The Select Insurance Carrier tab lists the Currently Selected Carrier (will be deleted) and Correct Carrier(will be used going forward).

Under Corrected Carrier (will be used going forward), search for and select the correct carrier from the list of carriers set up for your organization.

Once you select the Corrected Carrier, click Next to continue with merging the insurance carriers.
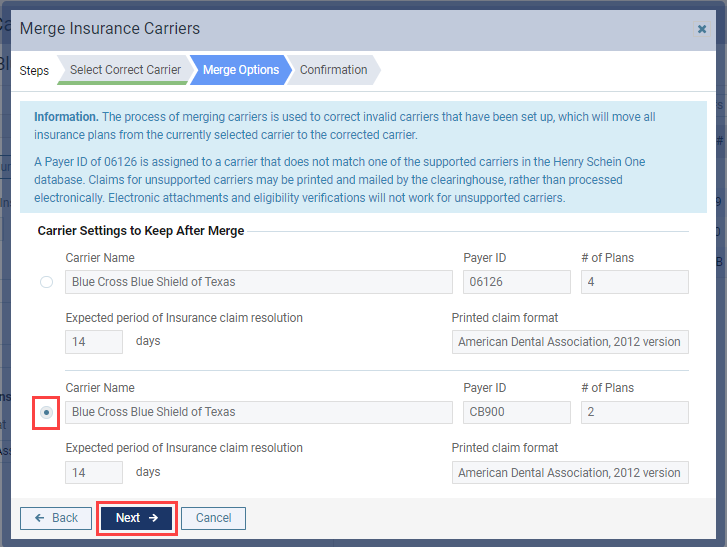
Choose the Merge Options
The Merge Options tab lets you choose the carrier settings to keep after the merge. There are only two settings: Expected period of insurance resolution and Printed claim format. By default, the Corrected Carrier is selected from the Select Correct Carrier tab. If you choose to select the other insurance carrier, those settings will be applied to the corrected carrier.
Note: The setting information is automatically drawn from Dentrix Ascend and cannot be changed.
Click Next to continue merging the insurance carriers.
Confirm the Merge
The Confirmation tab allows you to review and confirm the merging of the insurance carrier plans. Carefully review your selections. If you need to change the carrier settings you selected on the Merge Options tab, click the Back button. If the settings are correct, click Merge.
Note: Once you merge two insurance carriers, the action cannot be undone.

Billing Statements
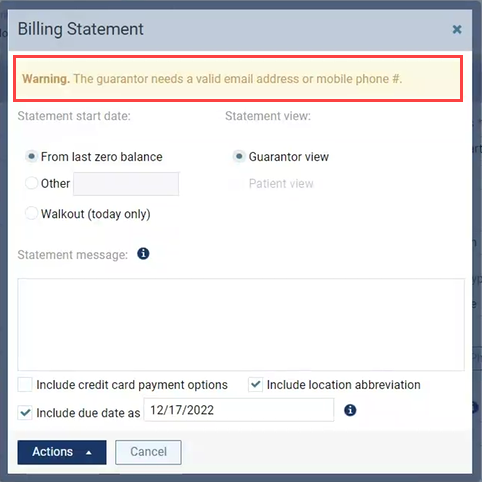
Billing Information Warnings
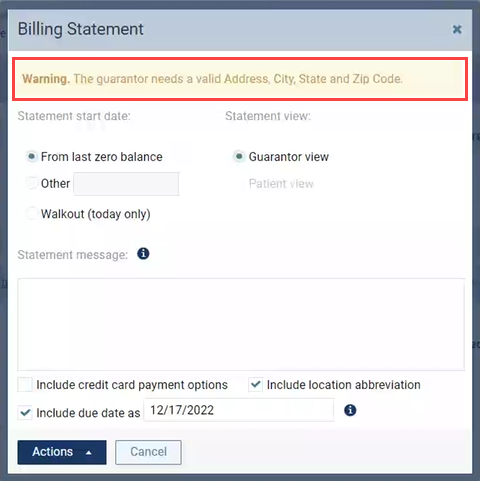
New warnings now appear on the Billing Statement dialog box and the Patient Walkout Statement tab when you try to send a billing statement to a guarantor that has missing billing information. Once you verify and update the guarantor’s billing information on the Patient Information page, the warnings will no longer appear.
Address Warning Message
If some or all of a guarantor’s Address, City, State, or ZIP Code are missing, a warning message appears. This information is critical for sending printed statements.
Email Address or Mobile Phone Number Warning Message
If an email address or mobile phone number is missing, a warning message appears. This information is critical for sending electronic statements.
User Rights
The following changes to user rights are included in this release:
- A new Clinical Note Tasks Report right allows you to view the Clinical Notes Task Report.
- A new Merge Carriers right allows you to merge the plans of two carriers.
New Learning Content
The Education Team continuously adds to and updates content in the Dentrix Ascend Resource Center. Below are the latest new additions. Click the title to get more information about these topics.
Webinar
On Demand Webinar: End-of-Year Best Practices
If you missed the live webinar, watch this new on-demand webinar to learn how to find and contact patients with remaining benefits, update fee schedules, and complete other end-of-year tasks in Dentrix Ascend.
Blog Posts
Evaluating Your Insurance Carriers
PPO write-offs can have a substantial impact on your bottom line. But before you consider dropping a payer or negotiating with a PPO, you need the numbers on your side. Dentrix Ascend has a report that lists everything you need to know about each insurance carrier so that you can make good decisions for your practice. You may be surprised by the results.
Creating an Excuse Letter for a Patient
Your patients may ask you for an excuse letter to give to their school or work. Dentrix Ascend makes it easy for you to set up an Excuse Letter template so that you can quickly create personalized excuse letters for your patients. Let’s learn how to set up the Excuse Letter template and how to print an excuse letter for a specific patient.
How to Avoid Charging Multiple Periapical Images During an Endo Procedure
A commonly asked question is: “How do you avoid charging for each x-ray acquired during an endo procedure?” In Dentrix Ascend, it’s important to make sure you are acquiring the periapical image in Endo mode to avoid charging a patient for each x-ray taken during an endo procedure. Read this tip to learn how to acquire a periapical image in endo mode.