The product update released December 14, 2021 features new filters to help you limit which procedures and adjustments are included in the Provider A/R Totals Report. There are multiple insurance-related updates, including the ability to attach clinical notes to claims, new ways to view rejected claims, and the ability to set the expected claim resolution period for each carrier. You can now change a provider for multiple procedures at once in the treatment planner. Also, a new Social Security # field allows you to enter and securely store a patient’s Social Security number.
Reporting
New filters to the A/R Totals Report
One of the challenges of using the Provider A/R Totals Report was that you didn’t have the ability to filter out specific procedures or adjustments. Because of this limitation, many users preferred to use a Power Report to determine what to pay their providers. As of this release, you can now filter the Provider A/R Totals Report by procedures, charge adjustments, and credit adjustments.

Procedure Filter
Choose which procedures to include in the Provider A/R Totals Report by selecting procedure presets.
Note: The procedure presets in the A/R Totals Report share the same presets used in the Aged Receivables report. Any changes affect the presets for both reports. To learn how to customize these presets, read Customizing procedure filter presets in the Dentrix Ascend Resource Center.

New Charge Adjustments and Credit Adjustments Filters
You can now filter the Provider A/R Totals Report to include specific charge adjustments and credit adjustments.
To filter by charge adjustments, expand the Charge Adjustments list and select which adjustments you want to include in the report. The Charge Adjustments field indicates how many adjustments have been selected.
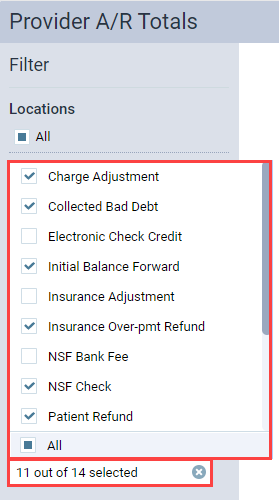
Position your pointer over the Charge Adjustments field to see a list of the selected adjustments.

The filter options that you choose will also show on the printed report.
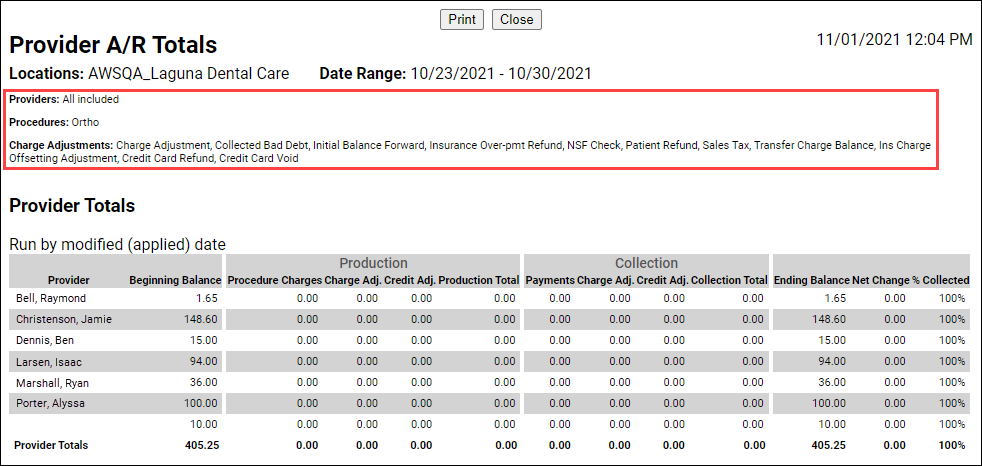
The Credit Adjustments filter works in the same way as the Charge Adjustments filter. Click the dropdown to select which adjustments you want to include in the report. The filter options you choose will show on the printed report.

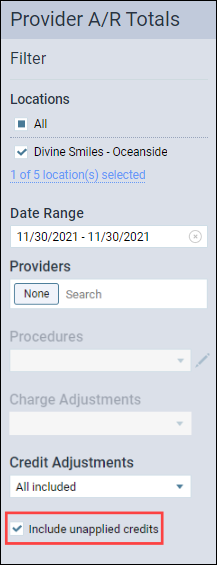
Note about unapplied credits: If you want to see the total of your unapplied credits, select None for the Providers filter. Then, select Included unapplied credits. This will show you a total of your unapplied credits for the selected date range. To get more information about which patients are tied to these credits, you will need to use a Power Report such as the Unapplied Credits Report.
Enhanced Provider Filter in Provider A/R Totals Report
In past iterations, you could only filter by All Providers, a single provider, or no providers in the Provider A/R Totals Report. Now, the Providers field includes a search box, which you can use to search for and select one or more providers.

Insurance
Attaching a Clinical Note to an Insurance Claim
As you know, the electronic clearinghouse requires all insurance claim attachments to be JPEG images. With this update Dentrix Ascend can automatically convert clinical notes to .jpg files so they can easily be attached to claims. Adding narrative clinical notes to claims may help improve your claim acceptance rates.
The Attachments tab of the Claim Detail window has a new dropdown list called Add Narrative.

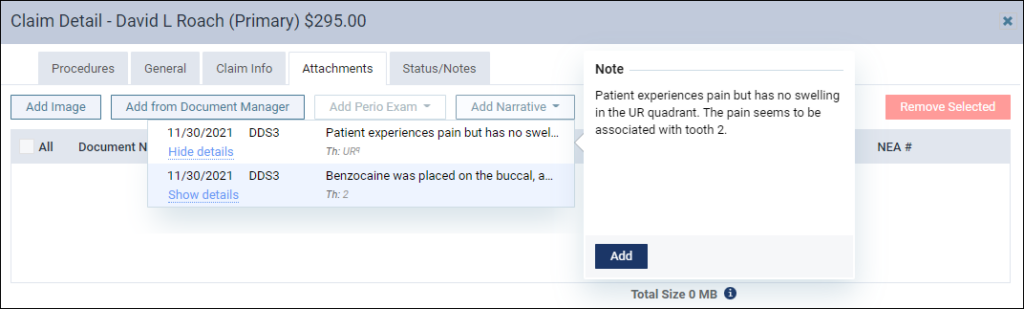
To add a clinical note as an attachment, first click the Add Narrative dropdown to view the clinical notes associated with this patient.

There are two ways to add clinical notes as an attachment. You can either click the note to add it as an attachment or you can click the Show details link to open a preview of the note to help make sure you are selecting the correct clinical note. The preview includes an Add button to attach the clinical note to the claim. Click Hide details to close the preview.
Note: You cannot select multiple notes to add at one time. You must add each note one at a time (separately).
The clinical note becomes an attachment with the Document Name of “Narrative” accompanied by the date the provider created the clinical note. The Classification/Type of Narrative is selected automatically, but you can change this to Report or Diagnosis by clicking the Classification / Type dropdown.

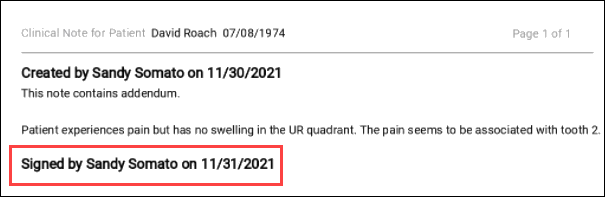
To see the narrative exactly as it appears to the insurance company, click the document name, which is a hyperlink, for a preview. Notice that the attachment includes the patient’s name and date of birth, the provider, the note creation date, as well as the practice name, address, and phone number.
The entire clinical note is included; there is no way to attach only a portion of the clinical note. Note: You may wish to examine your processes for creating clinical notes to make sure they optimized for communicating with an insurance carrier. And if you have not already, you may wish to build a list of common narratives into your clinical note templates for those few procedures which require a narrative.

To remove narrative attachments, select the checkbox on the narrative line and click Remove Selected.

Once you submit an insurance claim, you cannot delete an attached clinical note. You can later sign or add an addendum to the note, but it will not appear on the submitted claim; the claim remains unchanged for the sake of consistency. If you attach a clinical note to a claim before it is signed, you can still sign it later; just make sure to do it before you submit the claim. The narrative will include a “signed by” note but not the electronic signature you configured in Ascend.
Attachment Size Information
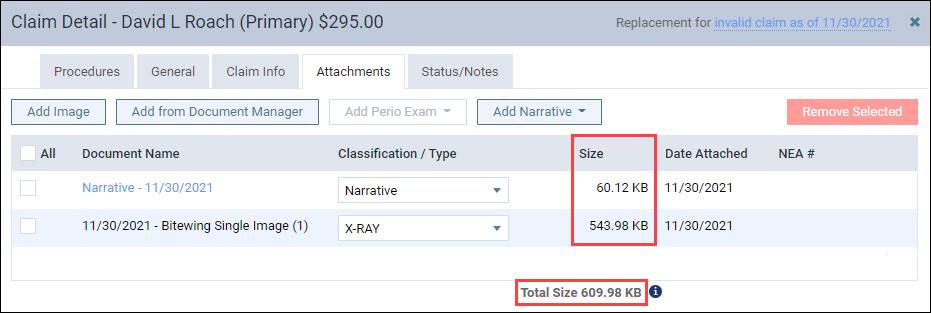
The clearinghouse Dentrix Ascend uses to process electronic insurance claims has a total size limitation of 15 MB for a claim and its attachments. To prevent you from exceeding this restriction so your claims can be processed in a timely manner, the Attachments tab also contains a new Size column.
The Size column shows the file size of each of your attachments in either kilobytes (KB) or megabytes (MB). At the bottom of the column is the total size of all attachments and the claim itself, which in this example comes to 609.98 KB.
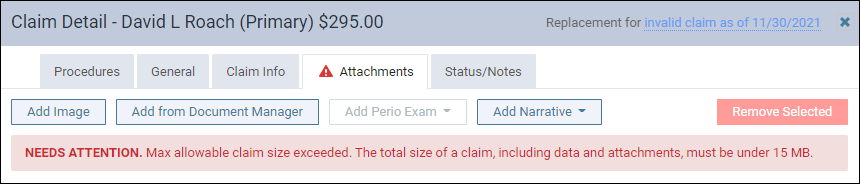
If the total exceeds 15 MB, you will see a warning. You will not be able to submit the claim while the total file size exceeds 15 MB. If this occurs, you will need to remove an attachment.
Enhancements to the Unresolved Claims Report
New Rejected Claims Filter
You can now filter the Unresolved Claims Report to view only rejected claims. Toggle the Show only rejected claims switcher to On to show only rejected claims.

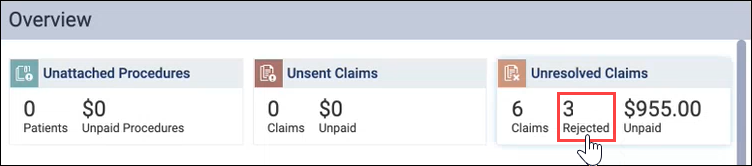
From the Unresolved Claims widget on the Overview page, you can also click the number of Rejected claims to open the Unresolved Claims report, which will automatically be filtered to only show rejected claims.
Set the Overdue Claim Period on a Per-Carrier Basis
In the past, all claims were considered overdue if they were over 14 days old. For some carriers, that is an unrealistic turnaround time for a claim. As of this release, you can now customize the expected period of insurance claim resolution for each carrier to give you a more accurate picture of how many of your claims are overdue.
From the Unresolved Claims report, locate a claim from the carrier that you want to edit. Click Visit carrier page.

The Insurance Carriers page opens allowing you to edit that carrier’s information. Under Expected period of insurance claim resolution, enter a new number, or use the plus (+) or minus (-) buttons to change the number of days. Click Save.
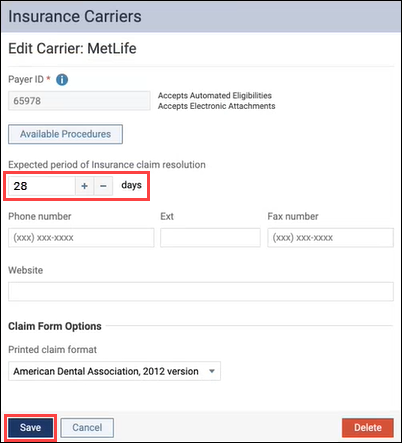
Now, claims from that carrier will not be considered overdue until the number of days you selected have passed. A good place to start configuring will be your Payer ID 06126 carriers where correspondence is by mail.
New Messaging in Add Carrier Workflow
From Dentrix Ascend, you have access to a large database of supported payers. Dentrix Ascend uses carrier information that is managed from a central source. The parent company, Henry Schein One, maintains a list of contracted payers. You may add any carrier not on our list, but these payers are considered non-contracted payers and are assigned Payer ID 06126. Claims for unsupported carriers may be printed and mailed by the clearinghouse, rather than processed electronically. Electronic attachments and eligibility verifications will not work for unsupported carriers.
To make it clear which payers are non-contracted payers, the Insurance Carriers page now includes a new explanatory message and a Printed Claims column to remind you which claims must be printed and mailed.
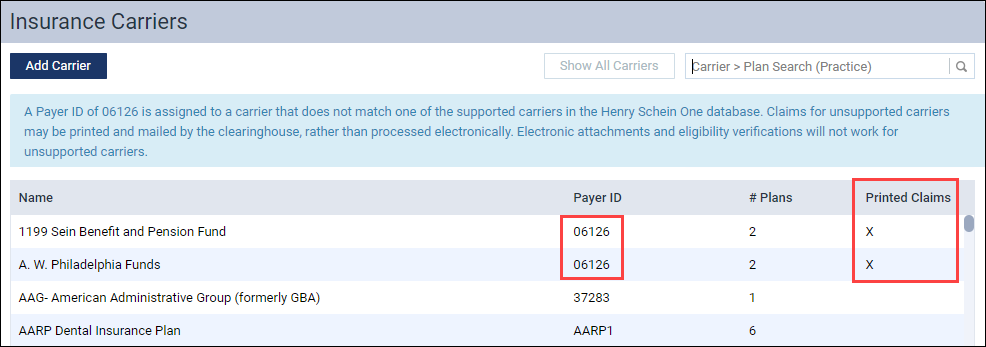
An X in the Printed Claims column indicates that the carrier does not support electronic claims.
To explore the list of supported carriers, please visit the Dentrix Ascend Payor Search tool.
Clinical
Change the Provider for Multiple Procedures in the Tx Planner
A new bulk Change Provider To dropdown menu allows you to change a provider for one procedure or multiple procedures at one time in the treatment planner. In the past, you had to open each procedure to change the provider. Now you can change the provider for multiple procedures at one time.
Select a procedure or select Date to include all procedures under the date.
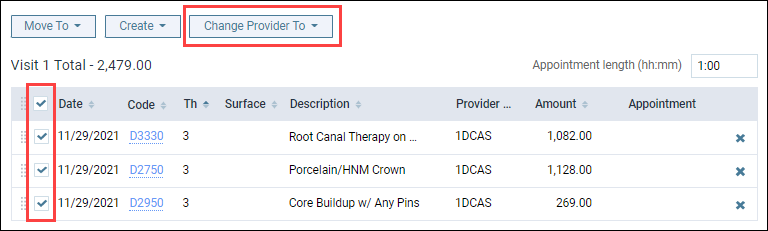
Then click Change Provider To and select the provider.

Note: The Change Provider To dropdown menu will appear grayed out until you select either Date or a procedure.
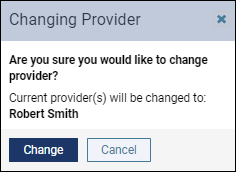
Next, the Changing Provider dialog box opens. Select the Update procedure amount(s) based on this fee schedule check box to the change to the new provider’s fee schedule, and click Change.

A green success message will appear if the change is successful.
If you select a provider that does not have an assigned fee schedule, the Changing Provider dialog box will open; however, it will not include the option to update procedure amount(s) based on a fee schedule. If you click Change, the amount for each procedure will default to the last provider’s fee schedule for the procedures originally entered in the treatment planner.
When you change providers or procedure fees in the treatment planner, these changes are tracked in the Audit Log.
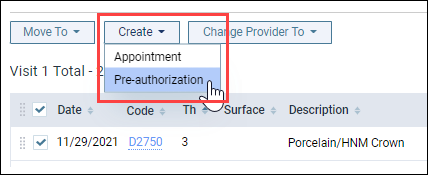
Treatment Planner Create Menu
The Create Appointment and Create Pre-authorization buttons have been moved to a new Create menu in the treatment planner. Before this release, the Tx Planner included a Create Appointment button and a Create Pre-authorization button. The two buttons were combined to make room for the new Change Provider functionality.
This change has not changed the functionality of how an appointment or a pre-authorization is created.
Note: The Create menu is not available until you move unassigned, treatment-planned procedures to a treatment plan case. When you select the procedure(s), the Create drop-down menu becomes active, and you can select whether to create an appointment or a pre-authorization.
Updated Clinical Note Tasks Widget
With this release, the functionality of the Clinical Note Tasks widget on the Home dashboard has been updated to save providers time when they are added as an additional provider in a clinical note.
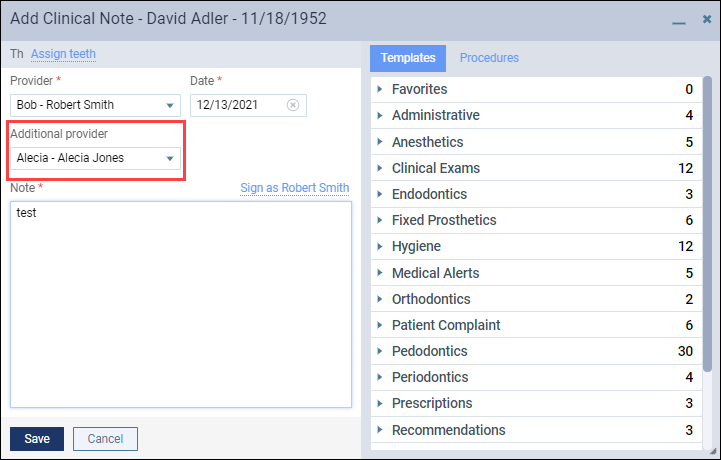
In the past, if you were listed as an additional provider in a clinical note, the Clinical Note Tasks widget indicated that you had an unsigned clinical note listed under Not Entered—even though you had no way to sign the note.
With this update, once the initial provider signs the clinical note, the additional provider will see a task under Unsigned in the Clinical Note Tasks widget. The additional provider will then be able to sign the clinical note by clicking the number under Unsigned.

The clinical note opens for the additional provider to sign the clinical note.
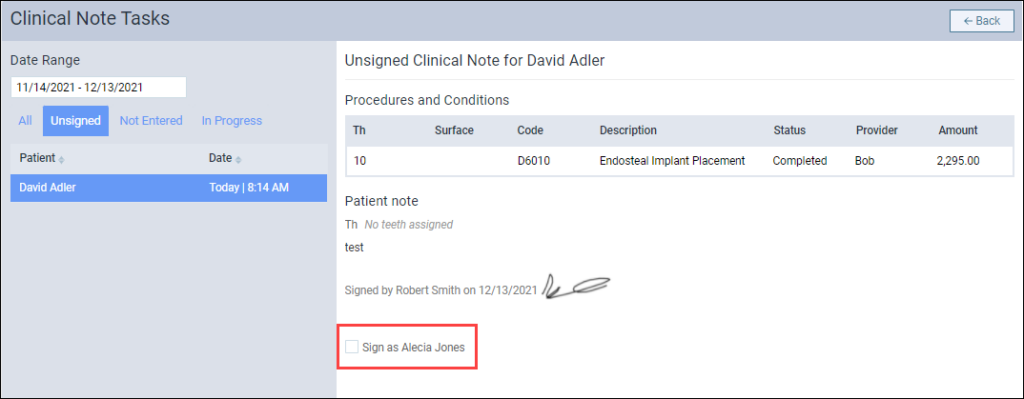
Note: The additional provider will not see a task under Unsigned until the initial provider signs the clinical note.
Social Security Number Field Added
A new Social Security # field allows you to enter and securely store a patient’s Social Security number so you can quickly access it for patient financing and insurance eligibility verification.
The Social Security # field is located on the Patient Information page under the Basic Info tab.
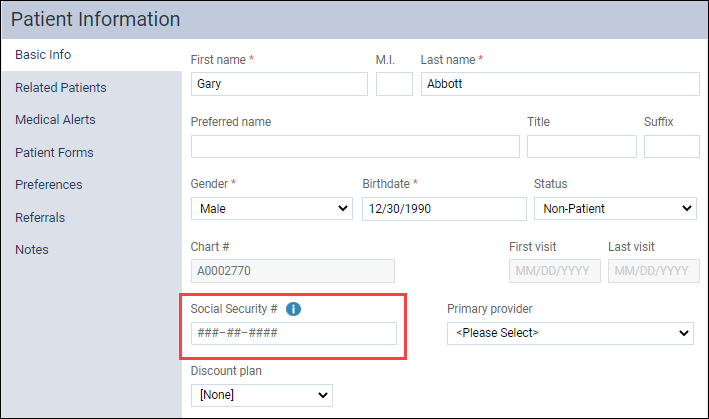
Hashtags in the Social Security # field means that the field does not have a Social Security number entered.
When you are ready to enter a Social Security number, click in the Social Security # field and enter the patient’s Social Security number. You can copy and paste into the field if you have the number stored elsewhere and want to bring the number over without retyping it. Be careful when you are pasting because while Dentrix Ascend does check to make sure the number fits a valid pattern, it does not check for duplicates.
A warning alert will appear if it is not valid Social Security number.

When you enter a valid Social Security number, a blue checkmark appears. This is the save button for the Social Security # field. You can either click the blue checkmark to save the patient’s Social Security number or click Save at the bottom of the Patient Information page.

Once you have saved the Social Security number, the number is hidden and an Unhide icon appears.

Click the Unhide icon to view the Social Security number. When you click the Unhide icon, the Social Security number becomes highlighted in blue for editing. After 3 seconds, a blue timer appears under the Social Security number. After 15 seconds if you are not actively typing in the field, the number becomes hidden automatically. If you click anywhere else on the screen, Dentrix Ascend will hide the number.

The information icon next to the Social Security # field contains important information about how the field works.
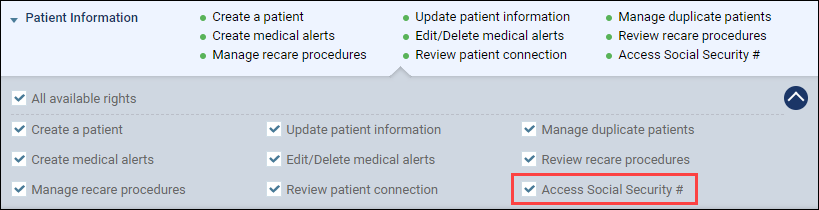
To view a Social Security number, your user role must have the rights to access a patient’s Social Security # field. A new Access Social Security # right has been added to user roles under Patient Information. By default, this right is enabled for the Administrator and Billing Coordinator user account roles. This right is also already enabled for users who have the Update patient information right.
The Audit Log records when patient Social Security numbers are reviewed, updated, or deleted, but does not show the Social Security numbers.

Note: Social security numbers cannot be viewed in a power report or any standard report. The numbers are encrypted and can only be viewed or edited from the patient information page.
CDT 2022 Update
Each year the ADA releases changes to procedure codes that take effect at the beginning of the new year (in this case, January 1, 2022). The 2022 edition includes 24 new codes and several revisions and deletions. Accordingly, Dentrix Ascend has adjusted the procedure codes in order to help you enjoy fewer claim rejections and speedier reimbursement. Here is a summary of the changes:

The new codes cover patient screenings, sleep apnea appliance fabrication and repair, immediate partial dentures, intra- and extra-coronal splints, rebasing hybrid protheses, and removal of temporary anchorage devices. Of special note are the codes D1701 – D1707 representing the various COVID-19 vaccination options.
This update will insert the new procedure codes into your existing fee schedules and update your fee schedule templates. The charge for all new codes is $0.00 so you will want to visit your fee schedules and update them after researching what you would like to charge for those procedures (which may or may not apply to your office). If you have been importing fee schedules from a spreadsheet you will want to update your spreadsheet template as well.
As of this update, inactivated codes simply stop showing up in search results. However, if you need to use an inactivated code again before the end of the year, you can manually reactivate it and then deactivate it again in January. Any inactivated code attached to an outstanding claim will remain in place—the update will not affect existing claims.
User Rights
This release includes the following user right changes:
- A new Access Social Security # right is required to enter, view, or edit the Social Security Number in a patient’s record.
New Learning Content
We want to thank everyone that attended the Fall 2021 Dentrix Ascend Insights Digital Series live webinar event, however, if you missed any of the webinars, you could still watch them on demand. The popular topics include:
Implement A More Profitable Patient Visit Workflow with the Dentrix Ascend Routing Panel
To remain profitable, your team needs to follow efficient and productive workflows.
Provide Better Patient Care with New Clinical Tools in Dentrix Ascend
New tools and apps from Henry Schein One help you improve clinical efficiency by streamlining routine tasks.
Make It Easy for Patients to Schedule: Offer Online Booking
Today’s patients want to see available dates and times and choose one that works for them.
Improve Cash Flow with Dentrix Ascend RCM Solutions
Make the most of the RCM solutions available to you in Dentrix Ascend.
Also, be sure also to check out our new insurance essentials video Insurance Overpayments Workflow. It will walk you through the steps of entering an insurance payment to ensure that your patient’s Ledger is balanced when the insurance carrier pays more than expected.