EARLY ACCESS ONLY
With this release of Dentrix Ascend, you can now restrict the refunding of credit card transactions by amount per user role. Also, there is a new report to track refund requests.
Security Right Enhancement
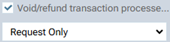
The existing security right “Void/refund transaction processed by credit cards” (in the “Ledger” category) has been enhanced. This right still controls if a user can void or refund a credit card payment that was posted using Dentrix Ascend Pay, but now you can select the maximum amount a user is authorized to process a refund for.
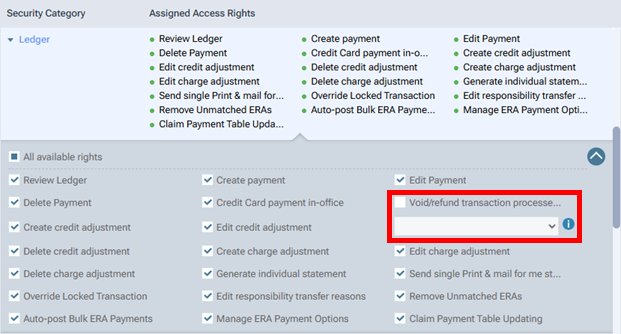
Note: This security right requires the “Create charge adjustment” and “Credit Card payment in-office” security rights.
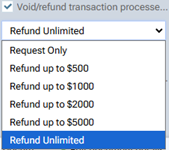
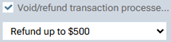
With the Void/refund transaction processed by credit cards checkbox selected, Refund Unlimited is selected by default.
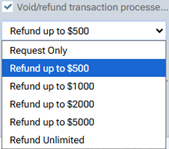
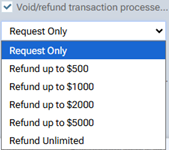
Do one of the following:
- To allow a user to process a partial refund or a full refund, leave Refund Unlimited selected.
- To set the maximum amount a user is allowed to refund, select Refund up to $500, Refund up to $1000, Refund up to $2000, or Refund up to $5000. With one of these options selected, a user can (a) process a partial or full refund up to the maximum allowed amount or (b) request a partial or full refund greater than the maximum allowed amount.
- To allow a user only to request a partial or full refund, select Request Only.
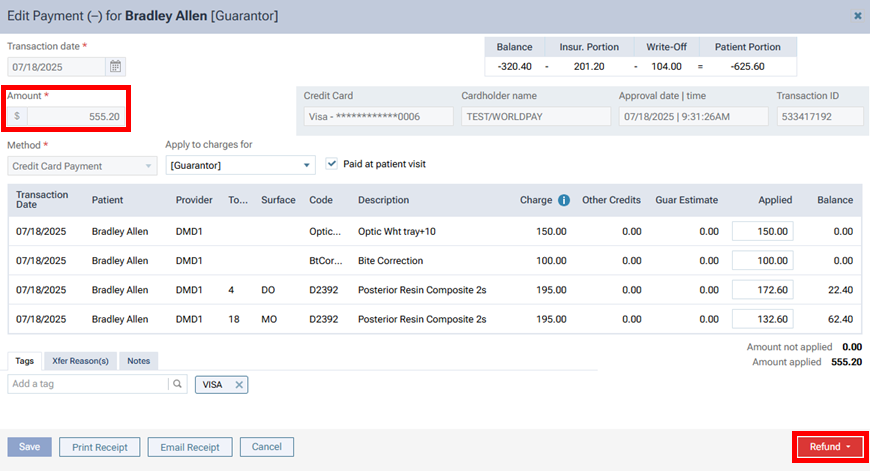
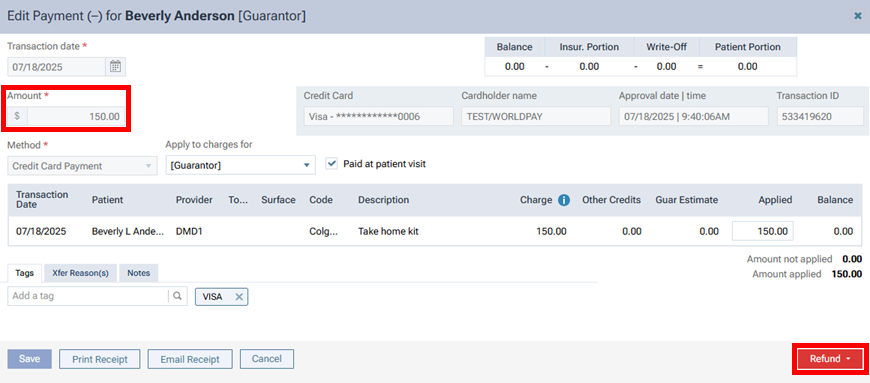
Processing Refunds and Requesting Refunds
In the Edit Payment dialog box for a credit card payment, the refund options vary according to the user’s limit:
- If an unlimited amount is allowed, do one of the following:
- To process a full refund, on the Refund menu, select Full Refund (see Example A).
- To process a partial refund, on the Refund menu, select Partial Refund (see Example A).
- To process a full refund, on the Refund menu, select Full Refund (see Example A).
- If a limited amount is allowed, do one of the following:
- If the allowed amount is greater than or equal to the payment amount, do one of the following:
- To process a full refund, on the Refund menu, select Full Refund (see Example A).
- To process a partial refund, on the Refund menu, select Partial Refund (see Example A).
- To process a full refund, on the Refund menu, select Full Refund (see Example A).
- If the allowed amount is less than the payment amount, do one of the following:
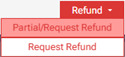
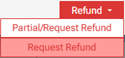
- To process a partial refund (if the refund amount is less than the allowed amount), on the Refund menu, select Partial/Request Refund (see Example B).
- To request a partial refund (if the refund amount is greater than the allowed amount), on the Refund menu, select Partial/Request Refund (see Example C).
- To request a full refund, on the Refund menu, select Request Refund (see Example D).
- To process a partial refund (if the refund amount is less than the allowed amount), on the Refund menu, select Partial/Request Refund (see Example B).
- If the allowed amount is greater than or equal to the payment amount, do one of the following:
- If only a request is allowed, do one of the following:
- To request a partial refund, on the Refund menu, select Partial/Request Refund (see Example E).
- To request a full refund, on the Refund menu, select Request Refund (see Example F).
- To request a partial refund, on the Refund menu, select Partial/Request Refund (see Example E).
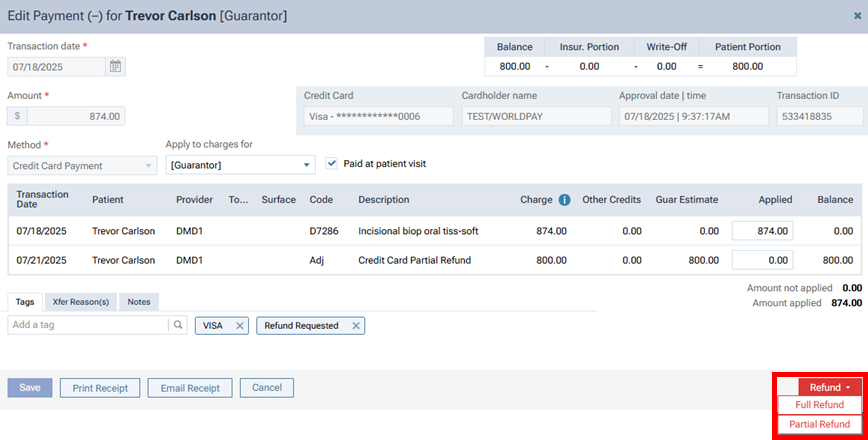
Example A
If an unlimited amount is allowed, or if the allowed amount is greater than or equal to the payment amount, how to process a full or partial refund:
![]() OR
OR
![]()

Do one of the following:
- To process a full refund ($500.00), on the Refund menu, select Full Refund.

- To process a partial refund ($0.01 – $499.99), on the Refund menu, select Partial Refund.

The steps for processing a full refund or a partial refund are the same as before.
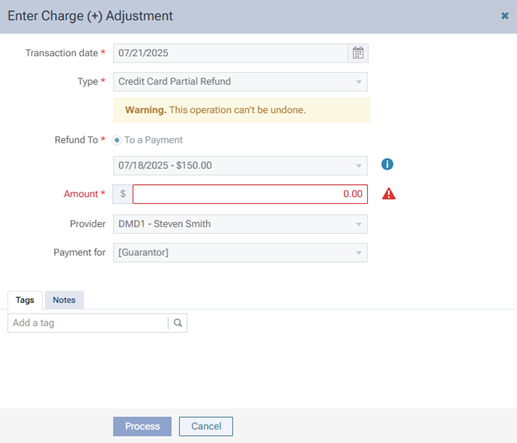
Example B
If the allowed amount is less than the payment amount, how to process a partial refund up to the allowed amount:

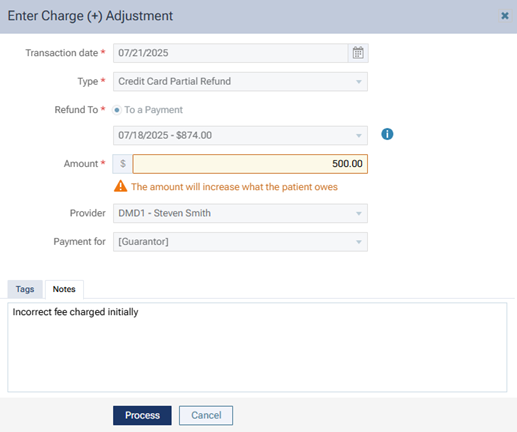
To process a partial refund up to the allowed amount ($0.01 – $500.00), on the Refund menu, select Partial/Request Refund.
The Enter Charge (+) Adjustment dialog box appears.
Enter an Amount that is less than or equal to the allowed amount.
Add Notes to explain the reasons for the refund.
Click Process.
The Edit Charge (+) Adjustment dialog box appears.
Click Save & Close.
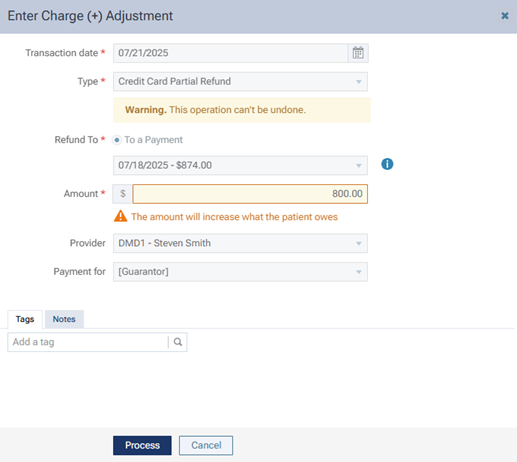
Example C
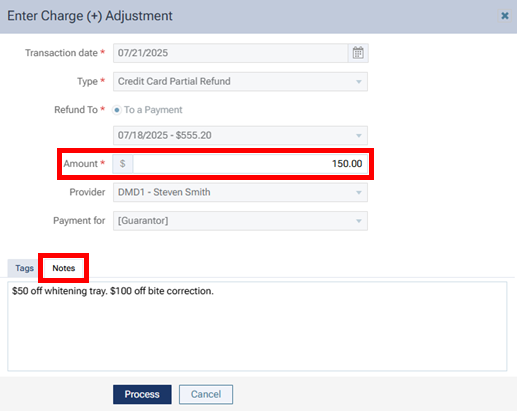
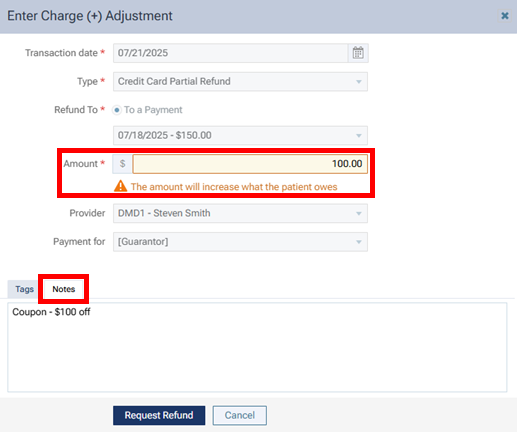
If the allowed amount is less than the payment amount, how to request a partial refund that is greater than the allowed amount:

To request a partial refund that is greater than the allowed amount ($500.01 – $873.99), on the Refund menu, select Partial/Request Refund.

The Enter Charge (+) Adjustment dialog box appears.

Enter an Amount that is greater than the allowed amount but less than the payment amount.
Add Notes to explain the reason for the refund.
Click Request Refund.
The Edit Charge (+) Adjustment dialog box appears.
Click Save & Close.
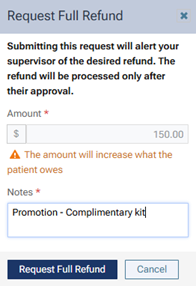
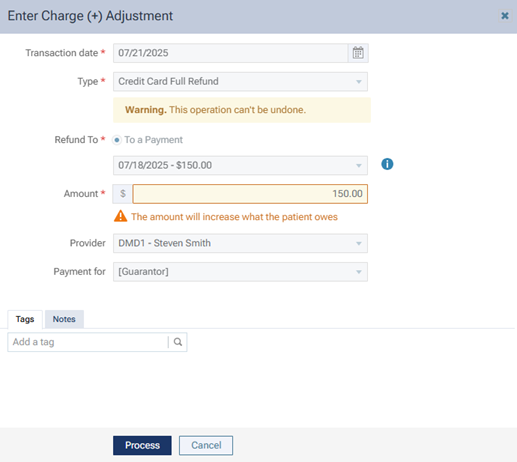
Example D
If the allowed amount is less than the payment amount, how to request a full refund:


To request a full refund ($874.00), on the Refund menu, select Request Refund.

The Request Full Refund dialog box appears.

Enter Notes to explain the reason for the refund.
Click Request Full Refund.
Example E
If only a request is allowed, how to request a partial refund:
To request a partial refund ($0.01 – $149.99), on the Refund menu, select Partial/Request Refund.

The Enter Charge (+) Adjustment dialog box appears.
Enter an Amount that less than the payment amount.
Add Notes to explain the reason for the refund.
Click Request Refund.
The Edit Charge (+) Adjustment dialog box appears.
Click Save & Close.
Example F
If only a request is allowed, how to request a full refund:


To request a full refund ($150.00), on the Refund menu, select Request Refund.
The Request Full Refund dialog box appears.
Enter Notes to explain the reason for the refund.
Click Request Full Refund.
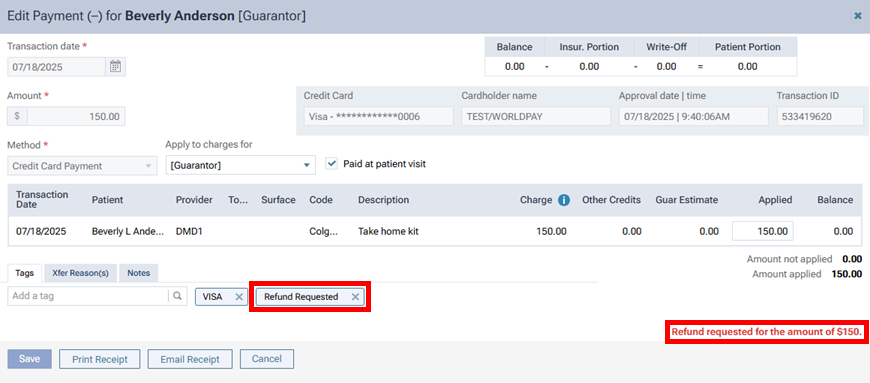
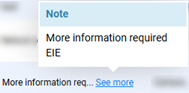
Note: After you request a refund, a “Refund Requested” tag is automatically added to the payment, and a notice in red text appears in the lower-right corner.
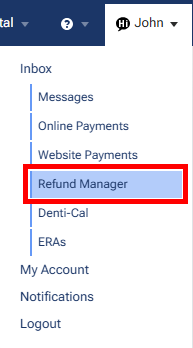
Inbox for Refund Manager
Refund requests appear in the corresponding location’s Inbox. There is a new Refund Manager option on the User menu. This option takes you to the new Refund Manager tab of the Inbox.
Note: The Refund Manager option is available only if your user role has been granted the “Void/refund transaction processed by credit cards” security right and if Refund Unlimited, Refund up to $500, Refund up to $1000, Refund up to $2000, or Refund up to $5000 is selected for that right.
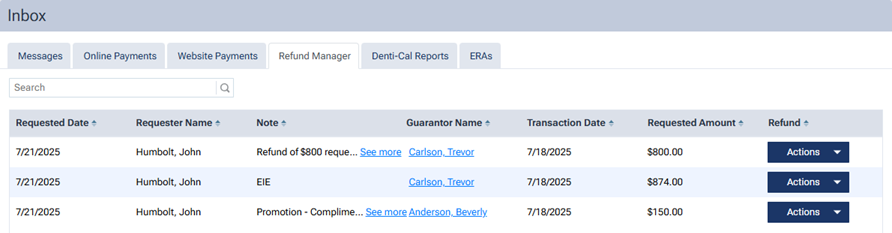
Note: For a refund request, if the Transaction Date is more than 45 days old, and if the amount in the Requested Amount column exceeds the maximum allowed amount that you are allowed to refund, Pending appears in the Refund column.

Note: You can click a name (which is a link) in the Guarantor Name column to go to that guarantor’s ledger.
The options on the Actions menu for a given request can vary according to a user’s access:
- Edit Amount – This option is always available for a user with an unlimited refund allowance and for a user with a limited refund allowance.
- Approve Request – This option is always available for a user with an unlimited refund allowance. This option is available for a user with a limited refund allowance only if the allowed amount is greater than or equal to the requested amount.
- Reject Request – This option is always available for a user with an unlimited refund allowance. This option is available for a user with a limited refund allowance only if the allowed amount is greater than or equal to the requested amount.
- Independent Refund – (Only for a request with a Transaction Date that is more than 45 days old.) This option is always available for a user with an unlimited refund allowance. This option is available for a user with a limited refund allowance only if the allowed amount is greater than or equal to the requested amount.
Editing a Requested Amount
To edit the amount of a request, do the following:
On the request’s Actions menu, select Edit Amount.

The Enter Charge (+) Adjustment dialog box appears.
Enter an Amount up to the requested amount but less than the payment amount. Also, if your user role has a limited refund allowance, the Amount cannot be greater than the allowed amount.
Optionally, enter Notes.
Click Process.
Rejecting a Request
To reject a request, do the following:
On the request’s Actions menu, select Reject Request.

The Reject Request dialog box appears.
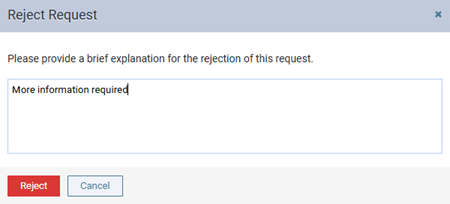
Enter a note to explain why the request is being rejected.
Click Reject.
For the request, Rejected now appears in the Refund column.

Approving a Full Refund
To approve a full refund, do the following:
On the request’s Actions menu, select Approve Request.

The Enter Charge (+) Adjustment dialog box appears.
Click Process.
The Edit Charge (+) Adjustment dialog box appears.
Click Save & Close.
For the request, Refunded now appears in the Refund column.

Approving a Partial Refund
To approve a partial refund, do the following:
On the request’s Actions menu, select Approve Request.

The Enter Charge (+) Adjustment dialog box appears.
Click Process.
The Edit Charge (+) Adjustment dialog box appears.
Click Save & Close.
For the request, Refunded now appears in the Refund column.

Posting a Partial Refund After a Rejection
If a request was rejected, depending on a user’s access, the user can process a full or partial refund for the corresponding payment.
Notes:
- A user with an unlimited refund allowance can process a full or partial refund.
- A user with a limited refund allowance can process a full or partial refund if the payment amount is less than or equal to the allowed amount.
- A user with a limited refund allowance can process a partial refund up to the allowed amount if the payment amount is greater than the allowed amount.
To post a partial refund, do the following:
Click the payment on the patient’s ledger.
The Edit Payment (-) dialog box appears.
OR

Depending on the refund allowance in relation to the payment amount, do one of the following:
- On the Refund menu, select Partial Refund.
- Click Partial Refund.
The Enter Charge (+) Adjustment dialog box appears.
Enter the Amount to refund, which can be up to the allowed amount (if the refund allowance is limited) but must be less than the payment amount.
Enter Notes regarding the refund.
Click Process.
The Edit Charge (+) Adjustment dialog box appears.
Click Save & Close.
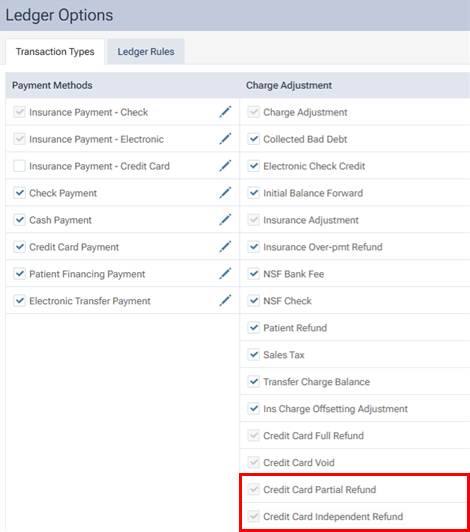
New Transaction Types
For a partial refund for a charge that is up to 45 days old, the Credit Card Partial Refund adjustment type is used.
For a refund for a charge that is more than 45 days old, or for a refund for a charge that was made with a credit card that has since expired, the Credit Card Independent Refund adjustment type is used.
Refund Manager Report
Someone who has been granted the “Financial Reports” security right (an existing right) can use the new Refund Manager Report to track refund requests so they can be processed by someone who has been granted access to process refunds; of course, that user can process refunds only up to the amount allowed by his/her user role (except if the role has been allowed an unlimited refund amount).
To view the report, on the Home menu, select Refund Manager.

The Refund Manager Report page opens and displays refund requests. For each request on the report the following details appear: the location, date requested, requester, reviewer (who approved or rejected the request), notes (from the requester and reviewer), patient’s name, payment date, status (Pending, Rejected, or Completed), and refunded amount (if the status is Completed).

Notes:
- If not all the notes of a request are visible, you can click the corresponding See more link to view the entire text of the requester’s notes and, if applicable, the reviewer’s notes.
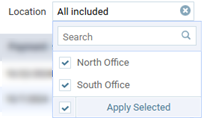
- If necessary, on the Location menu, you can choose to view requests by location. Only the locations that you have access to are available for selection.
- You can specify how many requests per page are displayed.

- If all items do not fit on one page, navigate between the pages as needed by clicking a page number, Previous, or Next.
