The product update released December 18, 2019, adds simple lab case tracking to Dentrix Ascend appointments. You can now manage provider working hours for a specified time frame, and a location’s default appointment length is configurable. The chairside dashboard includes imaging integration. This release includes the CDT procedure code updates for 2020.
Lab Tracking
With lab tracking, you can see right from the patient’s appointment what lab the work went to, when you expect it to return, and whether it has arrived.
To add a lab case note to a patient’s appointment, open the patient’s future appointment where you intend to place the work. Click the new Lab Case tab.

Toggle the Lab Case switcher to Yes to open the fields.

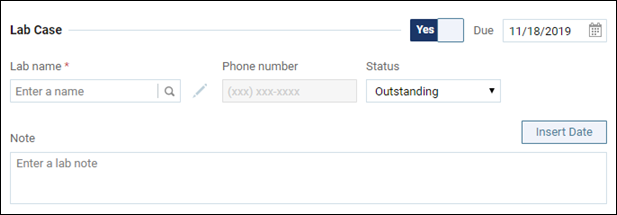
In the Lab name field, start typing to find and select an existing lab. If the lab name does not yet exist, type the name and then click Create Lab. Use the Create Lab dialog box to finish creating the lab record. The entire organization shares lab names.

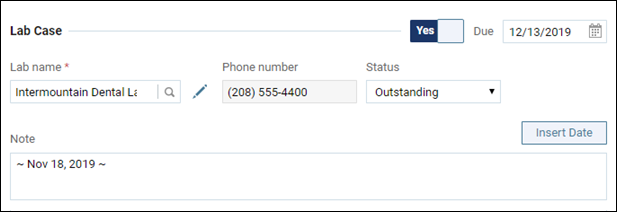
The default status of a new case is Outstanding, meaning the work is out. Click the calendar picker to select the Due date, the date work should be back. Enter any notes relative to this lab case. The Insert Date button places today’s date at the cursor position within the Note area.
When the lab work returns, open the patient’s appointment to set the Status to Received. This helps everyone know that the patient is good to come in for that appointment.
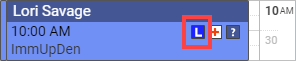
Another way to see whether the lab work has arrived is to look at the appointment’s lab case icon in the schedule. When you create a lab case, an “L” icon appears in the appointment.

When you set the lab case status to Received, the icon colors reverse.
This implementation of lab tracking is the first phase of the Dentrix Ascend lab case management feature.
Scheduling
Provider Working Hours Management
This update makes it possible to make changes to a provider’s working schedule for a future date. You can go into the provider’s schedule for a specific date range and indicate a special availability case for that date range. To make changes you must have the Edit Working Hours right.
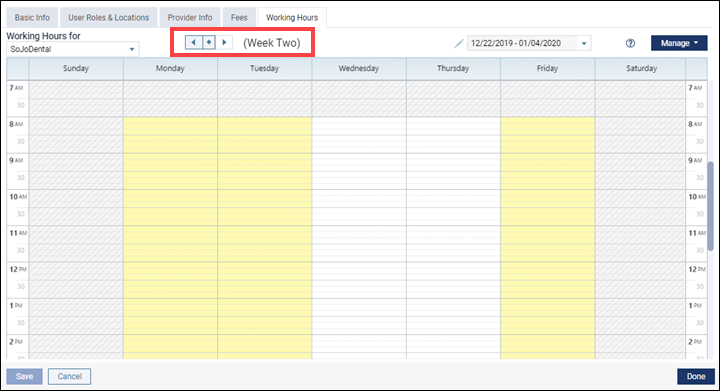
The user account Working Hours tab now has a date navigator. You can navigate back and forth one week at a time, or click the range to open a calendar picker and select a date farther into the future.

To modify working hours, click Manage and select Setup Working Hours from the dropdown. This opens the Edit Working Hours dialog box.
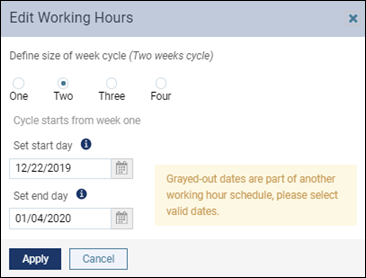
Define a work rotation cycle for a period of up to four weeks. Select the cycle size, the beginning and ending dates when the modified working hours will apply, and click Apply. When your timeframe is greater than one week, you will next see navigation buttons for the weeks in the cycle. For each week, use your cursor to add or remove hours of availability. When you are finished, click Done, and then Save.
Later, anyone with rights to review user accounts can see those modified hours in the display for that week, and the Calendar will warn you if you attempt to schedule the provider during times that he or she is not available.
The Online Booking feature does not automatically recognize changes to provider working hours; to remove a provider’s availability from online booking, you must create an event for that provider in the Calendar.
Configurable Default Appointment Length
In Dentrix Ascend, the default length of an appointment is 60 minutes. This means that every appointment you add—from either the Calendar or the Treatment Planner—starts as one hour long, and you must manually adjust the appointment length when you know that the planned procedures will take more or less time. With this update, you may now set the default appointment length so that you have less adjusting to do.
To set the default appointment length, open the Location Hours page (from Settings) and click the plus or minus buttons next to the Default appointment length (min) field to adjust the time in five-minute increments. Click Set.

The default appointment length is location-specific. We recommend you evaluate your schedule to get a feel for the most common appointment length, and set your default to that value.
Patient Forms Campaigns
Dentrix Ascend added a couple of enhancements to your ability to create a patient communication campaign. The first is that you can now select whether to include a link to the patient’s forms along with appointment reminder email and text messages. To include the link, set the Add forms link switcher to On. Note that the switcher does not show up in locations where patient forms are not active.
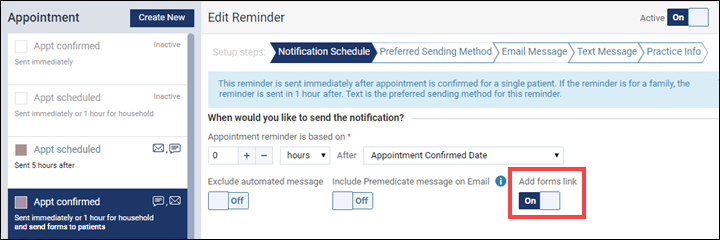
When the Add forms link is switched On, the message “…and send forms to patients” appears in the reminder description in the left panel.
When a patient clicks on the link they receive in their email or text, it navigates the patient to the forms portal, where he or she can enter his or her last name and date of birth, and fill out all their forms due. Links will only be included for patients who have a form due. Linking to a form does not confirm an appointment, if that is the message type. The confirmation link also has to be clicked or tapped.
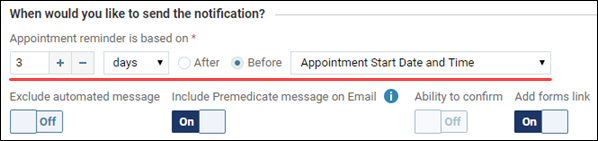
The second enhancement is that the scheduling dialog logic flows more naturally. For example, you can read the configuration below left to right as “send the notification three days before the appointment start date”.
Insurance
Hide Procedures Not Covered by a Specific Carrier
Have you ever planned or provided treatment, only to find out later—after submitting the claim—that that patient’s insurance carrier did not cover the procedure? Dentrix Ascend wants to help you avoid this situation. New with this update is a modification to procedure searches in the Chart, Quick Exam, Ledger, and appointment panel.
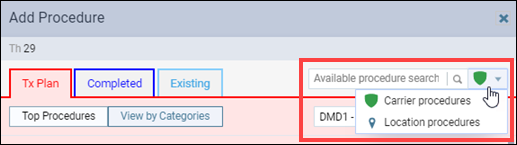
When a patient has insurance, you can search by carrier (the green shield icon) to make sure a procedure is covered. Any procedure not covered will not show up in your search results. When that happens, you can have a conversation with your patient about whether they are willing to pay out-of-pocket for a non-covered procedure. If they are, then you can search by location (the map icon), which represents the list of all procedures provided by your practice.
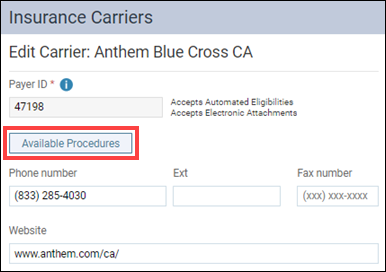
To prevent a procedure from appearing in a carrier search, you must edit the list of available procedures for that carrier. Click the new Available Procedures button in the Insurance Carriers page to open an Available Procedures window. Uncheck the checkbox next to any procedure that should not show up in a search.

Other things to know about this feature
- This feature is most applicable to Medicare and HMO programs.
- Hiding a procedure at the carrier level hides the procedure for all its associated plans. You cannot define a separate list for a specific plan.
- If there are procedures you do not wish to show up in any search, you can hide them using the same Available Procedures dialog box from the Location Information page.
- All procedures are always available (cannot be hidden) when you chart existing work and conditions.
New User Right to Work with Insurance Defaults
With this update, administrators are able to assign access rights to work in the Insurance Defaults page so that only authorized people can modify the claim settings for each location. The Edit Insurance Defaults right is located in the Settings category and requires the Review Insurance Defaults right.
Users who had the Manage ledger options right before this update automatically have the Edit Insurance Defaults right.
Clinical
CDT 2020 Update
Each year the ADA releases changes to procedure codes that take effect in the new year (in this case, January 1, 2020). Accordingly, Dentrix Ascend has adjusted the procedure codes in order to help you enjoy fewer claim rejections and speedier reimbursement. Here is a summary of the changes:
| New | Updated | Inactivated | ||||
| D0419 | D6082 | D6120 | D8696 | D2794 | D6076 | D1550 |
| D1551 | D6083 | D6121 | D8697 | D5213 | D6077 | D1555 |
| D1552 | D6084 | D6122 | D8698 | D5214 | D6094 | D8691 |
| D1553 | D6086 | D6123 | D8699 | D5221 | D6194 | D8692 |
| D1556 | D6087 | D6195 | D8701 | D5222 | D6214 | D8693 |
| D1557 | D6088 | D6243 | D8702 | D5223 | D6794 | D8694 |
| D1558 | D6097 | D6753 | D8703 | D5224 | D1510 | |
| D2753 | D6098 | D6784 | D8704 | D6066 | D1520 | |
| D5284 | D6099 | D7922 | D9997 | D6067 | D1575 | |
| D5286 |
As of this update, codes that will no longer supported will simply stop showing up in search results. However, if you need to use an inactivated code again before the end of the year, you can manually reactivate it and then deactivate it again in January. Any inactivated code attached to an outstanding claim will remain in place—the update will not affect existing claims.
Spanish Text for Treatment Consent Forms
This update adds support for treatment consent forms for patients whose preferred language is Spanish. Dentrix Ascend does not provide a translation; it provides an area for you to place that translation.
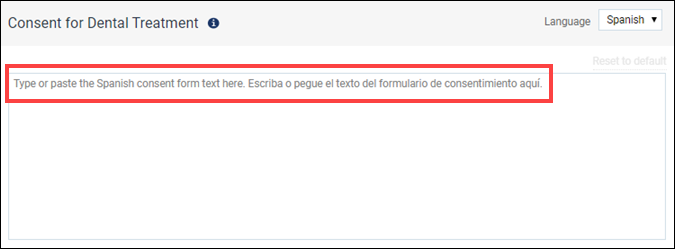
To implement a Spanish version of a treatment consent form, for any of your treatment consent messages—including any custom messages you have created—open the form and select Spanish from the new Language dropdown.

Use the text area to type or paste in your translation. When a translation exists, and the preferred language for a patient is Spanish, the translated version of the message displays in the treatment consent form.
Reporting
Location Isolation in Power Reporting
With this update, Dentrix Ascend now enforces location isolation for power reporting data. This means that when you run a report, the results reflect only those locations for which your role has Financial Reports rights.
When you don’t have financial rights to a location, that location does not show up as a filter option when building or modifying a power report.
If you have access to multiple locations, your user role in each location must include financial rights in order to report for all those locations.
User Rights
The following changes to user rights are included in this release:
- Checking to make sure you do not accidentally remove all administrative roles from your list. At least one role must have the ability to manager other users and roles. You will receive a warning and fail if you attempt to delete the last role with Edit User
- Adding a new user right to Edit Insurance Defaults (Settings category). The right also requires the Review Insurance Defaults
- Extending location isolation for the Financial Reports right to the Power Reporting module.
Imaging
Imaging Integrated into the Chairside Dashboard
When you turn on the chairside dashboard in the patient Chart, the patient’s images now appear in a panel to the right of the page. As with the rest of the dashboard, you can filter to show just today’s work (teeth scheduled for procedures). Clicking an image thumbnail in the panel opens the image in the graphical area.

Text Annotation Tool for Images
This update adds a text annotation tool to the Tools tab in the Image Navigator, next to the drawing tools. Select the radio button next to the “T” to activate the text tool.
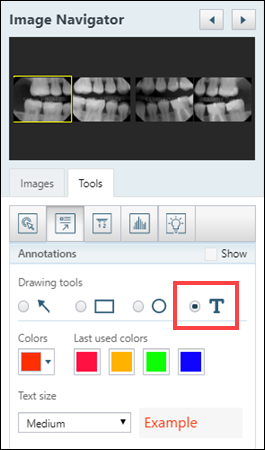
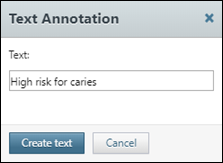
After selecting the text color and font size, click on the image where you want the text to appear. In the Text Annotation dialog box, type in the annotation and click Create text.
Like the other annotation tools, you can undo the placement, show or hide annotations, and choose to include annotations when sharing an image. This is phase one for this tool and we anticipate adding future enhancements to text annotations.
Share Selected Image(s)
When sharing an exam, you now have an option to share only some of the images in a series. After you select the Selected image(s) option in the Exam or Image(s) to be shared dialog box, click the images you want to include. They become highlighted in yellow.

This update also adds support for e2V sensors in Windows and for the HD1 Serial button on Macs.
New Learning Content
The Resource Center contains many topics that can help you understand the background or context of the features mentioned in this release. To learn more about these features, please visit the following articles.
Scheduling an Appointment for an Existing Patient
One of the most frequent things you do in a dental office is schedule appointments.
Step #8 Reminders in Setting up Dentrix Ascend
You can customize the schedule and content of an appointment communication.
Setting Up Provider Hours
When your organization has multiple sites, there is a good chance some of your providers will work at more than one location.
Editing appointments
You can edit an appointment as needed.
Editing procedure codes
Procedure codes represent the services that you render and products that you sell.
Adding Procedure-Specific Treatment Consent Messages
When the doctor performs an invasive procedure, there really are risks for complications.
Filtered Patient Lookup
Dentrix Ascend includes the ability to limit the scope of patient search results based on the patient’s preferred location and the user’s access rights.
Viewing the chairside dashboard
You can show and hide the progress notes and data from a recent perio exam while working with a patient’s clinical chart.