The product update released February 04, 2020, brings several useful enhancements to the usability of Dentrix Ascend, especially with regard to the clinical notes window. This update includes the next phase of the lab tracker solution, allows you to add an abbreviation to the location name, and lets you create a different customer-facing Internet profile for each location.
Clinical
Clinical Notes Enhancements
New with this update is the ability to navigate between clinical modules while the clinical note window is open. The window holds position while you switch among Chart, Progress Notes, Tx Planner, and so on. This is because the clinical note window has been undocked from the pages. You can now reposition, resize, minimize, and restore the window.
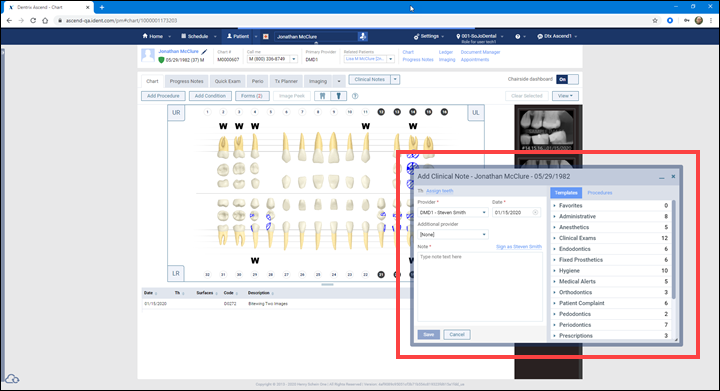
To reposition the window, position your cursor anywhere in the title bar. When the cursor turns into a move pointer, click and drag to move the window within the browser.

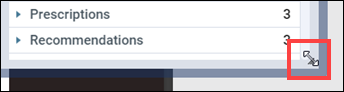
To resize the window, position your cursor near the hatched area in the lower right corner of the window. When the cursor turns into an arrow pointer, click and drag to change the window size.
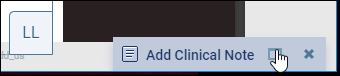
To shrink the window completely out of the way, click the minimize icon near the upper right corner of the window. It reduces to a tab in the lower right corner of your browser. Click the maximize icon to reopen the window.

Dentrix Ascend will remember the size and position of the clinical note window the next time it opens on this machine.
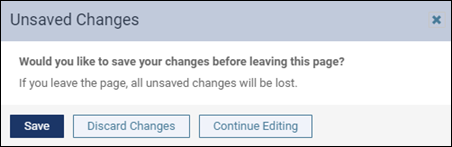
There are two additional enhancements, to incomplete clinical notes. First, when you close the window, Dentrix Ascend checks for changes before prompting you to save, i.e. if you didn’t make any changes, the Save button stays grayed out and you do not get a prompt to save. Second, there is a new message to assist you when the note is incomplete and you attempt to either navigate out of the clinical modules or select a different patient.
Workflow Enhancement
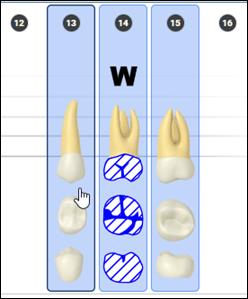
Previously in Dentrix Ascend, when you hovered your cursor over a selected tooth the background color changed and it was impossible to distinguish between a tooth already selected and one that you were selecting newly. With this update, when you hover your cursor over a selected tooth the background remains unchanged and the edge changes, making the difference much easier to see.
Patient Clinical Report Enhancement
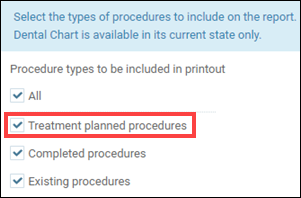
In the list of procedure types to be included in the Patient Clinical Report, the type Planned procedures was renamed Treatment planned procedures in order to clarify the selection.
Lab Tracking Phase 2
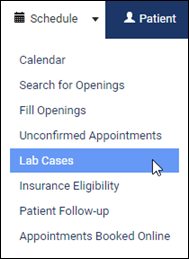
The Lab Tracking feature now includes a summary page so you can see all the appointments with associated lab cases in one place (your role must have the Review Schedule right). To open the new Lab Cases page, the menu path is Schedule > Lab Cases.
The page opens a list of today’s or this week’s appointments, depending on your View setting. Appointments for which the lab work has not been received are under the Outstanding tab, and appointments for which the lab work has been received are under the Received tab. Appointments are grouped by date and laboratory name, and ordered by appointment time.
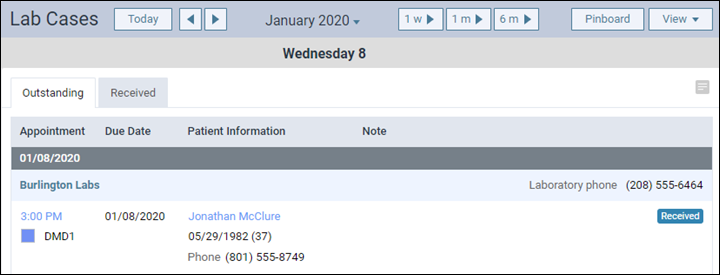
Use the schedule navigation controls to change the date, for example if you want to check on the status of appointments for tomorrow or next week. Use the View menu to see appointments by day or by week, or to filter the list by provider.
To set an outstanding lab case status to received, click the Received button. The appointment moves from the Outstanding tab to the Received tab. (You can change the status back by clicking the Outstanding button for appointments in the Received list.)

The patient name is a hyperlink to the patient’s Overview page. The appointment time is a hyperlink to the appointment, which is handy when you need to enter notes about the case.

If you jump out of the Lab Cases page to follow a hyperlink, use your browser back button to get back into the list.
You can also update the lab case status manually within the patient’s appointment without going through the Lab Cases list.
Lab case status changes are recorded in the Audit Log.
Usability
Success Notification Messages Enhanced
If you are long-time Dentrix Ascend user, you know that green messages flash to confirm the success of your activities. Up to this point, these messages appeared near the top center of your screen.

While it’s important to know that your task was successful, that information shouldn’t cover up your ability to navigate to other pages. Success notifications have moved to the bottom of the page, where you will see them pop up from the bottom and then disappear. You can also dismiss this message by clicking on it. This change will make these notifications easy to see while also freeing up your ability to navigate to other tasks or pages.

Note that warning (yellow) and alert (red) messages still appear in the top center of your screen.
Provider User Role
There are two usability enhancements relative to provider user accounts. First, to help speed up the configuration of new provider accounts, the Specialty field (Provider Info tab) populates automatically with the most common value, Dentist. You can of course click the dropdown to select a different value.

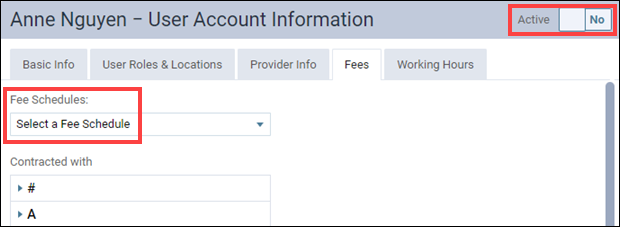
Second, to help keep your database clean, when a provider user account is inactivated, Dentrix Ascend clears their associated fee schedule.
Location Abbreviation Code
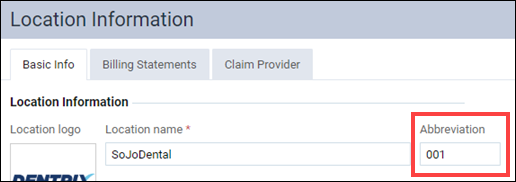
A new Abbreviation field in the Location Information page, Basic Info tab, allows you to add a prefix of up to three characters to the location name.
The abbreviation shows up in the location selector.
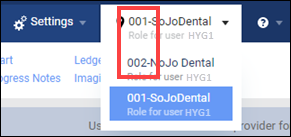
The purpose of this feature is help differentiate and quickly locate locations from the dropdown list.
You can also choose to include the location abbreviation in billing statements. A new include location abbreviation checkbox is in the Patient Walkout and the Generate Billing Statements windows.
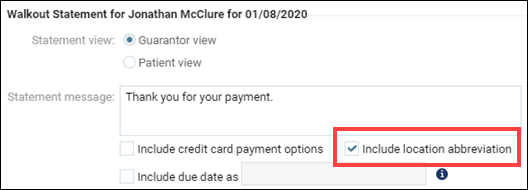
Including the abbreviation means that those characters show up next to procedure charges in the statement, and with the location name. This could make it easier to see location-specific charges if for any reason the patient received treatment at more than one location.

Patient Notes Interface
We have simplified the Notes icons. Rather than clicking the pencil icon to edit, click anywhere in the note summary line to edit. A bell icon indicates that a note will pop up as an alert.

Billing
Edit Patient Procedure Zero Amount
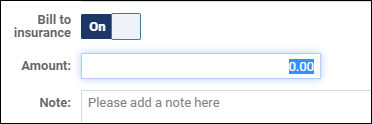
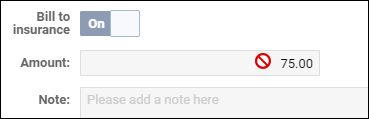
This update adds a new right to the Patient Procedures section of the User Roles page called Edit patient procedure zero amount. The purpose of this feature is to allow team members to correct a posted procedure amount when the amount is zero, but not allow editing of any procedure with a non-zero amount. To use this feature, you must first clear the Edit patient procedure amount right.

Exclude Procedures from Sliding Fees Discount
A new Settings button has been added to the Discount Options page. It opens a window where, similar to the hiding procedures options introduced in the previous release, you can search for a procedure code by number or by name and add it to a list, which shows only in this window.
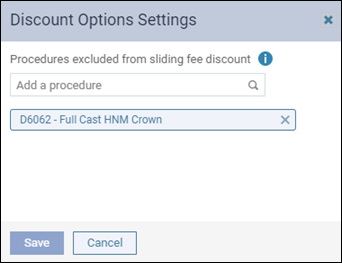
Procedure codes appearing in this list are excluded from the discount options, i.e. no discount will be applied through the sliding fees configuration.
Patient Communication
Location-specific Practice Profile
The practice profile settings for colors, logo, and social media links are now location-specific rather than shared by the entire organization (Settings > Patient Communications > Practice Profile). Log in to each location where you wish to make changes; the changes affect only that location. This is especially helpful when different locations use a different logo or have different landing pages for “Follow us on Facebook” and so on.

Reporting
Standard Report Label Changes
In the standard Dentrix Ascend reports, for example the Day Sheet, the Include Organization Summary option was renamed to simply Include Summary, mainly to reinforce the fact that location rights mean the report will only include data for which you have access.
Updated Manage Reports Right
The Manage Reports right in the Report section now refers to Power Reporting only. Access to the standard reports is still controlled by the various report categories. This also means that providers with access rights to Power Reporting will only be able to see financial data for providers other than themselves if they also have the Financial Reports for All Providers user right.
Filter Date Enhancement
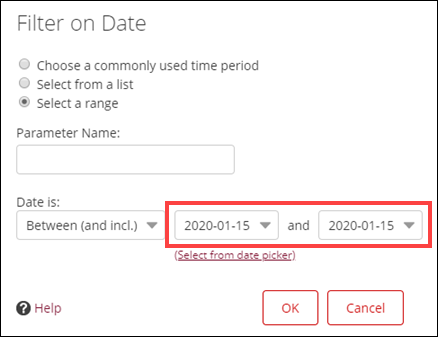
Previously, the default Filter on Date range for power report builders (e.g. Analysis Ledger Report Builder) was a date somewhere in 1901. The new default is today’s date.
User Rights
The following changes to user rights are included in this release:
- Updated the existing user right called Review Schedule to allow or restrict the ability to view and edit the Lab Cases
- The Manage Report right was broken out to only affect Power Reporting and have nothing to do with the standard reports.
- Modified Power Reporting to only allow providers that have the user right Financial Reports for All Providers to be able to see financial data for providers other than themselves.
- Added a new Edit patient procedure zero amount right to allow team members to correct a posted procedure amount when only the amount is zero.
Imaging
No new changes to the Imaging module are included in this release.
New Learning Content
The Resource Center contains many topics that can help you. Have you browsed lately? Here is a sampling of what’s been added recently:
Adding Insurance Carriers and Plans
From Dentrix Ascend, you have access to a large database of supported payers updated regularly for your convenience. You can add any of these supported insurance carriers to your organization’s database.
Using the Routing Panel for Patient Check In
The routing panel helps guide you through a patient visit and manage the flow of your day, offering you relevant information at each stage of the patient’s appointment.
Settings to Succeed with Dentrix Ascend
Although there are endless customizations you can create in Dentrix Ascend, we have a handful of specific recommendations to help get you on your way.
Checking Patient Remaining Benefits
Learning how to check a patient’s remaining benefits is important, so that you and your patients have a clear understanding of the remaining amount before starting treatment.
Changing Appointment Statuses
When scheduling or editing an appointment, you can select a status to help you and others track the appointment.