The product update released April 14, 2020, rolls out the ability to update fee schedules by file import. This update also introduces copayment coverage tables and coordination of benefits options. A new reporting concept—patient health—makes its debut.
Billing
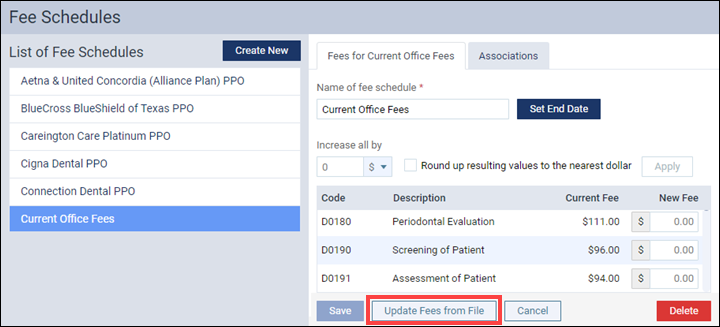
Update Fee Schedule from File
Next time you are ready to update your Fee Schedules, you now have the option to perform the update speedily and in bulk by importing a .CSV file. You still have the option to update procedure code amounts manually.
To update fees from file, open the Fee Schedules page (Settings > Fee Schedules) and select the fee schedule you wish to update (you can also populate a new fee schedule using the same method after first creating the name). Click the new Update Fees from File button at the bottom of the page.
There are several steps to updating a fee schedule, and a wizard walks you through it.
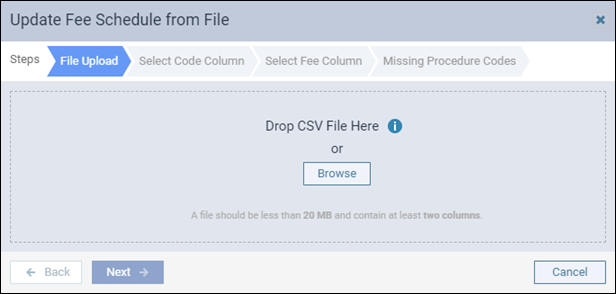
The first thing to do is acquire the file. You can do this by dragging the file into the work area or using the Browse button in the middle of the panel to open an explorer window. Note that your file format and extension must be .CSV, which is an Excel or text file option. Only two columns are required: the procedure code, and the amount. Dentrix Ascend ignores any additional columns of information. After the file uploads, the wizard automatically advances to the next step.
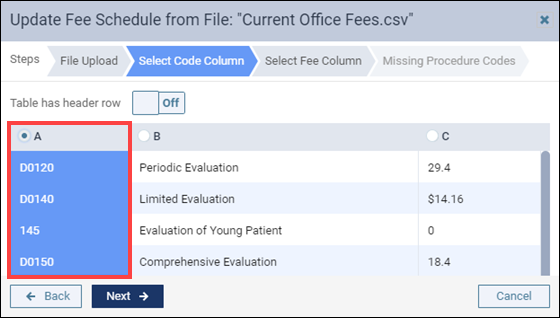
In the Select Code Column step, click the radio button of the column that contains the procedure code. The procedure code format must exactly match the ADA codes in your Procedure Codes & Conditions page (for example no space allowed between the D and the number). Multi-codes do not import. Click Next.
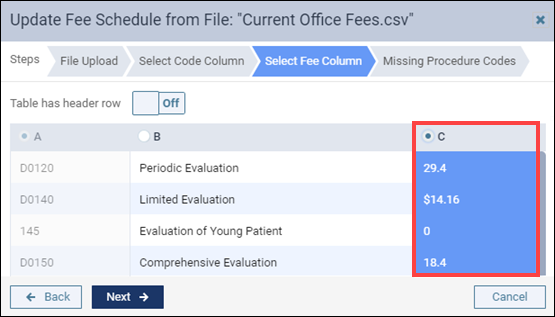
In the Select Fee Column step, click the radio button of the column that contains the procedure amount. It doesn’t matter if the amount format can contain a “$” or not. If your calculated fee amount extends out several decimals, Ascend will round the amount up to the nearest cent. Click Next.
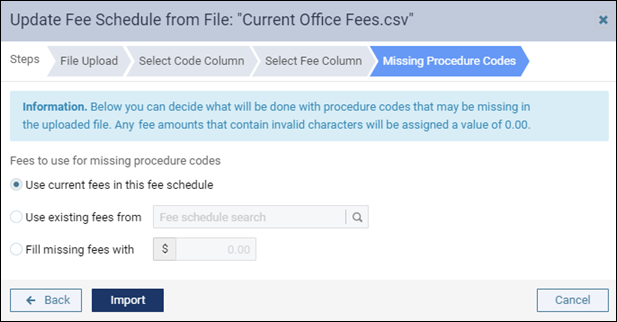
In the Missing Procedure Codes step, you have a choice to make. The message asks you what you want to do if there are any procedure codes in your database that are not included in the file. Your choices are:
- Use current fees in this fee schedule – if you are updating an existing fee schedule, Dentrix Ascend will use the procedure amount already in place. In other words, no change.
- Use existing fees from – use the amounts from another fee schedule already in your list.
- Fill missing fees with – specify a default amount. This will apply to all missing procedure codes.
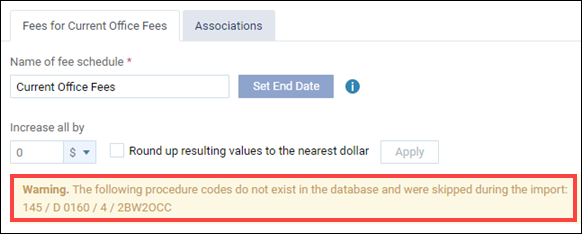
Make your selection and click Import. Be patient while the wizard works. Watch for the green success message. Once the import is complete, Dentrix Ascend reports any errors it encountered.
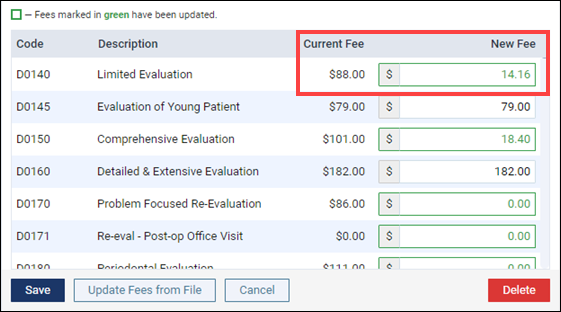
The last step in the update is to review the import results. As the new legend states, updated fees have a green border while in this review mode. You can make manual adjustments if needed at this time. When you finish the review, click Save.
Insurance
Copayment Coverage Tables
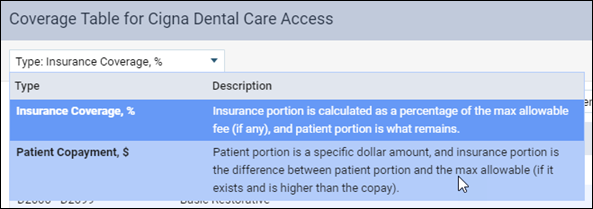
A typical DHMO-type plan doesn’t have any deductibles or maximums. Instead, patients pay a fixed amount, known as the copayment, for dental services. (Often, diagnostic and preventive services have no copayment.) With this update, Dentrix Ascend supports fixed patient copay coverage tables.
Create and edit copayment coverage tables exactly as you would percentage-based coverage tables; the only difference is in specifying whether a table type is by percentage or by a fixed amount.
Dentrix Ascend has several default coverage tables, including one for copayment, which you can use as templates for setting up the coverage tables of insurance plans.
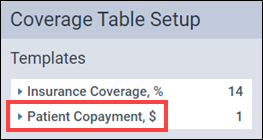
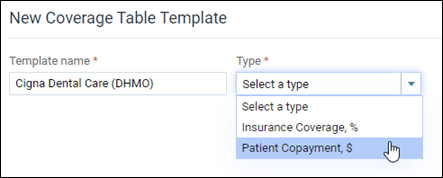
You can create templates for your organization as needed. Click New Coverage Table, provide a name, and select the Patient Copayment, $ table type. Add procedures and specify the copayment amount. When you finish, click Create. For a detailed description of this process, read Creating coverage table templates.

To edit an existing coverage table, open the individual plan and its coverage table. Click the Type dropdown and select Patient Copayment, $.
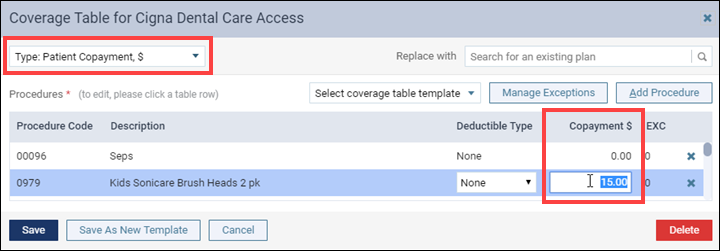
You can update the copayment amounts from a template, or manually adjust any procedure code. For a detailed description of this process, read Editing coverage tables.
Tip: For easy data entry, the coverage table accepts using Tab, Enter, and Shift+Enter shortcut keys.
Coordination of Benefits
There are several methods insurance companies use to coordinate the distribution of benefits when more than one dental plan provides coverage to a patient. Up to this point, Dentrix Ascend has only supported the Traditional method. With this release, Dentrix Ascend supports two additional methods: Maintenance of Benefits and Carve Out/Non-duplication. Each method follows slightly different rules for determining the insurance payment calculation, which determines the patient portion. You must contact the carrier to discover which method they use.
You configure Coordination of Benefits (COB) from within the secondary insurance plan. Locate the carrier (Home > Carriers) and then select the patient’s Plan/Employer name. Note that all patients with the same secondary coverage plan will use the same COB methods once you configure them the first time.
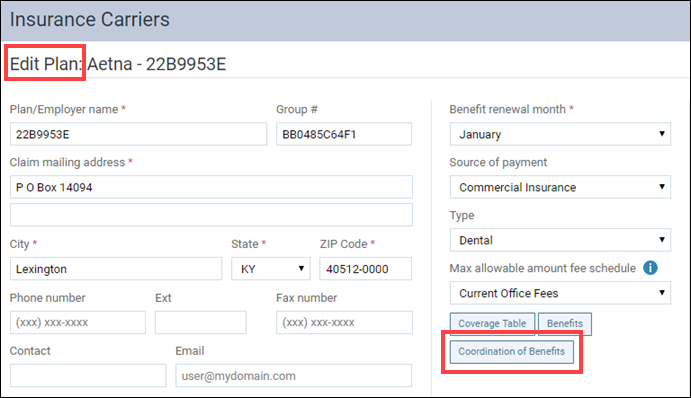
Click Coordination of Benefits to open the Coordination of Benefits window.
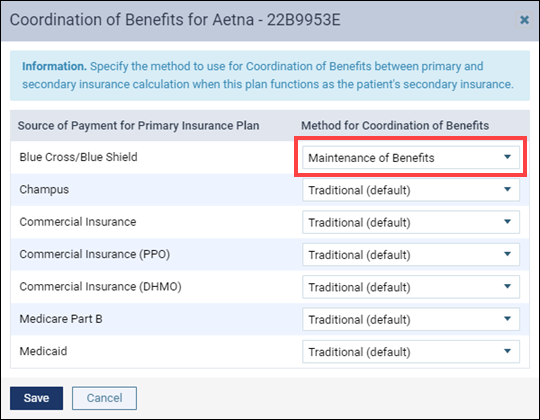
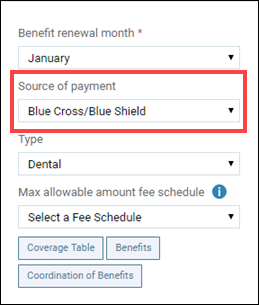
The window invites you to associate a coordination method for any of several “primary” payment sources. Meaning, the Source of payment type selected in the primary insurance plan determines where Dentrix Ascend will look in the secondary insurance plan to select the coordination of benefits.
If you don’t specify a different method, the Traditional method continues to apply. Select from the dropdown corresponding to the primary payment source. When you finish, click Save. Back on the Insurance Plan page, click Save again.
The Audit Log does not report changes to coverage tables or the coordination of benefits at this time. No new rights are required to configure either fixed copay tables or coordination of benefits.
For more information on coverage tables and coordination of benefits, click here.
Clinical
Clinical Note Templates Shareable Set
This new feature supplements and complements the template distribution function that appeared in the last software release. It allows for more power and control over sharing templates among the entire organization.
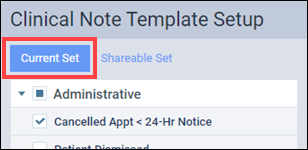
A “shareable set” is a list of existing templates that you define as distributable to the entire organization. To create the list, in the new Current Set tab of the Clinical Note Templates page, select the templates you want to be shareable.
When you are ready, click the Copy to Shareable button at the bottom of the page. Watch for the green success message when the copy is complete. All locations will see the shareable set.
Your user account must have access to all locations in order to distribute the shareable set to all locations in the organization. Open the Shareable Set tab and select the templates you wish to distribute (you do not have to push the entire set). Click Distribute. The distribution wizard opens and guides you through the process and helps you resolve any conflicts.
A new Manage Shareable Set right allows you to create, edit, or delete clinical note templates in the shareable set, and choose how to resolve template conflict should any arise during copying. Users with the Distribute clinical note templates right can see and select from the shareable set for template distribution.
The Audit Log tracks the creation of a shareable set and the distribution of clinical note templates.
Scheduling
Provider Visibility and Availability
This enhancement is for those of you who run the Calendar in Provider view. The first thing you will notice is that the provider name is now a hyperlink.

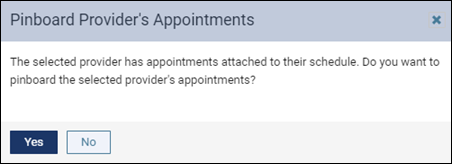
There are two options available from the hyperlink. If the provider has working hours that day, the link is Make Provider Unavailable for a day. The provider becomes unavailable for scheduling that day (the column grays out in the Calendar). If the provider has patients scheduled for that day, you will get the option to move those appointments to the Pinboard for rescheduling.
Insights Dashboard
Patient Health Report
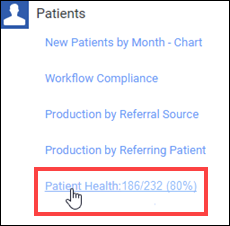
“Look Ma, no cavities!” Have you considered using the oral health of your patients as a marketing tool, for example, to claim that 75% of your patients don’t have cavities? Well, that number is now readily available. The new Patient Health report shows the number of patients categorized as healthy—meaning that with an evaluation, there are no caries diagnosed or restorative procedures required. To see the report, follow Home > Insights > Patient Health.
The report looks and acts like a standard report—you can select the location(s) and a date range and re-run the report. The default view is the last calendar month.
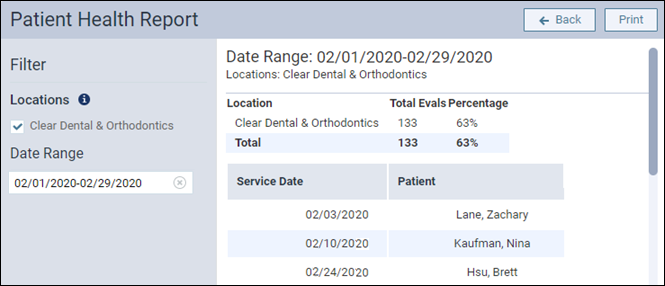
This is phase one of this report, with more refinements coming.
Power Reporting
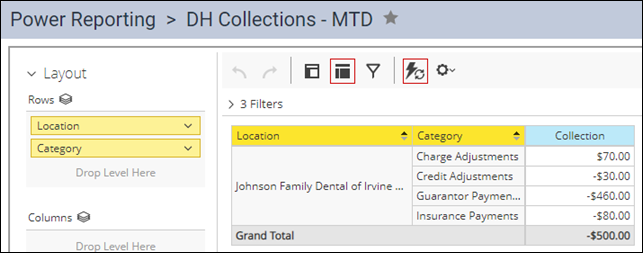
Daily Huddle Collections
The suite of Daily Huddle (DH) Collections reports have received two enhancements to the default version of the report. The first is the addition of a Category column to add visibility to the collection types. The second is a Grand Total field.
Usability
Location Sorting
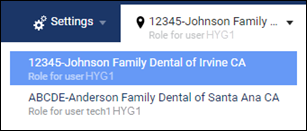
The location drop-down now sorts locations alphabetically. The sort includes any abbreviation added to the location name.
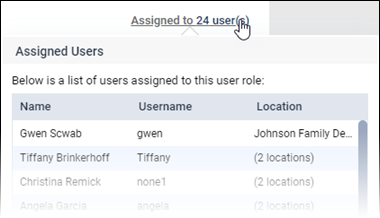
Role Assignments
An enhancement to the User Roles page shows how many users share any given role.
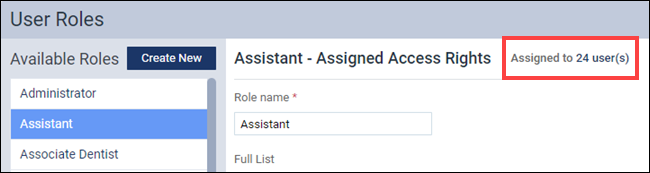
The count represents Active users. If you want to see who those users are, click the count to see a list.
User Rights
The following changes to user rights are included in this release:
- Manage Shareable Set (in the Settings category) allows the user to copy selected clinical note templates from the Current Set to the Shareable Set in the Clinical Note Template Setup page. This right requires that Distribute clinical note templates be enabled, which in turn requires that Manage clinical note templates be enabled.
New Learning Content
Did you know that, in addition to the Resource Center, Dentrix Ascend hosts a blog page? Each week you’ll find a new tip for getting the most out of your practice management platform. Here is a sampling of popular posts; click a title to open the link.
Mass Communications with Your Patients
Need to send a bulk email communication to your patients? Dentrix Ascend does not currently offer this as an integrated feature, but you can still get your message out.
9 Ways to Effectively Use Your Office Downtime
Here are some examples of things you and your staff can do when the practice is not bustling with patients.
Using Appointment Task Reminders to Schedule Recare
Is it your goal to schedule recare appointments before the patient checks out? The routing panel can help with that through its unique appointment task reminder system.
Adding a Custom Recare Type
Dentrix Ascend comes with several recare types predefined, but one size does not fit all. What if, for example, your practice needs to automate scheduling and reminders for, say, scaling and root planing?
Building a Procedure Code Billing Report
Have you ever wondered, “Can I generate a report of all patients where I have billed a specific procedure code?” Yes, you can.