The product update released April 06, 2021 introduces a major transformation of Dentrix Ascend’s ability to track transaction change histories, with far-reaching changes to the Ledger and ledger-based reports. This release also includes improvements to Imaging features. Additionally, we are pleased to announce a new Resource Center category created expressly for new users.
Transaction Revision History
This update brings multiple changes to the Ledger. These changes bring two main benefits. First, they allow Dentrix Ascend to preserve the integrity of financial reports in a closed period—they will remain unchanged even when revisions are made to historical transactions. The revisions apply to the current period. Second, you can now view a detailed history of any changes to a ledger transaction.
Ledger Layout Changes
The Date column was replaced with two columns named Service Date and Created On. The Service Date is the date you chose when adding a transaction (for example, the Date field in the Enter Payment window). The Created On date is the date when the transaction was actually created or modified (you cannot change this date).
The Th and Surface columns were removed. Tooth and surface information are now part of the Description information.
Ledger View Menu Changes
The Ledger View menu was rearranged to accommodate two new options. To see transaction revisions, set the Show transaction history switch to Yes. To add more precise detail to the history, set the Show transaction time switch to Yes. Or, set the switches to No to use the normal, simplified view of the ledger. Click Done to continue.
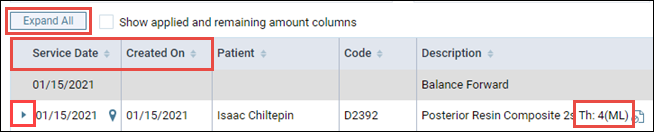
With the Show transaction history switch turned on, expand and collapse arrows (►, ▼) appear next to modified transactions, and there is a new button that lets you Expand All or Collapse All those transaction rows.
Transaction Correction History
This update introduces a new behavior in the Ledger when you make a correction to a transaction.
- First, Dentrix Ascend automatically creates a Transaction Cancellation line item for the original transaction that was corrected.
- Next, it preserves a snapshot of the previous state of the transaction and adds that as a line item.
- Finally, the corrected or updated transaction appears on the Ledger as a new line item.
In this example, a D2392 was originally entered for tooth #3. The user caught an entry mistake and changed the tooth selection to tooth #4.
Let’s look at these transactions in more detail.
- The system automatically posts a Transaction Cancellation entry every time you make any change to the current transaction. Note that it backs out the transaction amount from the database. The “A” flag inside a circle indicates the entry was created automatically. You will see it on other automatically-created transactions as well.
- Historical records are dimmed by a hatch pattern so the current transaction—above the “History for [transaction name]” bar—is more easily distinguished. This is the original transaction. Click it to view the details, but you cannot edit anything. All the original values are stored in the database.
- The current transaction occupies a regular line on the ledger and reflects the current transaction amount. If the change was to the transaction amount, that new amount would be the current amount. While the transaction is in the open period, it can be opened and edited as usual.
If you make multiple changes, Dentrix Ascend keeps a record of each time you save a new version. In the example below, the transaction had a change (D) to the procedure amount at 05:04:17 PM and a change (E) to the provider assignment at 05:07:50 PM. The Show transaction time switch is turned on to enhance the view.
Cascading Corrections
If the transaction you change or correct has related transactions, for example an insurance claim with both a payment and an adjustment, the tracking information for all the related transactions are updated automatically.
Here, for example, is a claim that processed normally and has been paid by the insurance company:
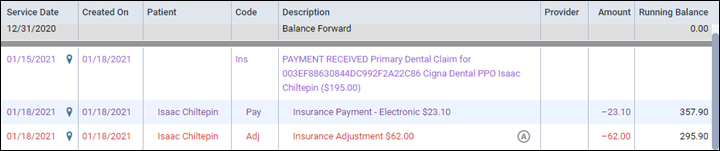
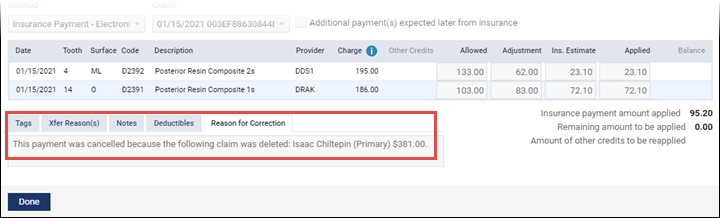
If you delete the claim, note that the associated payment and adjustment transactions are also deleted and automatically have full tracking histories.

Ledger Rights
There are no new rights associated with viewing transaction corrections. All previous controls, for example Edit Payment, Edit patient procedure, Edit patient procedure amount, Override Locked Transaction, and Unlock Insurance Overrides, remain in effect.
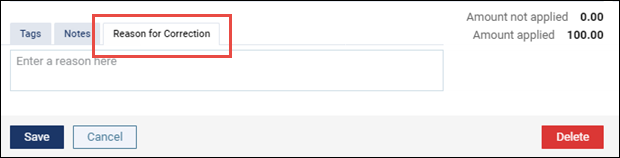
Reason for Correction
This update adds a Reason for Correction tab to the transaction dialog box. It is not visible when you originally enter a transaction, only when you open the current transaction and make a change. The field on this tab provides a way for you to record why a change was required.
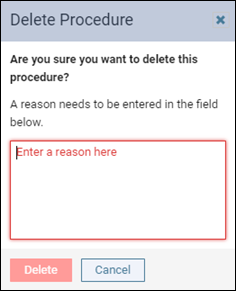
Deletion Reason
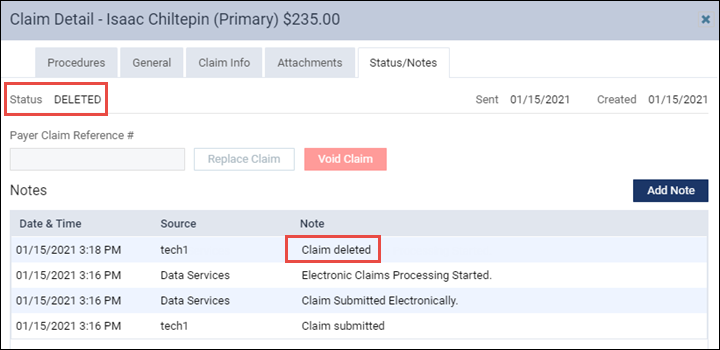
The Delete confirmation message now includes a field so you can add a note. This is a valuable option because Dentrix Ascend now retains deleted transactions.
Keep Deleted Transactions
To help provide a full correction history and keep historical records, Dentrix Ascend now stores deleted transactions. You can see them when the Show transaction history switch is turned on. Deleted transactions appear with strikethrough text and the word “deleted.”
For a deleted claim, a “claim deleted” entry appears under the Status/Notes tab.
As is currently done, deleting a claim also deletes any associated payments or adjustments, which remain on the Ledger and are marked as deleted. What’s new is that a reason automatically populates the Reason for Correction field of the associated transactions.
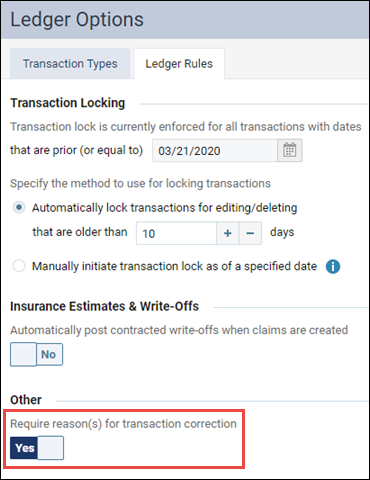
Require Reasons for Transaction Correction
Administrators have the option to require users to always enter a Reason for Correction when making a change to a transaction. The state of the new Require reasons(s) for transaction correction switch, located in the Ledger Options page, applies to the entire organization.
With the requirement invoked, the Reason for Correction field is highlighted in red, and a warning triangle appears next to the tab name. You cannot save any changes without entering a reason.
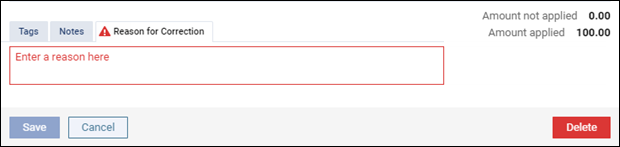
The requirement also applies to the Transaction Delete prompt.
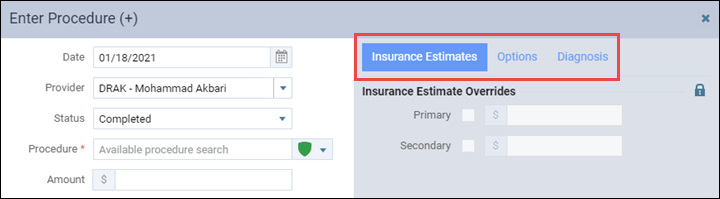
Modified Enter Procedure Dialog Box
The tabs in the Enter Procedure dialog box have been arranged to make room for new fields coming in the next update to the transaction corrections feature. There are now three tabs. The Insurance Estimates tab contains the Insurance Estimates Overrides fields. The Options tab contains the Start/Completion Dates fields. The Diagnosis tab is unchanged.
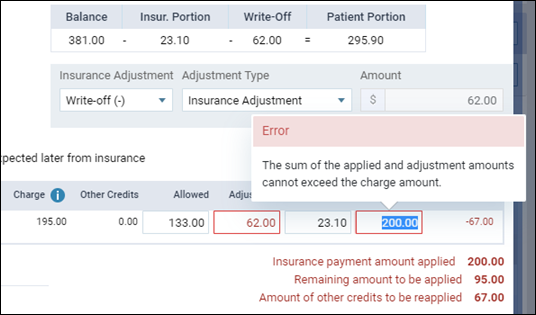
Modified Enter Payment Dialog Box
In addition to monitoring the applied amounts, for insurance payments, the Enter Payment dialog box will now also warn you if the adjustment amount plus the applied amount exceeds the charge amount.
Reports
Changing Transactions without Changing Closed Financials
Tracking transaction correction history makes it easy to apply needed adjustments to transactions in the closed financial range while leaving reports for that period unchanged. You can run reports for any chosen date to see the exact status of the ledger as of that date, including patient payments, insurance collections, and provider payments. This provides consistency in historical reports while allowing changes to be reflected in the current period.
The following standard reports were modified to take advantage of the options made available by capturing and storing complete transaction histories:
- Deposit Slip Report
- Payment Analysis Report
- Provider A/R Totals
- Day Sheet
- Payment Plan Status Report
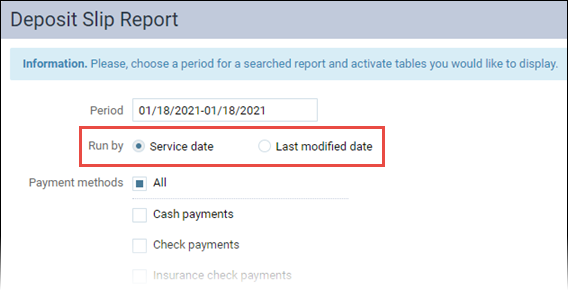
Deposit Slip Report
The Deposit Slip Report now includes the option to run the report by Service Date or Last modified Date (Created date). When you run the report by Service Date, it includes transactions whose Service Date is within the selected date range and shows the current transaction data at the moment you run the report. When you run the report by Last modified Date, it includes transactions whose last modified date falls into date range selected and shows the most recent transaction data for those dates.
Here is a simplified sequence to show how the report remains unchanged for historical data and is updated for current data. If today were 01/18/2021, and you ran today’s report, here are the two versions (Service date and Last modified date) of the report for the specific date:

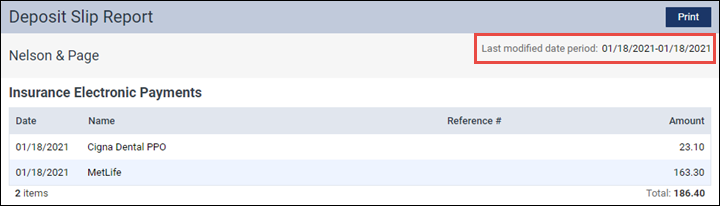
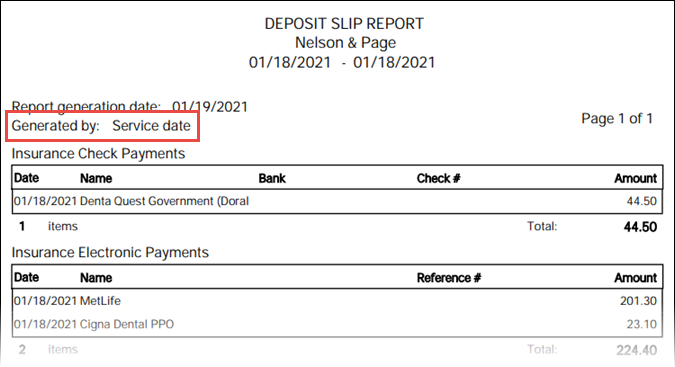
Initially they are identical. But let’s say that the next day you discovered an error in one of the insurance payments and corrected it, from $163.30 to $201.30. If today were 01/19/21 and you ran the two report types for 01/18/2021 again, they would look like this:


The Service date version shows the change and accurately reflects the current state of the transactions. The Last modified version is unchanged—historical accuracy is preserved. Those were the payments received on that date.
The preview page and the print page both include a note indicating whether the report was run by Service date or Last modified date.
The Payment Analysis Report received the same filter and behavioral changes.
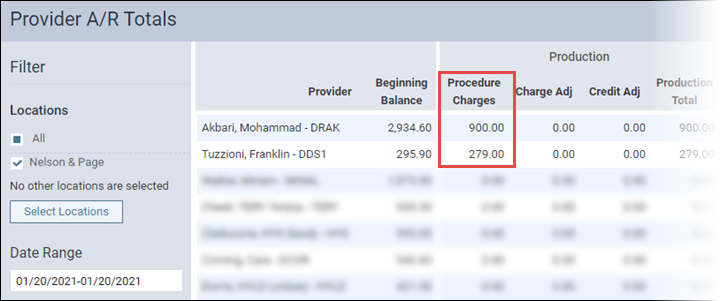
Provider A/R Totals
The Provider A/R Totals report tells a story of provider production and collections for the date range selected. To preserve historical data, any changes made to transactions after a selected date are not included. Because of the changes implemented to track correction history, this report will always include data according to the former Applied date option, so the Report By date option was removed from the filter list.
This simplified example shows production for Dr. Akbari (DRAK) and Dr. Tuzzioni (DDS1) on 01/20 (they did one procedure each).
On 01/21, the provider of one of the procedures is changed from Dr. Akbari to Dr. Tuzzioni, such that Dr. Akbari has no procedures for that date—both are now applied to Dr. Tuzzioni.
The report for 1/20 will remain unchanged. Running the report for 1/21 shows the changes. In this example, the only change was one provider assignment. Dr. Tuzzioni’s production on 1/20 remains intact on 1/20, and only the 1/21 change is reflected.
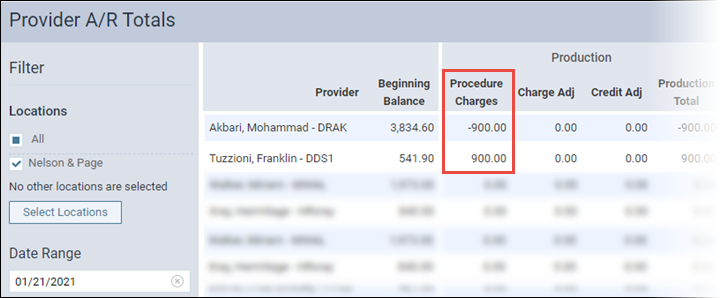
To reiterate, if today is 1/21 and you run the report for 1/20, the report will look exactly as it did when “today” was 1/20.
Day Sheet
The Day Sheet now includes the history of all transaction modifications in order to form the correct picture of a specific day. The Day Sheet’s Transaction Date corresponds to the Ledger’s Service Date, and the Day Sheet’s Created Date corresponds to the Ledger’s Created On date. If you compare the examples used above for the Aged Receivables and Provider A/R Totals reports, you’ll see that, to keep things simple, we posted one payment and two procedures on 1/20:
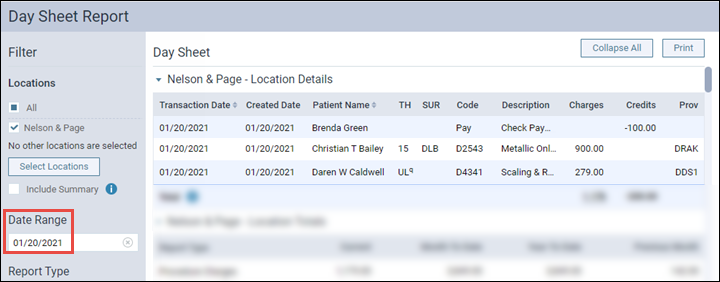
On 1/21, we made two modifications to the 1/20 transactions: one to the payment amount, and one to a procedure. Later, if you run the Day Sheet for 1/20, you will see the modified transactions:
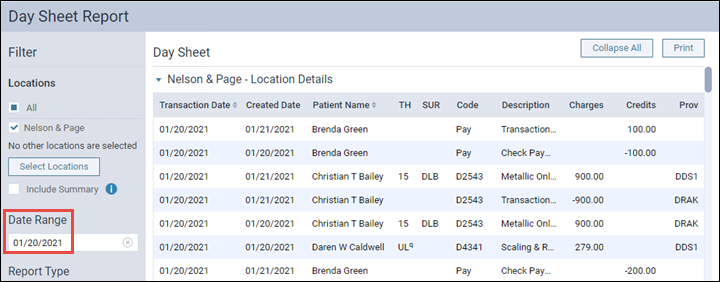
For your convenience, here again is how the Day Sheet details above look in the two ledgers involved:

Billing Statement
The Billing Statement was adjusted to accommodate history tracking. Only current transaction versions appear on Billing Statements. Cancellations do not appear on statements. Dates on the statements reflect the Ledger Service Dates.
Calendar
Location Production Enhancement
Enhancements have been made to the Location Production reports in the Calendar. With this update, when production changes occur, a blue refresh icon appears to indicate changes to production in the Calendar by appointment, provider, and location. To update the production numbers, click the blue refresh icon where it appears.

Production Totals Enhancements
Enhancements to the Production Totals chart include a new navigation panel, a provider filter, and links to switch between table and graphic views.
A new date navigator like the one used by the Calendar has been added, which allows you to view your past, present, and future weekly and monthly production totals for your location.
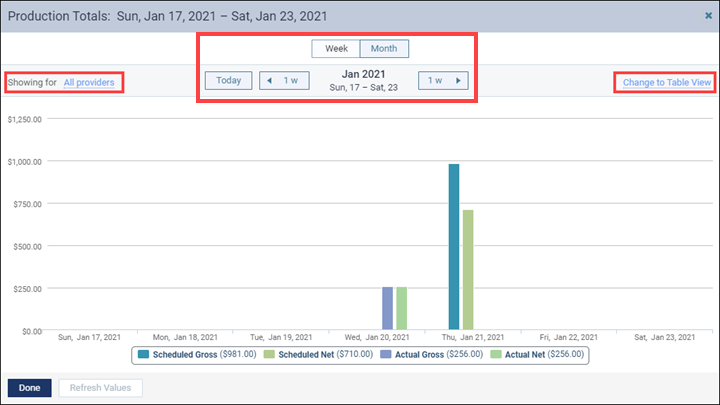
The new Change to Table View hyperlink gives you the option view a Weekly Production Table instead of the chart. The Weekly Production Table shows you production for each day of the week, and each provider when you click the expand arrow next to each day. To return to weekly chart view, click Change to Graphic View.
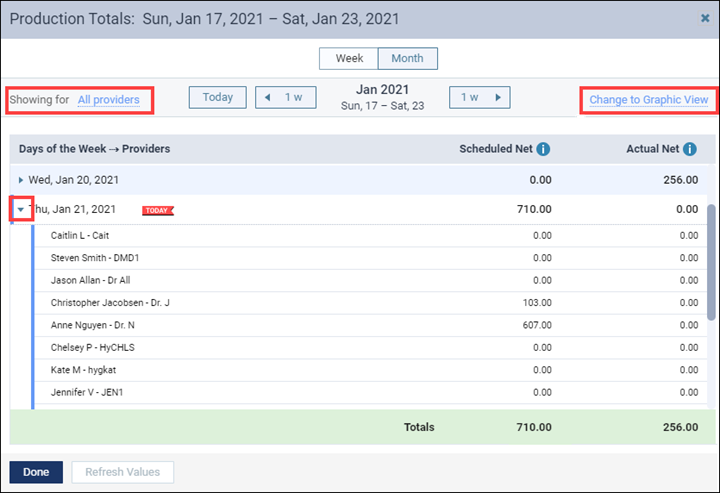
The production table and charts include a new provider filter. Click All Providers and select one or more providers to see their production.

When you click Month on the navigation panel, the chart opens a Monthly Production Table. Click the expansion arrows to see details by provider and by date.
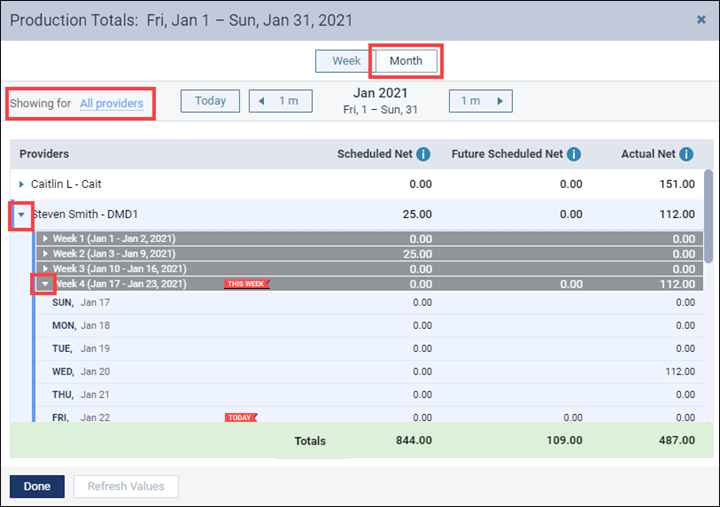
When production changes occur in the Calendar, the Refresh Values button will become enabled. Click the button update the numbers.
Insurance
Bulk Insurance Payments Enhancements
This update improves the searching and sorting capabilities for bulk insurance payments.
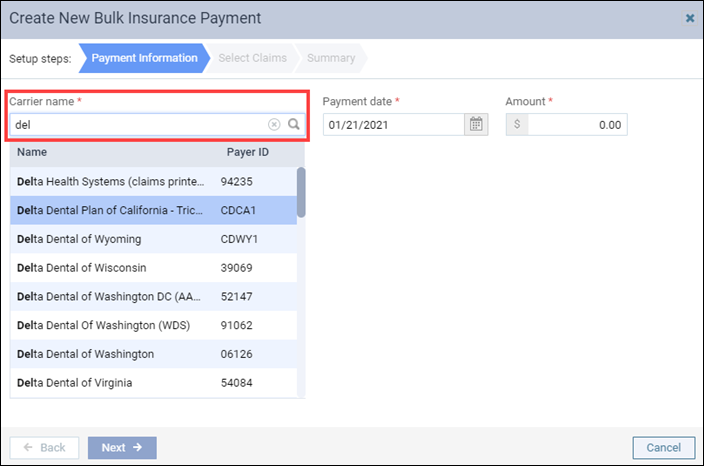
When you add a new bulk insurance payment, the Carrier name search field shows a larger list of matches, and you can search by either the carrier name or the payer ID number. When you start typing either part of the carrier’s name or the payer ID, a list of carriers appears, which allows you to scroll to the carrier you want to select.
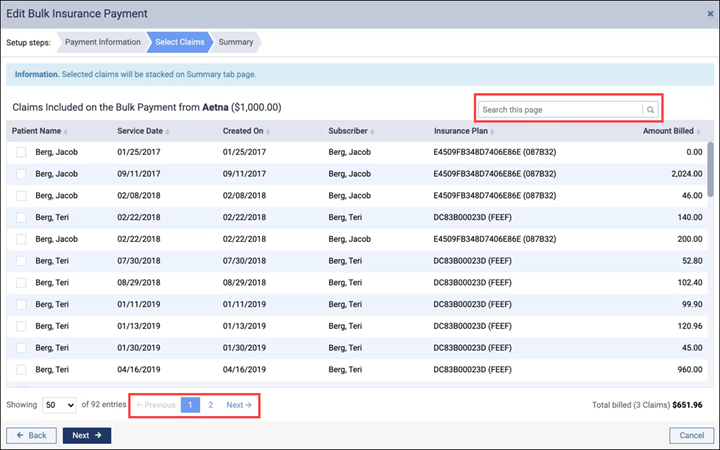
The Select Claims tab of the Create New Bulk Insurance Payment dialog box has three new improvements:
- The Search field now searches all pages, not just the one you’re currently on.
- There are page numbers at the bottom to help you navigate.
- If you sort the claims list by any of the columns, the dialog box now retains those values for all pages, not just the one where you applied the sort.
Reporting
Payment Analysis Report Enhancement
In addition to incorporating the changes in the new transaction history tracking feature, the Location Methods section of the Payment Analysis Report now includes an expandable breakdown of credit card payments from three sources: payments entered by hand, payments entered through a card reader using the Dentrix Ascend Pay feature, and payments entered online through the soon-to-be-released Patient Online Payments feature.
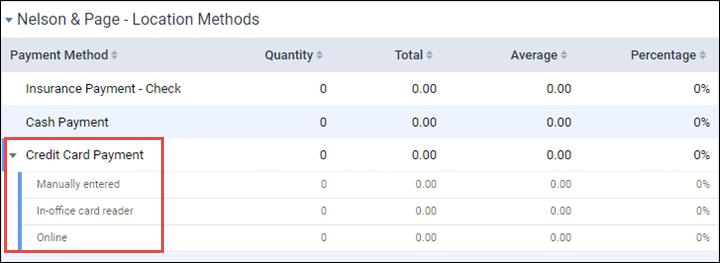
The expanded view also appears on the printed version of the report.
Power Reporting
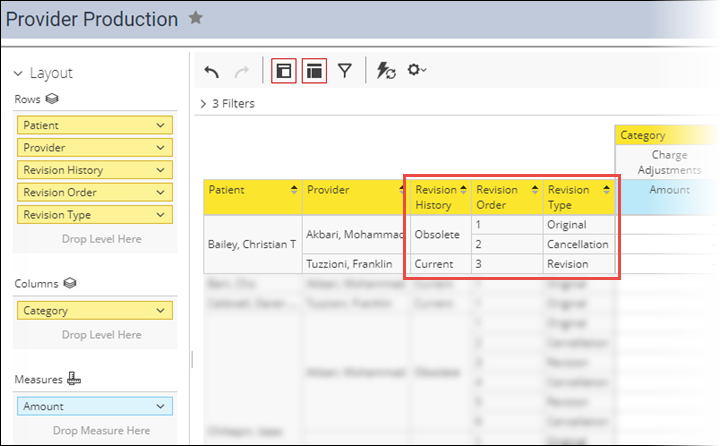
Power Reports working with Ledger data have been updated with additional fields that support the new transaction history tracking capability. In this release, none of the existing Power Reports were modified, and there are no new reports. The new fields are Revision History, Revision Order, and Revision Type. The Power Reports also include Created Date and Service Date fields to capture Ledger activity.
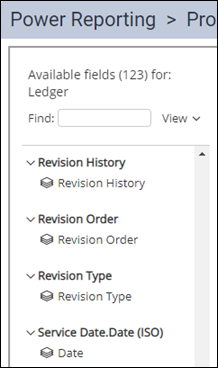
The Revision History tells you whether a transaction is Current or Obsolete. Revision Order puts things in a chronological history, so you can see the sequence in which the transactions were created. The Revision Type values are Original, Cancellation, or Revision. By default, all reports show only Current transactions.
For example, if you customized the Provider Production report and added the new Revision fields, it could look something like this:
Patient Forms
Questionnaire Enhancements
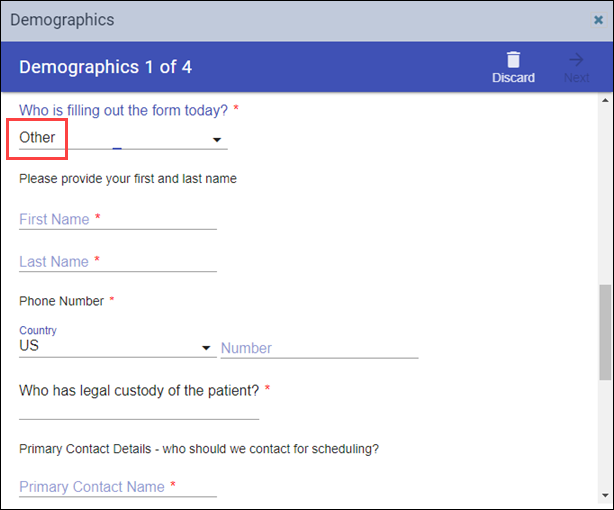
This update introduces extended functionality to the Demographics, Dental History, and Medical History questionnaires. What’s new in each form is that, for certain fields, a specific answer will reveal additional fields that would not otherwise be included. The purpose of these enhancements is to improve the quality of the information gathered.
In the Demographics questionnaire, if the person filling out the form answers Other to the question “Who is filling out the form today?”, the person is required to provide their first name, last name, phone number, and other information describing their relationship to the patient.
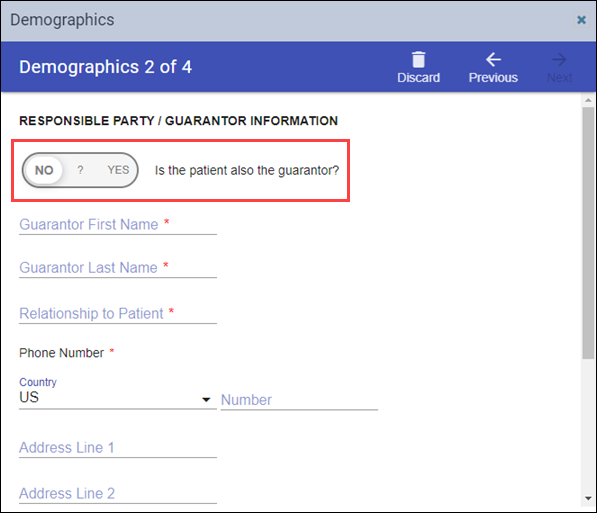
In the Responsible Party/Guarantor Information section of the questionnaire, if the response to the question “Is the patient also the guarantor” is No, additional fields appear to capture the guarantor information.
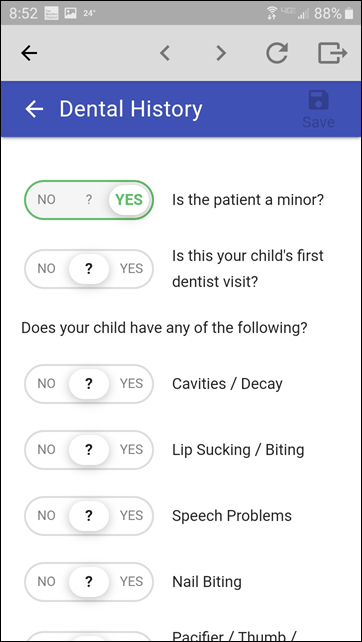
In the Dental History questionnaire, if the response to the question “Is the patient a minor?” is Yes, then additional fields display which are commonly useful to a pediatric dental practice.
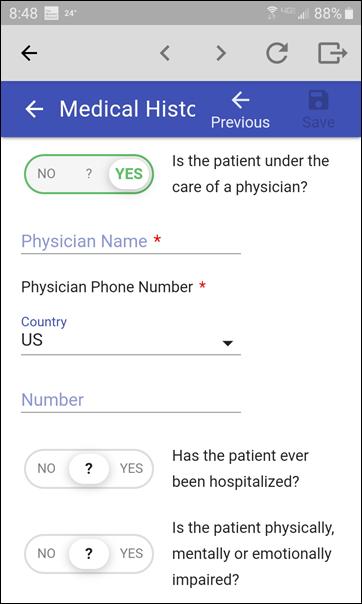
In the Medical History questionnaire, if the person filling out the form answers Yes to the question, “Is the patient under the care of a physician?”, the person is required to provide the physician name and phone number.
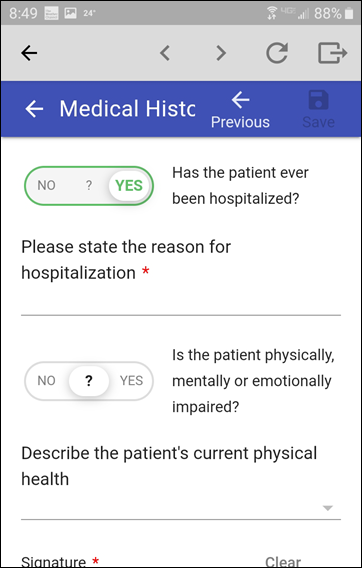
If the response to the question “Has the patient ever been hospitalized” is Yes, a new field requires a statement of the reason for the hospitalization.
Business & Team Management
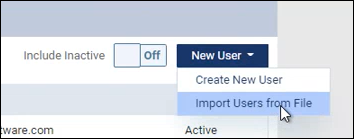
Import New User Accounts from File
With this update, you can now import user accounts in from file rather than adding them one at a time. Prior to this new feature, you had to manually enter the Basic Info and User Roles & Locations information for each new user account and Provider Info, Fees and Working Hours information for providers. The Import Users from File feature saves you time from manually entering every user account.
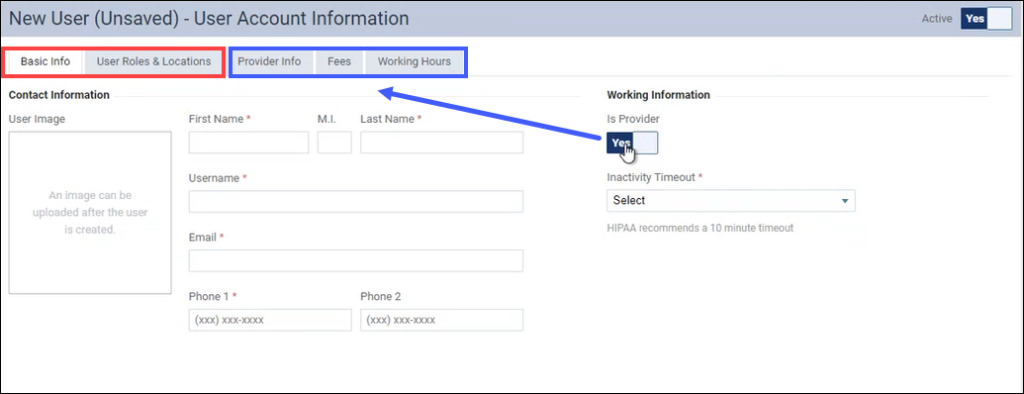
In the User Accounts page (under the Settings menu), the Create New button was renamed to New User. When you click New User, a dropdown appears giving you two options: Create New User or Import Users from File.
To continue to add single user accounts as you always have, select Create New User. To add multiple user accounts, select the Import Users from File option.
A new Import Users from File wizard opens to guide you through the steps of importing your user account information.
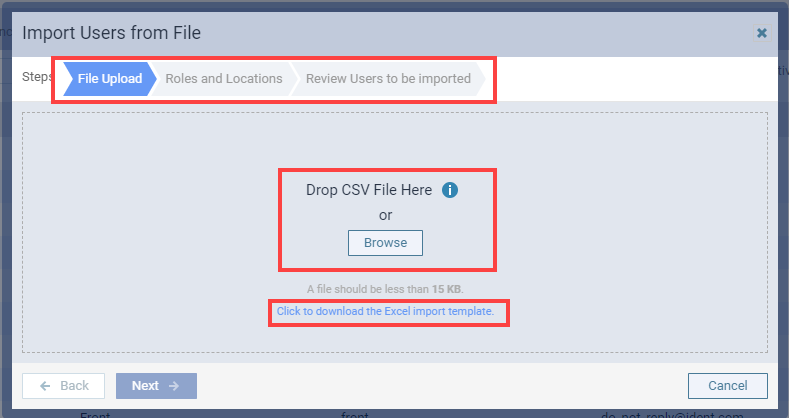
Before you can import user accounts, you must prepare their information in a .CSV file. To help you with this, the wizard includes a link called Click to download the Excel import template. Click the link to save the file on your computer or network, and then open it to enter the field information exactly as specified.

For non-provider roles, your file must include the following required fields:
- First Name
- Last Name
- Username (must be unique)
- Phone Number
- NO (means the user is not a provider)
For example:

Note: The inactivity Timeout is not included in the template, however, automatically defaults to 1 hour.
For provider roles, your file must additionally include the following fields:
- YES (means the user is a provider)
- Shortname
- Address
- City
- State abbreviation
- ZIP Code (must be 9 digits) Example: 123450000
- NPI number
- DEA number
- TIN number (must include the “dash”) Example: 12-3456789
- State ID #
For example:

Note: The Provider State ID # must be entered as numbers with quotations around it; for example “12345”.
When you have your file populated, you can return to the wizard. Bring your file into the wizard by dragging the file into the work area or by using the Browse button to open an explorer window. Note that your file format and extension must be .CSV, which is an Excel or text file option.
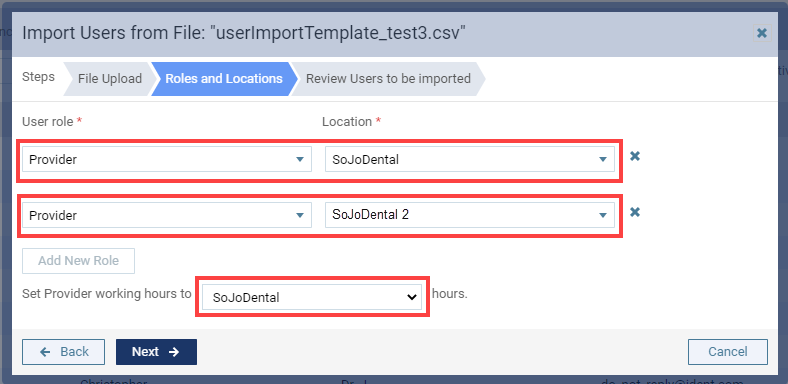
IMPORANT: You can only import for one role and location combination at a time. This means you must create a file for each user role and location combination in your organization.
After you select the file, the wizard takes you to the next step, where you will identify the user role(s) and location(s) shared by each new user included in the file.
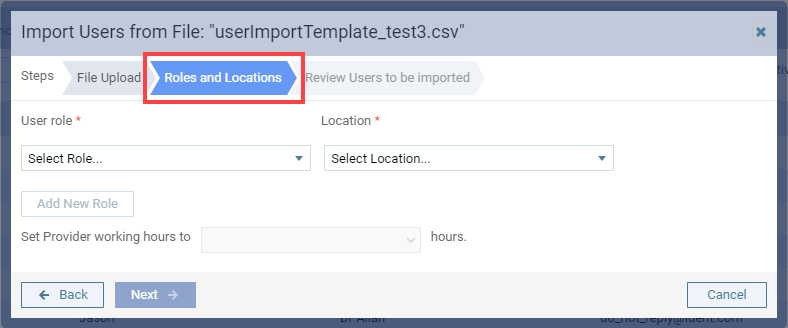
Use the field dropdowns to select the user role(s) and location(s) for this batch. For example, to import Provider roles into two locations, select that role for each location. (For providers you will also select the working hours.) Click Next to continue.
The last step in the wizard is to review the information from the CSV file before completing the import.
If there is duplicate information such as usernames, Dentrix Ascend will highlight the duplicate information so that you can make changes. You can use the sliding bar to locate errors (in red) and click on the warning icon for more information. If changes are needed, cancel out of the wizard, make your changes in the file and then go through the wizard setup again.
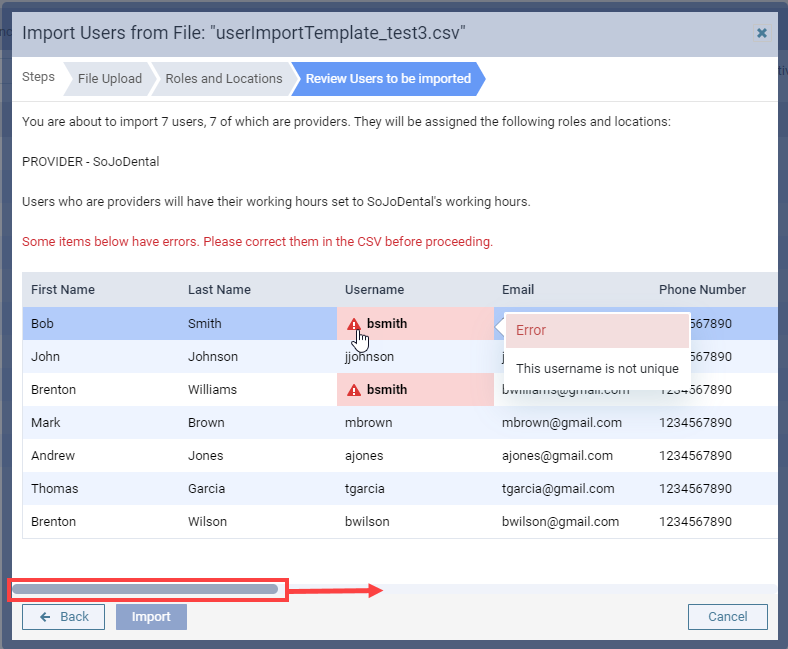
When you are ready, click Import.
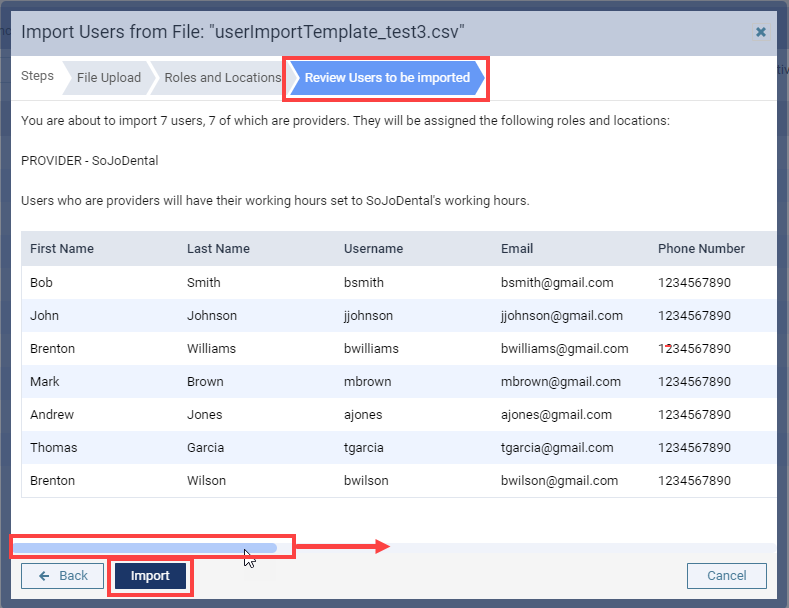
When the import is complete, you will see a confirmation.

Note: The bulk import times out in 60 seconds. To keep your import from timing out, we recommend you upload no more than 70 new user accounts per CSV file. If you need to upload more than 70 users for a given role, use a separate file.
When you have successfully uploaded your new user accounts, you will see them listed on the User Accounts page.
Note: After importing you must go into each provider user account and change the provider color (the default color is white) and possibly the Inactivity Timeout (defaults to 1 hour) if needed. You must also configure the UCR fee schedule and the Contracted With list.
User Rights
The following changes to user rights are included in this release:
- A new Review Denti-Cal Reports right allows you to see the Inbox page, view the number of unread Denti-Cal reports in your user menu, and mark a report status as read or unread.
- There is a new Manage Denti-Cal Reports right, but no additional functionality has yet been created for it.
Imaging
New Imaging Codes in CDT 2021
Dentrix Ascend is ready to accept all new 2021 CDT codes for imaging procedures. The new CDT code additions for 2021 will include nine (9) new codes from the image capture only category of service. Here is a summary of the new codes and new code descriptions:
| New Capture Only Image Code (without interpretation) | New Code Description |
| D0701 | Pano – image capture only |
| D0702 | 2D ceph – image capture only |
| D0703 | 2Doral/fac’l photo-capture only |
| D0705 | E/O posterior img-capture only |
| D0706 | I/O occlusal-image capture only |
| D0707 | I/O periapical-img capture only |
| D0708 | I/O bitewing-image capture only |
| D0709 | I/O comp ser-image capture only |
Note: Ascend Imaging doesn’t perform 3D photographic image capture for D0704.
The new codes are used when the acquisition is performed at one place, and the interpretation/evaluation (diagnosis) is performed at another location or via another provider.
These nine new codes do not replace or duplicate any of the comparable current “Image Capture with Interpretation” codes (D0210 through D0371) that are used when the acquisition and interpretation are performed in the same setting.
Feature Enhancements
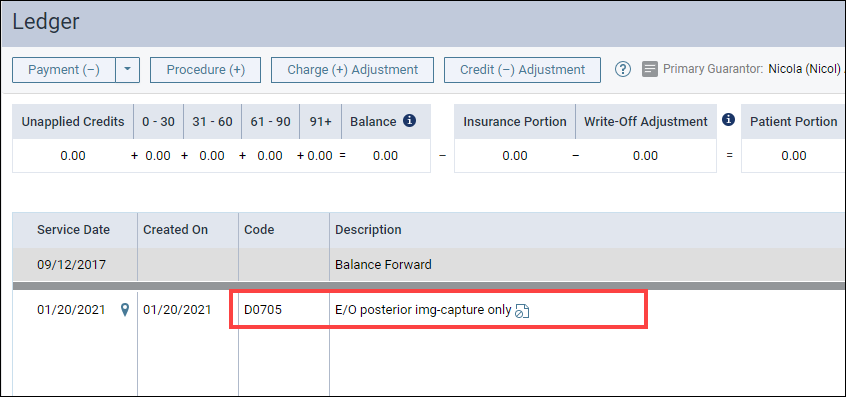
With this update, a new Without interpretation/analysis using code XXXX checkbox has been added to the acquisition options. When the image capture (acquisition) is performed at another location or via another provider, select the Without interpretation checkbox. The check box is not selected by default, so you must select it to apply the new “without interpretation” CDT code if applicable.
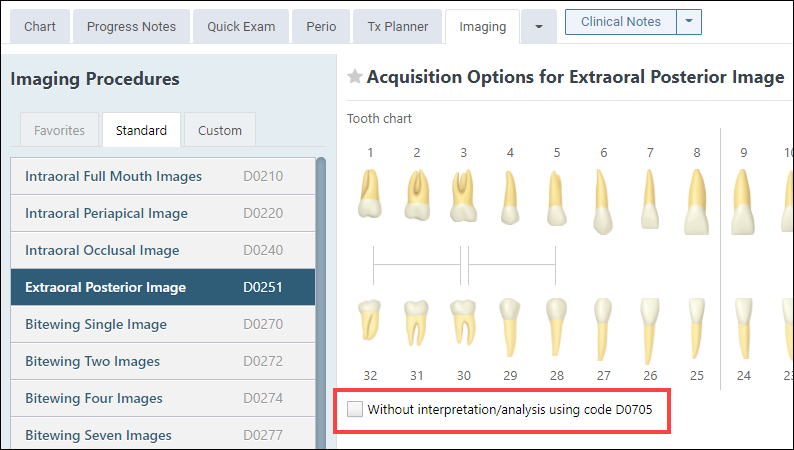
When the Without interpretation/analysis using code XXXX check box is selected, and the image is acquired, the new CDT capture-only code is reflected in the Ledger.
Also included in this update is a new Assign Tooth Numbers button. The Assign Tooth Numbers feature is available while viewing image history from the Images tab. While viewing an image, click the pencil icon next to the image date. The Assign Tooth Numbers dialog box opens. Edit and assign tooth numbers, and then click Assign Teeth.

New Device Integrations
New with this update are two supported imaging convertors/imaging extractors:
- Imaging Conversions – MiPACS
- Imaging Conversions – CS7
Also, with this update is the integration of a bidirectional software bridge with Dentrix Ascend:
- Morita iDexel
To download the latest version of the Acquisition Agent, click this Dropbox link:
https://www.dropbox.com/sh/4jpdo5pktp3y1yc/AACUX8BBIrJS5VNnVk_Y_rzOa?dl=0
New Learning Content
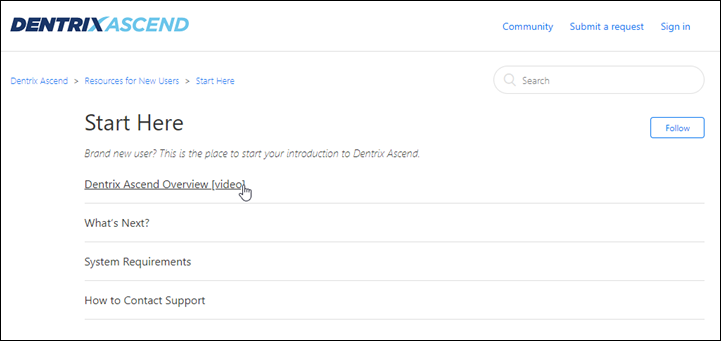
The Dentrix Ascend Resource Center has a new category specifically for new users. It is called Resources for New Users, and you access it directly from the main page.
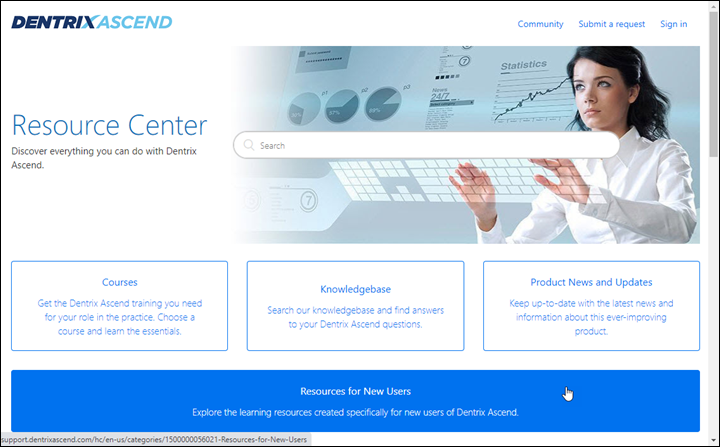
The four main sections allow users to explore freely, with an invitation to Start Here.
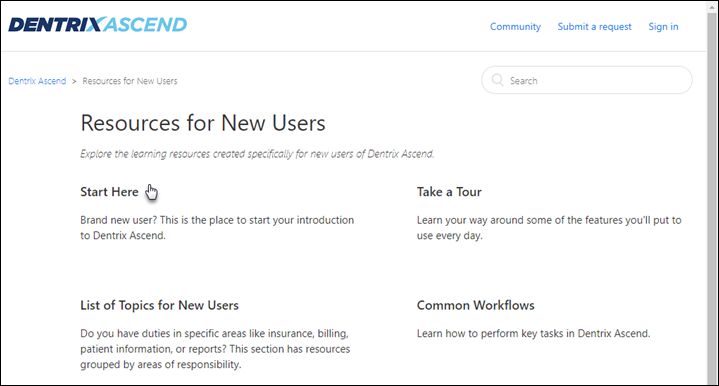
Especially created for team members who have never yet opened or explored the pages of Dentrix Ascend, the Dentrix Ascend Overview video provides a brief tour of the main areas of the platform.